- Home
- Unravel 4.7.9.2 Documentation
- Installation
- Marketplace installation
- AWS Marketplace
- Unravel for Databricks on AWS
Unravel for Databricks on AWS
Overview
Unravel for Databricks on AWS provides AI-enabled, end-to-end observability, and monitoring for big data applications running on Databricks. By using Unravel, you can monitor, understand, and optimize your spending for your big data workloads on AWS.
When you install Unravel for Databricks on AWS, you get the first 50,000 DBUs of Unravel for free. After 50,000 instance hours are used, the license expired message is displayed on the Unravel UI. To get help purchasing Unravel or using Unravel for Databrick on AWS, contact Unravel AWS Marketplace Help.
This topic helps you set up the following configuration:
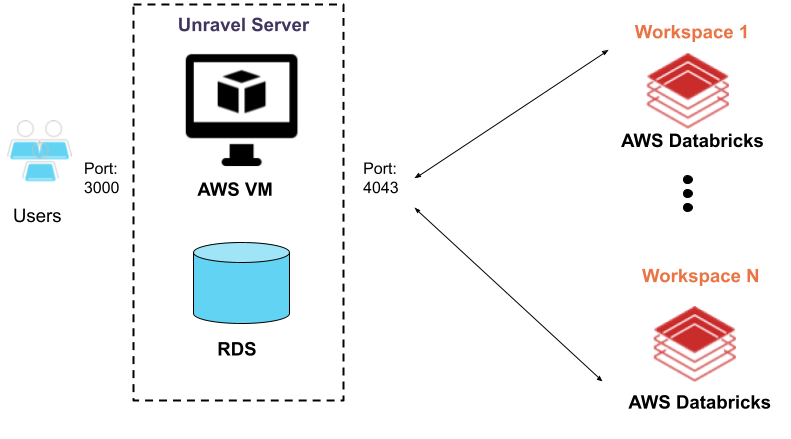
You can view your active subscriptions in the AWS Marketplace subscription manager by signing in to the AWS Marketplace console.
You must subscribe to AWS before deploying the Unravel instance.
You must have the following ports open:
4043: To receive traffic from the workspaces so Unravel can monitor the Automated (Job) Clusters in your workspaces.
3000: To access the Unravel UI using your browser.
See also Prerequisites (Databricks).
Search for Unravel for Databricks on AWS (BYOL) in the AWS Marketplace.
On the listing page, click Continue to Subscribe.
On the subscription page, click Continue to Configuration.
On the Configure this software page,
From the Software version list, select the latest software version.
From the Region list, select the region where you plan to create job clusters.
Click Continue to Launch to continue with the setup.
On the Launch this software page, perform the following actions:
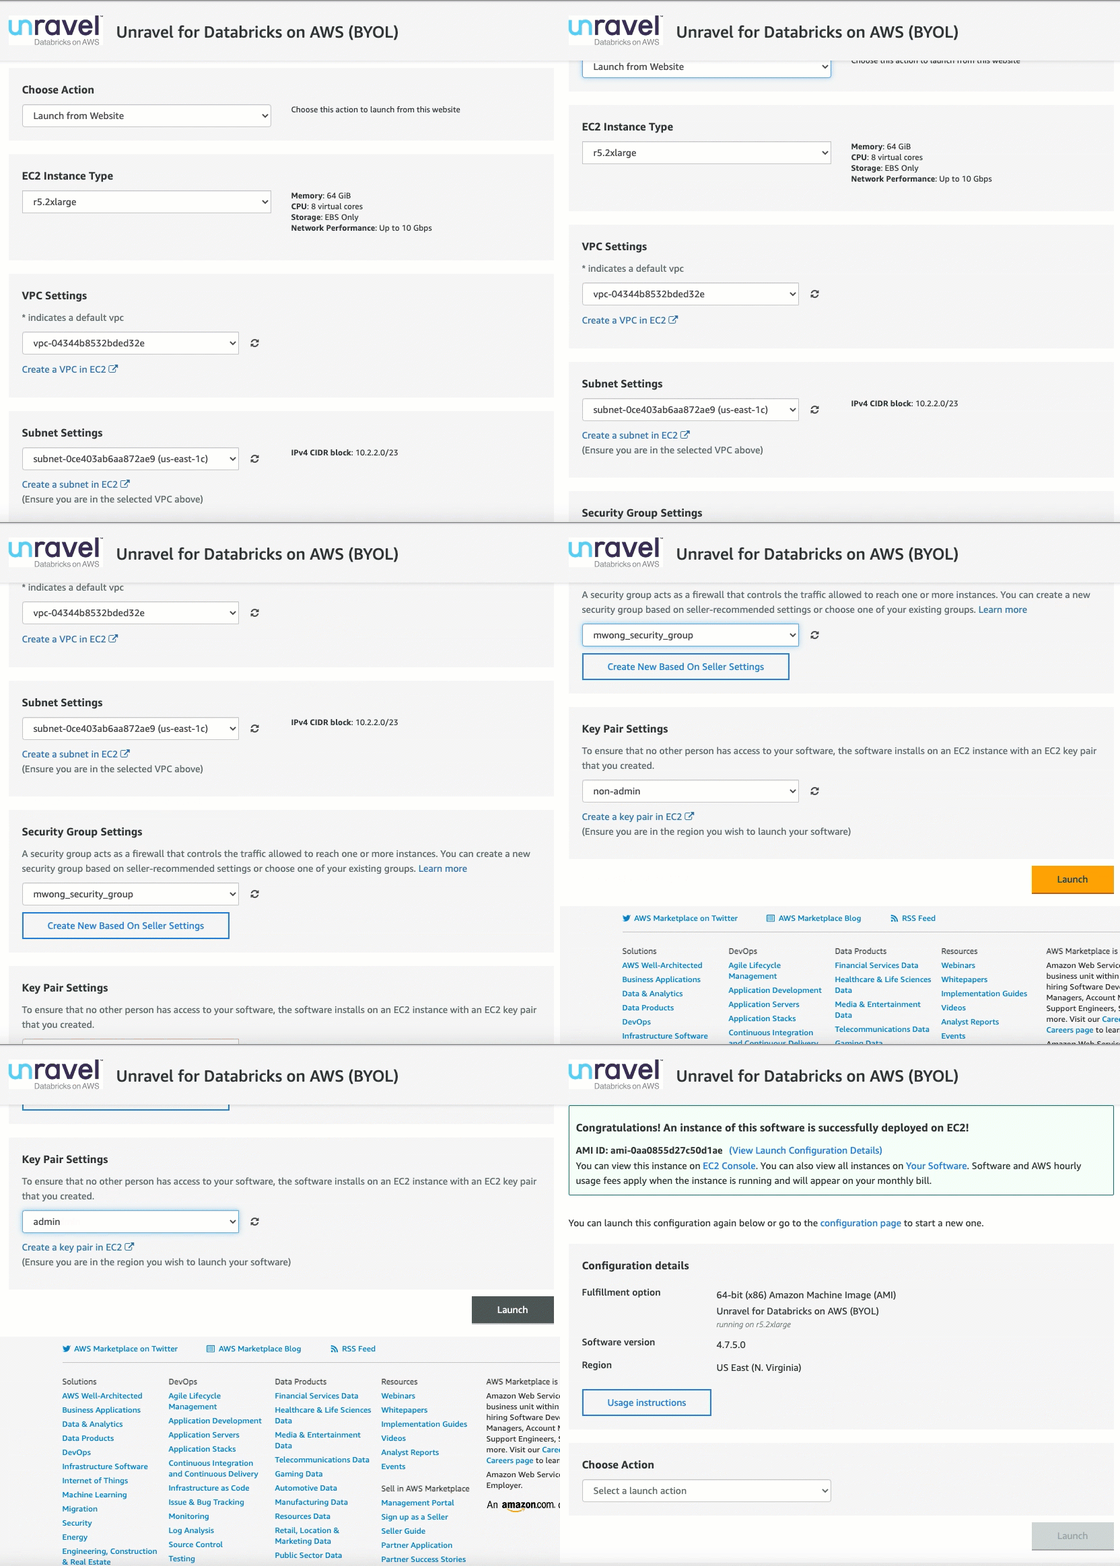
Select Launch from Website from the list.
Select the EC2 Instance Type. Unravel recommends selecting the default r5.2xlarge option, which has 64 GiB memory and 8 virtual cores.
Note
You must increase the instance size if you expect heavy data workloads. For the recommended instance settings, see Prerequisites (Databricks).
From the VPC Settings and Subnet Settings list, select the VPC and Subnet. See Prerequisites (Databricks).
Note
Ensure that the selected subnet is public.
From the Security Group Settings, select the existing security group or create a new security group.
Note
If you create a new security group based on seller settings, ensure that the Databricks node is accessible to the
4043port. For a list of ports, see the Ports section in Prerequisites (Databricks).From the Key Pair Settings, select an existing key pair that connects to this instance or create a new instance, and then click Launch.
After a successful installation, the message is displayed. Next, go to the EC2 Dashboard and launch the instance created in the previous step.
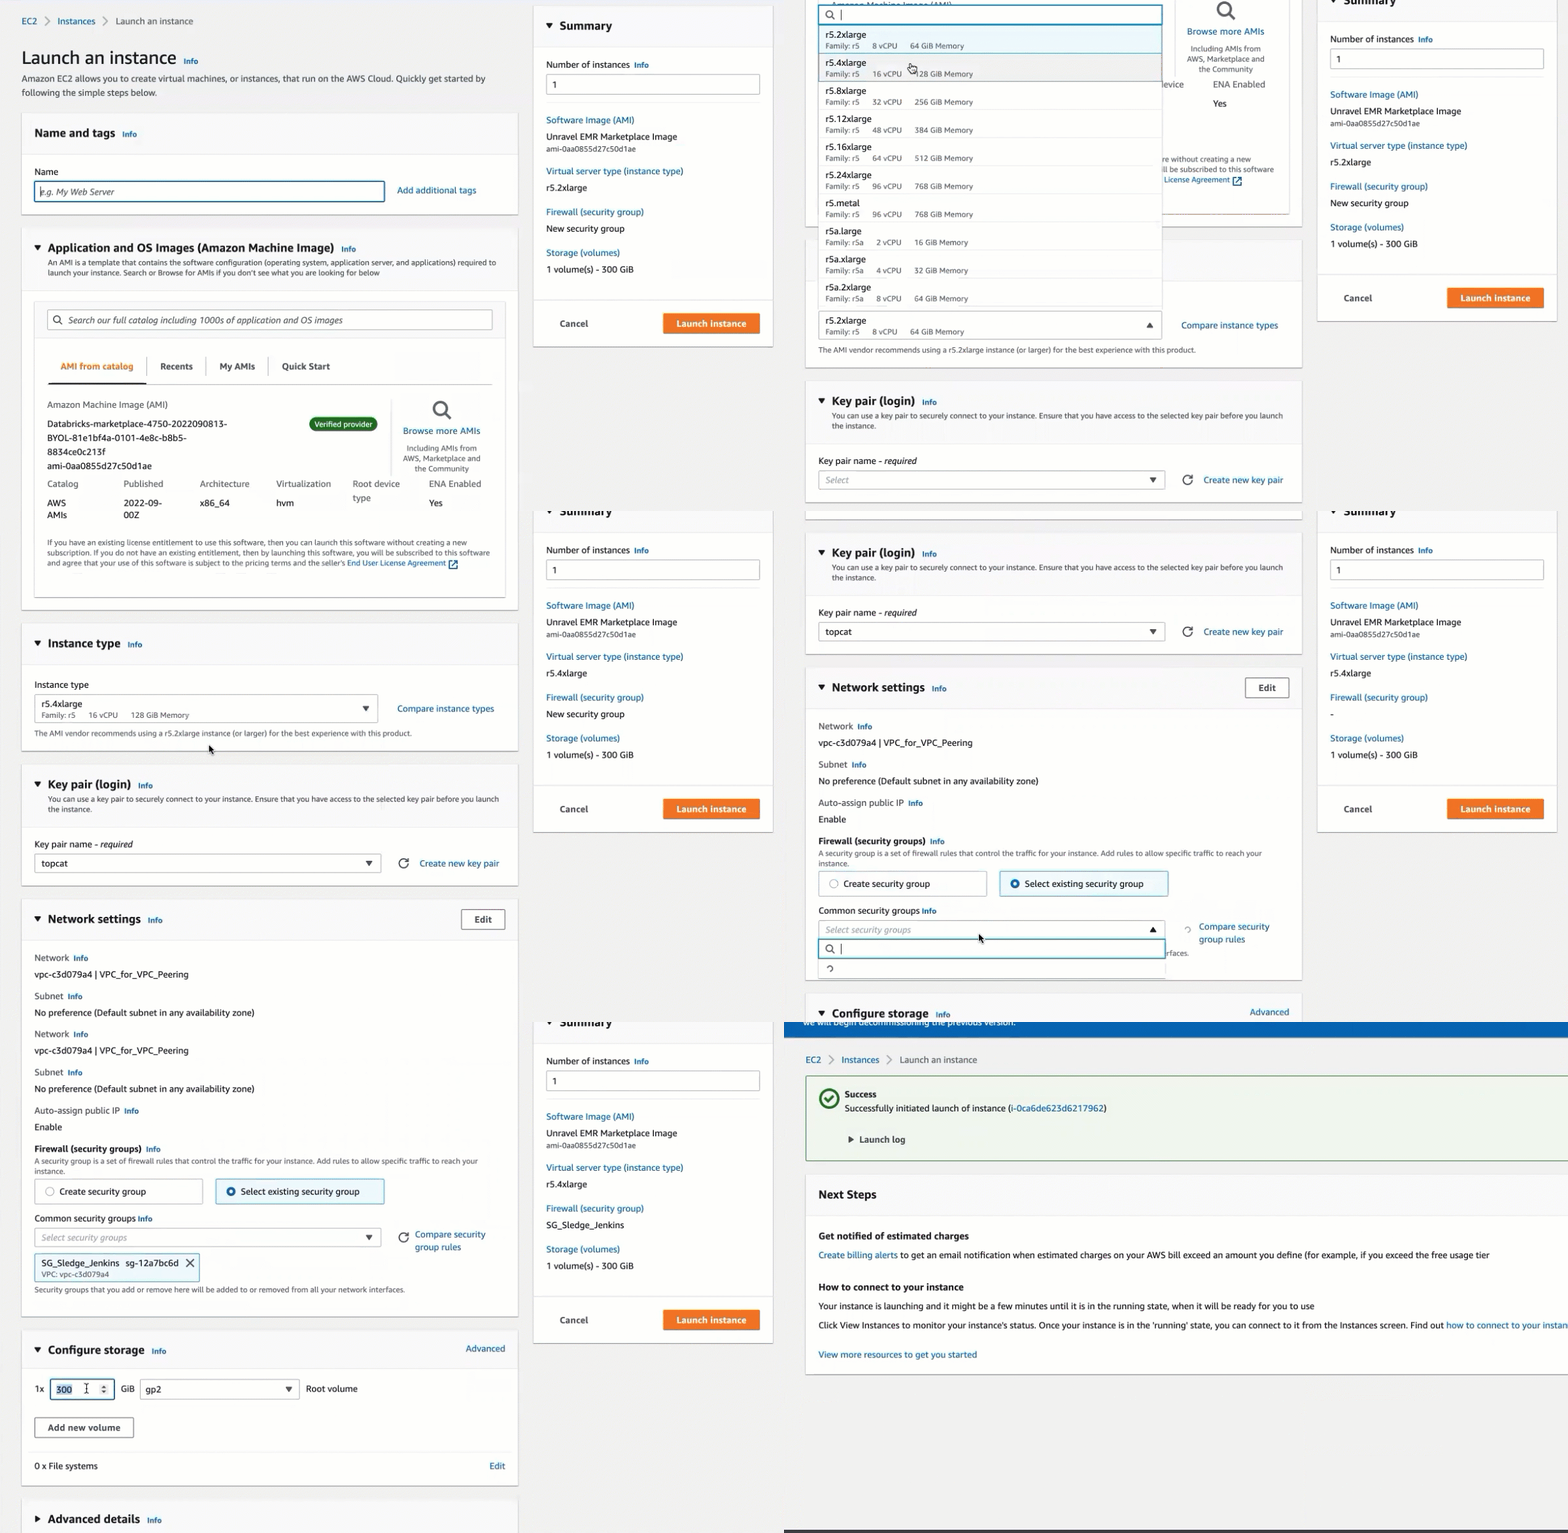
Select Launch through EC2 from the list and then click Launch.
On the EC2 Launch page, enter the name of the server.
Select the EC2 Instance Type.
From the Key Pair Settings section, select an existing key pair with which you want to connect to this instance through SSH.
From the Network Settings section, select the existing security group or create a new security group.
From the Configure storage section, enter the storage size. By default, the minimum requirement is 300 GiB. Based on your requirement, you can increase the storage size.
Click Launch instance.
After a successful installation, the message is displayed.
Click View all instances.
On the EC2 Dashboard and launch the instance created in the previous step.
After the AMI has instantiated and Unravel is installed, you can sign in to Unravel.
Prerequisites
Connect to the Unravel instance using SSH and get the admin password for Unravel UI.
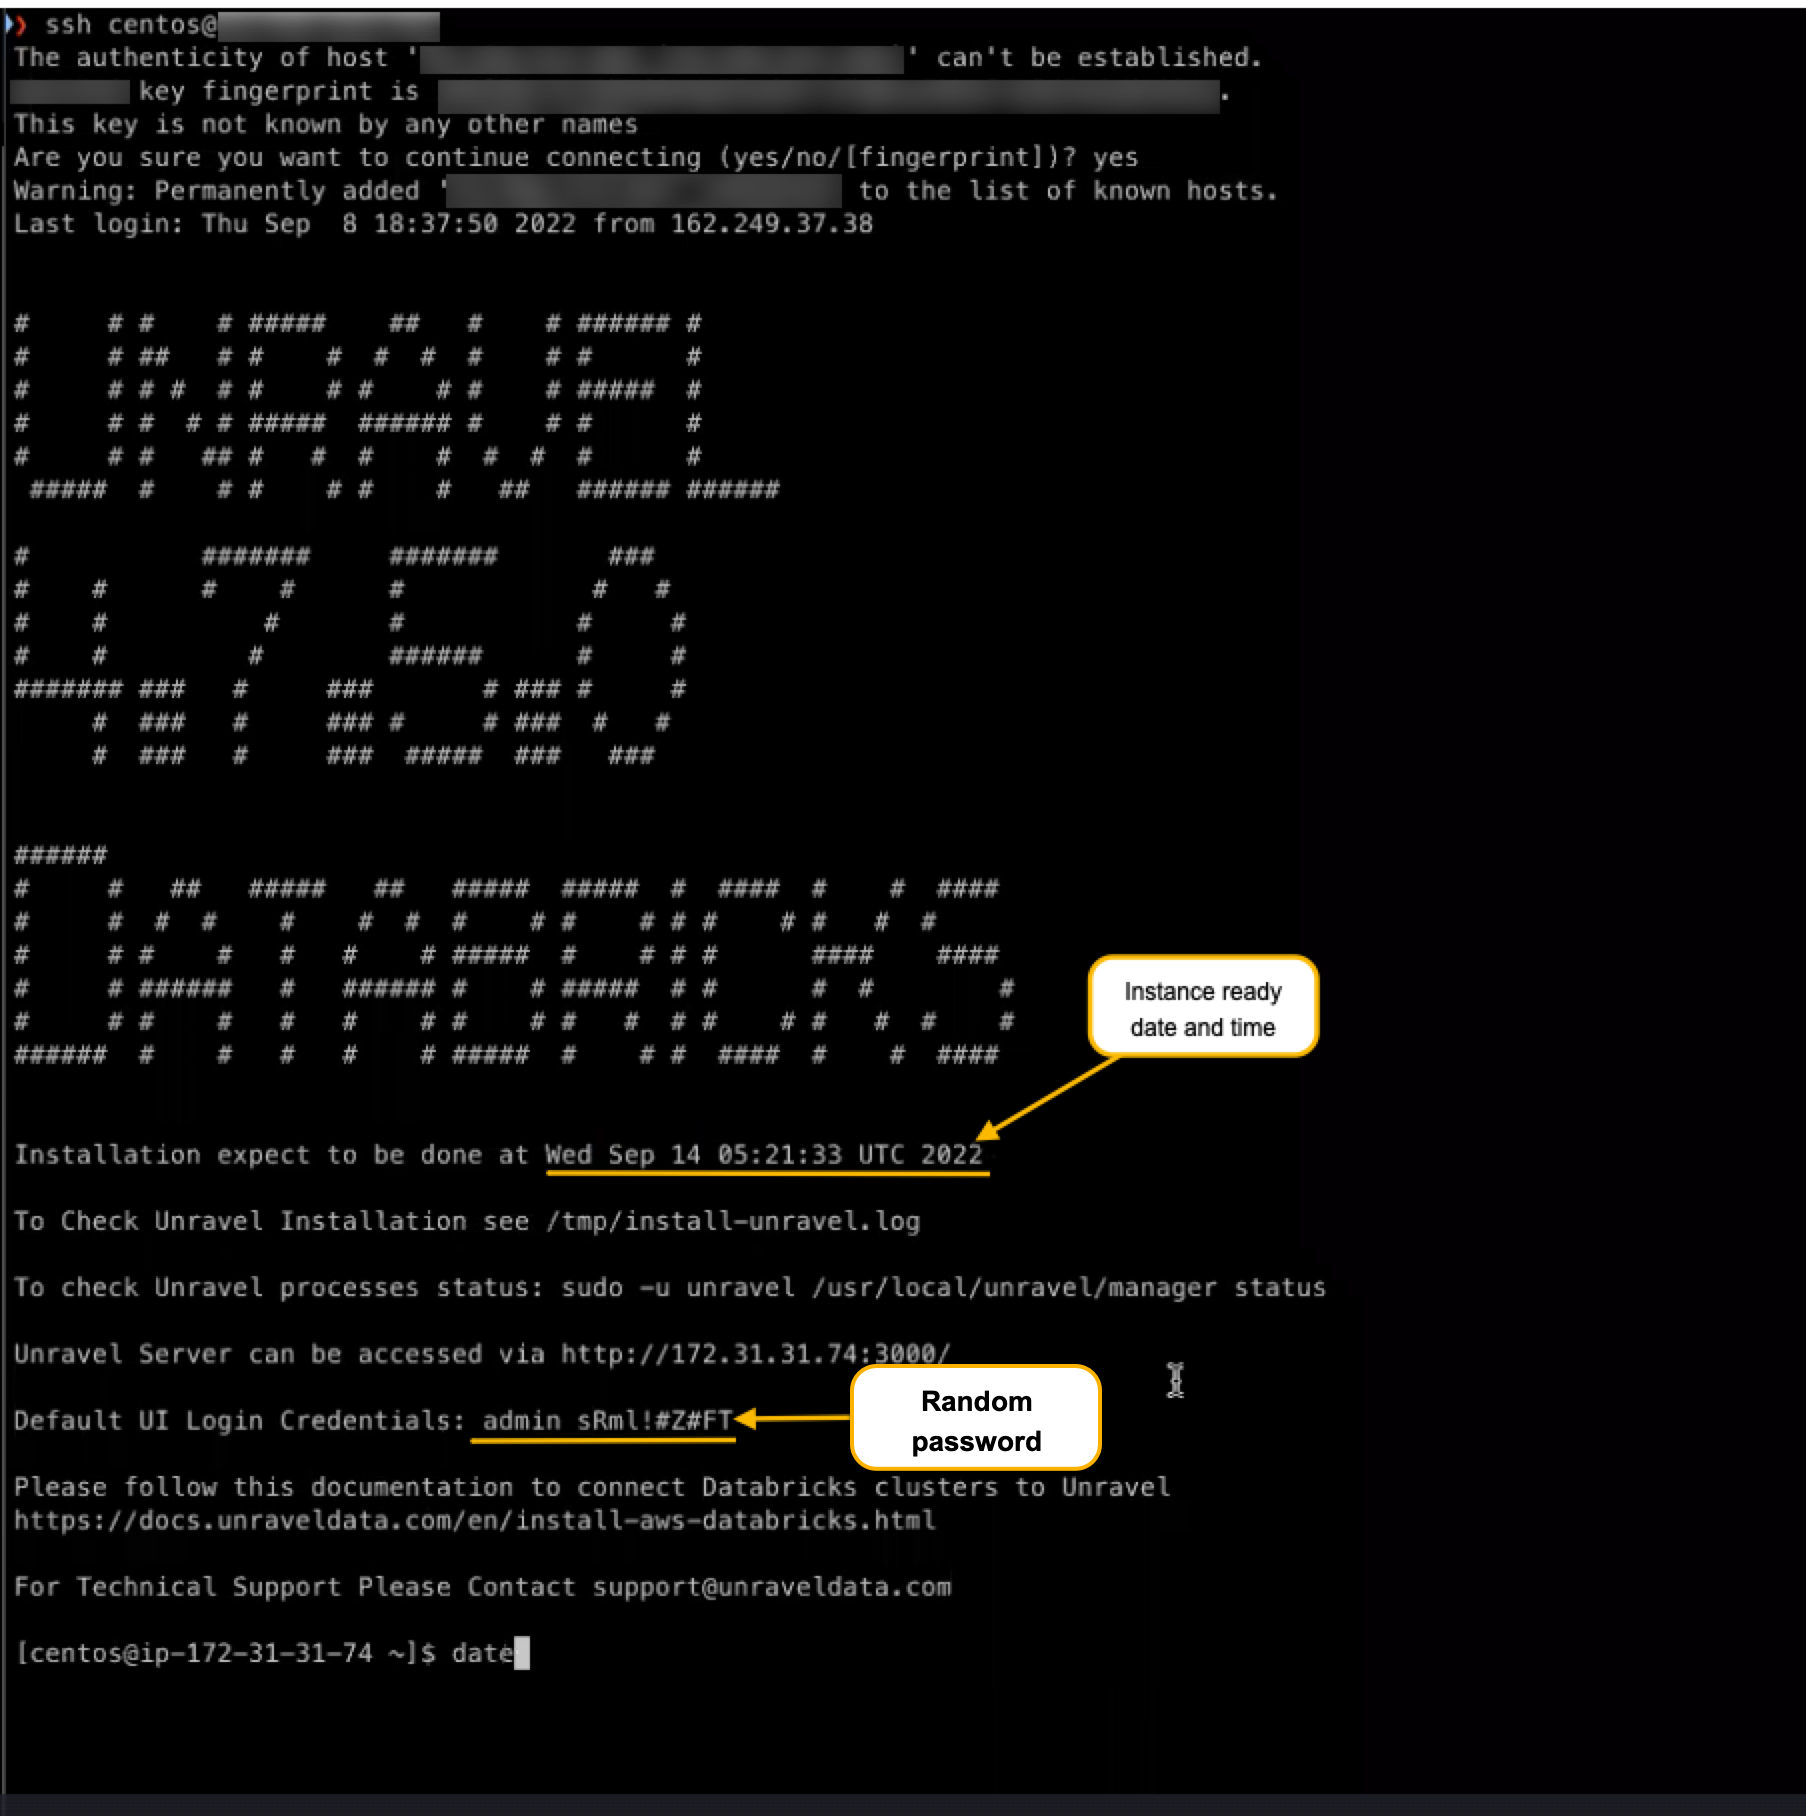
For every deployment, a random password is generated. You must log in to Unravel using this password.
Get the hostname or IP of the instance from the AWS Console.
Navigate to
http://with a web browser.hostname-or-ip-address-of-the-instance:3000Log in to Unravel with the username as
adminand the random password generated when connecting to the Unravelinstance.
Next Steps
Stop Unravel.
/usr/local/unravel/manager stop
Review and update Unravel Log Receiver (LR) endpoint. This is default set to local FQDN, only visible to workspaces within the same network. If this is not the case, run the following to set the LR endpoint and press ENTER:
/usr/local/unravel/manager config databricks set-lr-endpoint
<hostname><port>For example: /opt/unravel/manager config databricks set-lr-endpoint <hostname> <port>
Note
If you do not enter the port number for
<port>, then the default port 4043 is considered for cases where SSL is not enabled and port 4443 in cases where SSL is enabled.Apply the changes.
/usr/local/unravel/manager config apply
/usr/local/unravel/manager refresh databricks
Start all the services.
/usr/local/unravel/manager start
Register workspace in Unravel.
Sign in to Unravel UI, and from the upper right, click
 > Workspaces. The Workspaces Manager page is displayed.
Click Add Workspace and enter the following details.
Field
Description
Workspace Id
Databricks workspace ID, which can be found in the Databricks URL.
The random numbers shown after o= in the Databricks URL become the workspace ID.
For example, in this URL:https://<databricks-instance>/?o=987654321123456, the Databricks workspace ID is the random number after o=, which is 987654321123456.
Workspace Name
Databricks workspace name. A human-readable name for the workspace. For example,
ACME-WorkspaceInstance (Region) URL
Regional URL where the Databricks workspace is deployed. Specify the complete URL. For example, https://dbc-1dbx661f-a33e.cloud.databricks.com
Tier
Select a subscription option: Standard or Premium. For Databricks Azure, you can get the pricing information from the Azure portal. For Databricks AWS, you can get detailed information about pricing tiers from Databricks AWS pricing.
Token
Use the personal access token to secure authentication to the Databricks REST APIs instead of passwords. You can generate the token from the workspace URL (Go to Settings > User Settings > Access Token > Generate New Token)
See Authentication using Databricks personal access tokens to create personal access tokens.
Note
Users with admin or non-admin roles can create personal access tokens.
Note
After you click Add, it takes around 2-3 minutes to register the Databricks Workspace with Unravel.
Add Unravel configuration to Databricks clusters using any of the following options:
Global init script
Global init script applies the Unravel configurations to all clusters in a workspace. Do the following to set up Unravel configuration as Global init scripts:
Global init is deployed automatically on the Workspace and needs to be enabled manually from the location shown in the following image:
Go to your workspace, and from the dropdown located in the upper right corner, select Admin Settings.
From Settings, click Compute and then click Manage next to Global init scripts. The Global init scripts page is shown.
Use the toggle key under the Enabled column to enable the Global init scripts.

You can also find the Global initialization script in your workspace at this path: /Workspace/Unravel/install-unravel.sh
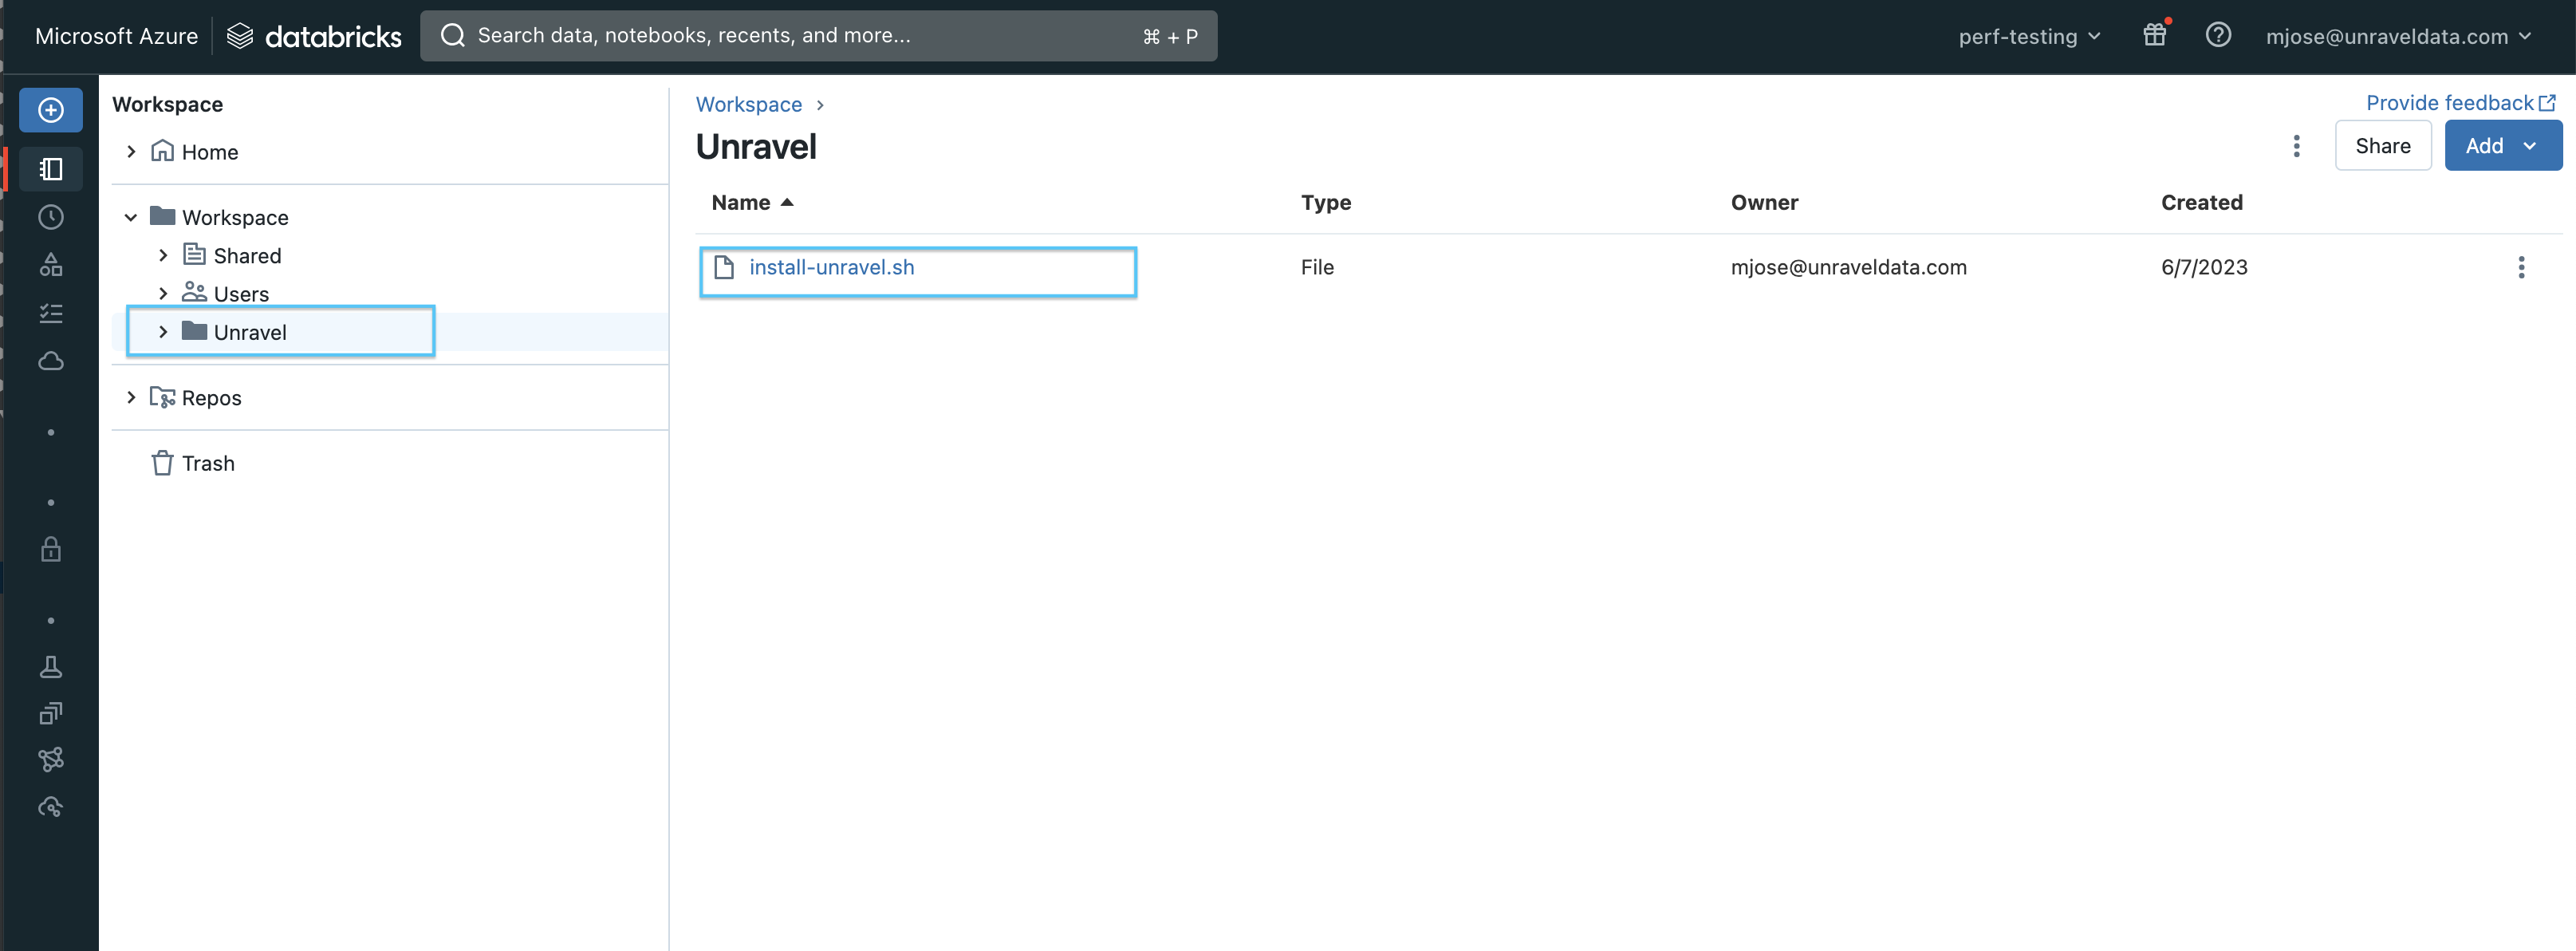
If it is not deployed automatically, you can do one of the following
Use this script as a Cluster init script.
Add Unravel configuration to Databricks clusters using the Global init script by referring to these instructions.
Note
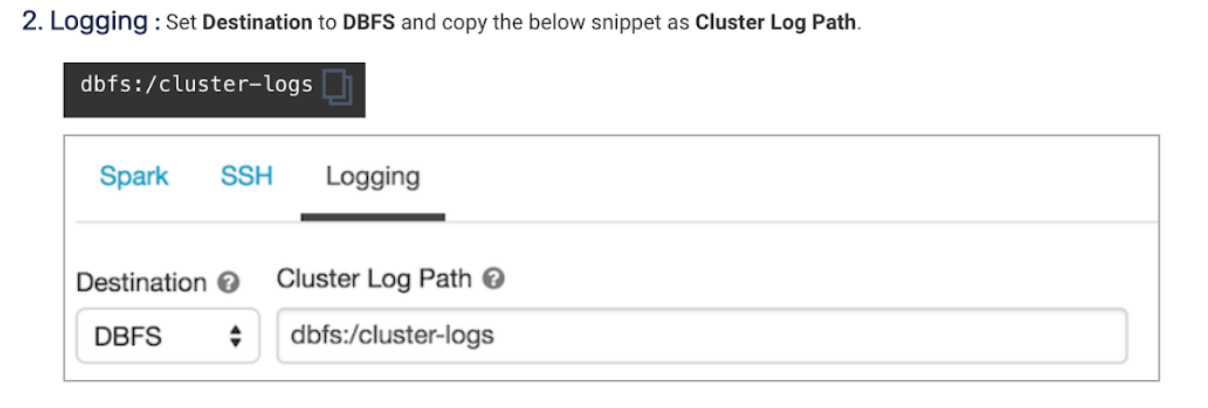
Cluster logging should be enabled at the cluster level. See Logging in Cluster init script for instructions.
If upgrading from a previous version of Unravel, you must remove all the existing scripts such as
unravel_cluster_init.sh,unravel_spark_init.sh, etc.On Databricks, go to Workspace > Settings > Admin Console > Global init scripts.
Click +Add and set the following:
Item
Settings
Name
Enter the name as unravel_init
Script
Copy and paste the following content in the Script box:
#!/bin/bash
#
# Runs Unravel Init scripts

COUNTER=1
while [ ! -d "/dbfs" ] && [ $COUNTER -le 20 ]; do
 echo "$(date) Waiting for dbfs mount: RetryCount = ${COUNTER} ....."
 ((COUNTER++))
 sleep 0.1
done

UD_ROOT=/dbfs/databricks/unravel
CLUSTER_INIT=${UD_ROOT}/unravel-db-sensor-archive/dbin/unravel_cluster_init.sh
SPARK_INIT=${UD_ROOT}/unravel-db-sensor-archive/dbin/unravel_spark_init.sh

if [ ! -f "${CLUSTER_INIT}" ]; then
 echo "Unravel Cluster Init ${CLUSTER_INIT} doesn't exist!"
 exit 0
else
 cp ${CLUSTER_INIT} /tmp/
 chmod a+x /tmp/unravel_cluster_init.sh
 /tmp/unravel_cluster_init.sh
fi

if [ ! -f "${SPARK_INIT}" ]; then
 echo "Unravel Spark Init ${SPARK_INIT} doesn't exist!"
 exit 0
else
 cp ${SPARK_INIT} /tmp/
 chmod a+x /tmp/unravel_spark_init.sh
 /tmp/unravel_spark_init.sh
fi
Note
Unravel supports Databricks version 11.3 and below. Newer versions can be included by setting the environment variable
DATABRICKS_RUNTIME_VERSIONat the top of this scriptEnabled
Turn on the Enable toggle.
Click Add to save the settings.
Note
Cluster logging should be enabled at the cluster level. See Logging in for instructions.
For reference, you can also watch the following video:
Important
When you upgrade from an Unravel version below v4.7.5.0, you must disable or remove all the previously set up global init scripts (unravel_cluster_init, unravel_spark_init).
Cluster init script
The Cluster init script applies the Unravel configurations at the cluster level. To setup cluster init scripts from the cluster UI, do the following:
Go to Unravel UI, and click Manage > Workspaces.
Choose the desired workspace as the source.
Set the path as: /unravel/install-unravel.sh.
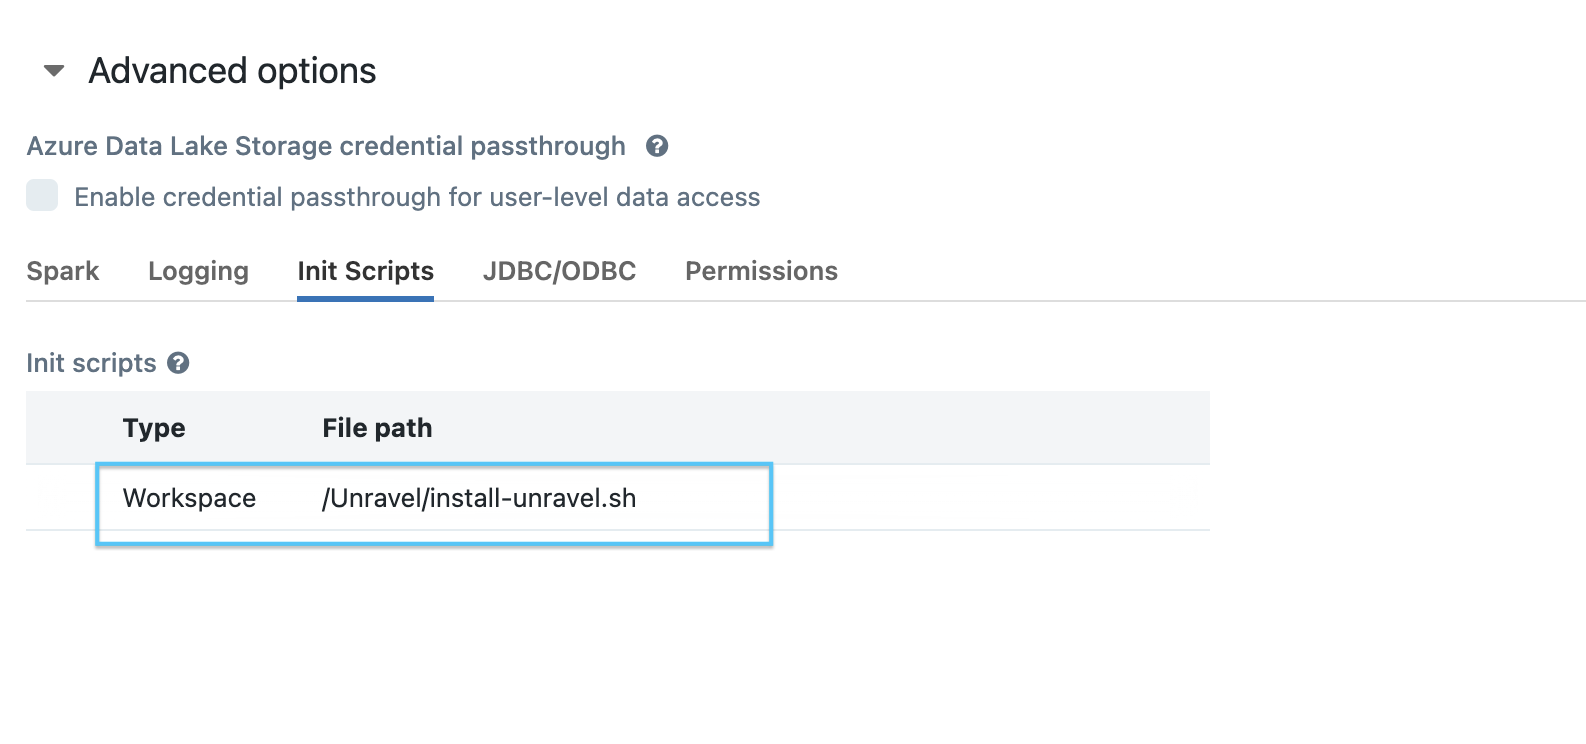
Note
Prior to configuring the new cluster-level init script, ensure you remove any existing cluster-level init script configurations that are pointing to the DBFS location. For cluster-level init script setup, make sure to configure it using the workspace file path: /unravel/install-unravel.sh.
Note
To add Unravel configurations to job clusters via API, refer How to setup cluster init scripts via cluster API.
The Cluster init script applies the Unravel configurations at the cluster level. To setup cluster init scripts from the cluster UI, do the following:
Go to Unravel UI, and click Manage > Workspaces > Cluster configuration to get the configuration details.
Follow the instructions and update each cluster (Automated /Interactive) that you want to monitor with Unravel.
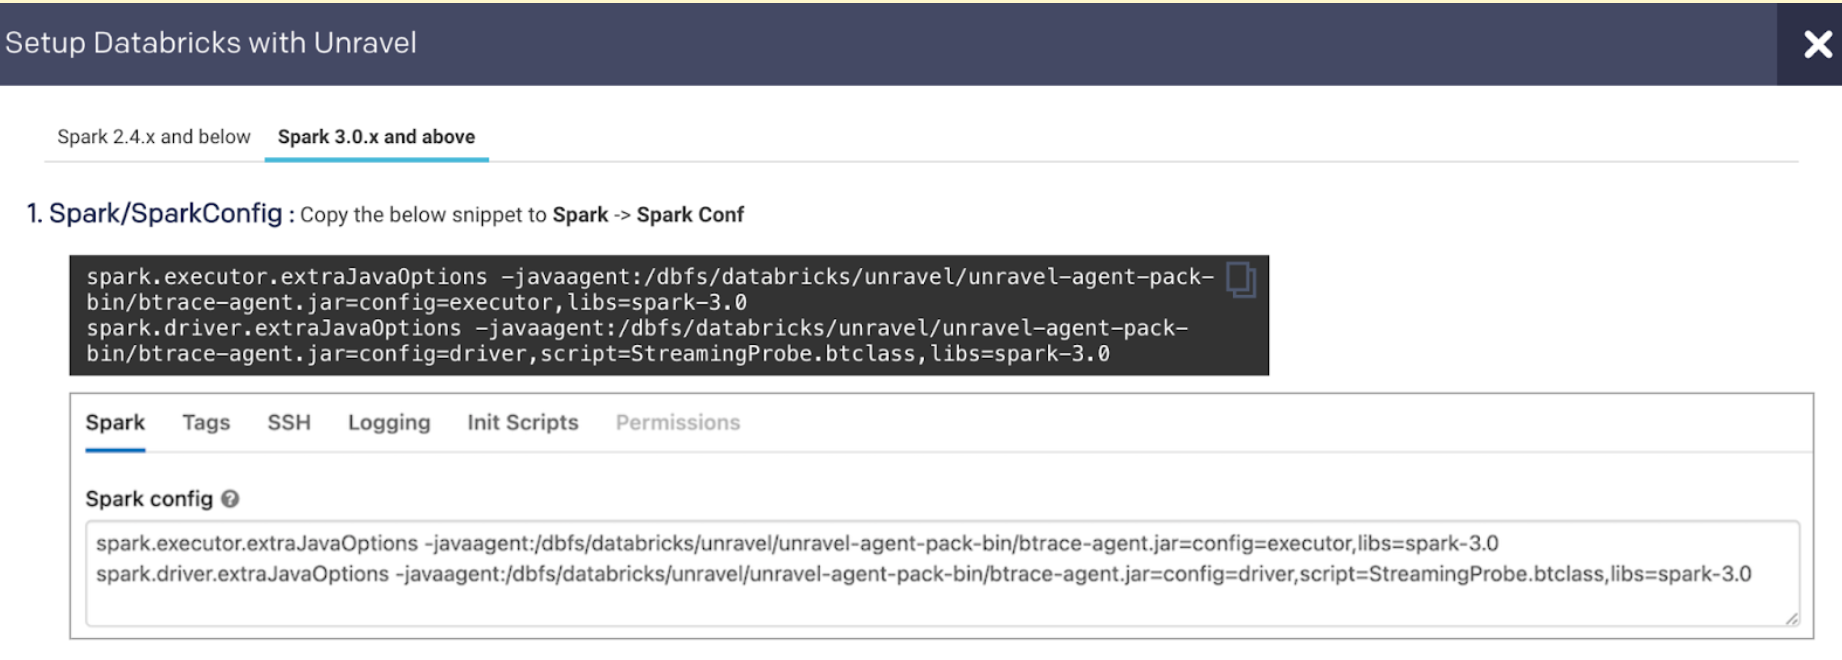
Add Unravel configuration to Databricks clusters. Go to Unravel UI, and from the upper right, click Manage
 > Workspaces > Cluster configuration to get the configuration details. Follow the instructions and update every cluster (Automated /Interactive) in your workspace.
Tip
By default, the Ganglia metrics are enabled with Dcom.unraveldata.agent.metrics.ganglia_enabled property set to true.
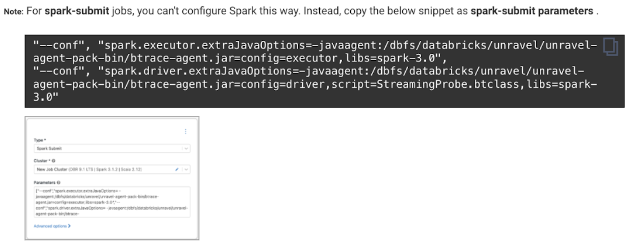

Note
To add Unravel configurations to job clusters via API, refer How to setup cluster init scripts via cluster API.
Set additional configurations if required.
Configure the Workspace for Data page.
Ensure that at least one of the workspaces is populated before you configure a workspace for the Data page.
To configure the Databricks for Data page, do the following:
Stop Unravel
<Unravel installation directory>/unravel/manager stopSet the following property.
<Unravel installation directory>/unravel/manager config properties set hive.metastore.<X>.workspace.ids<Comma-separated list of Databricks workspaces>Replace
<X>with the metastore variables listed in the com.unraveldata.hive.metastore.list property. Refer here for more details about this property.Apply the changes.
<Unravel installation directory>/unravel/manager config applyStart Unravel
<Unravel installation directory>/unravel/manager start
Optionally, you can run healthcheck, at this point, to verify that all the configurations and services are running successfully.
<unravel_installation_directory>/unravel/manager healthcheckHealthcheck is run automatically on an hourly basis in the backend. You can set the healthcheck intervals and email alerts to receive the healthcheck reports.
Tip
The workspace setup can be done anytime and does not impact the running clusters or jobs.
Refer to Databricks FAQ.