Upgrading Unravel from version 4.7.x to 4.7.9.x
This topic provides instructions to upgrade Unravel from version v4.7.0.x, v4.7.1.x, v4.7.2.x, 4.7.3.x, 4.7.4.x, v4.7.5.x to v4.7.9.x for the on-prem platforms (single cluster and multi-cluster deployments):
Cloudera Distribution of Apache Hadoop (CDH)
Cloudera Data Platform (CDP)
Hortonworks Data Platform (HDP)
The following upgrade paths are supported:
4.7.5.x → 4.7.9.x
4.7.5.x Hot fix → 4.7.9.x
4.7.4.x → 4.7.9.x
4.7.3.x → 4.7.9.x
4.7.2.x → 4.7.9.x
4.7.1.x → 4.7.9.x
4.7.0.x → 4.7.9.x
4.6.1.9 → 4.7.9.x
4.6.1.8 or earlier → 4.6.1.9 → 4.7.9.x
Backup the data directory
Take a backup of the
datadirectory and the external database if you use one. To back up the data, refer to Backing up and recovering UnravelNote
If an upgrade fails, you can roll back the upgrade to the release you had upgraded from. For information, see Rollback after a failed upgrade. For this rollback to work, you must take a backup of the
datadirectory and the external database before upgrading.For more such troubleshooting issues, refer to the Troubleshooting guide.
Configure custom JDK, if you have a different version of JDK installed
Unravel requires Java Runtime Environment (JRE), and hence it is shipped with OpenJDK version 17.0.1. If you have a different version of JDK installed, you must configure Unravel to access the corresponding
jredirectory in that JDK. For instructions, refer to Configuring custom JDK.In a multi-cluster deployment, you must configure the
jredirectory on both the edge and the core nodes.Remove
ondemand_flask_1enty fromunravel.yamlfileIf you have configured custom ports and you want to upgrade from v4.7.4.3 to 4.7.9.1 version, ensure to remove the
ondemand_flask_1entry from the<unravel_installation_directory>/unravel/data/conf/unravel.yamlfile.notebook_1: config: network: port: 55004 ondemand_flask_1: config: port: 55014If you do not remove this entry, then the following error message is displayed:
Skipping unknown entry for host 'host_main’
You can also do this step post-upgrade.
You can upgrade Unravel for the single cluster as well as multi-cluster deployments. Refer to the following:
Important
Ensure to perform the post-upgrade steps. Refer to Post upgrade steps for on-prem platforms (v4.7.x to v4.7.9.x).
Upgrade Unravel in a single cluster deployment (v4.7.x to v4.7.9.x)
Go to the Download section. The complete list of Unravel downloads is available in this section.
Select and download the Unravel version that you want to upgrade. The section provides the details and necessary instructions to download Unravel.
Extract the Unravel binaries of the Unravel version you want to upgrade.
tar zxf unravel-
<version>tar.gz -C</path/to/installation/directory>For example: tar zxf unravel-4.7.9.x.tar.gz -C /opt
Note
The default installation directory is
/usr/localfor RPM installation. This might have changed during the initial deployment. Make sure that you use the same installation directory when you upgrade Unravel.Stop Unravel.
<Unravel installation directory>/unravel/manager stopActivate Unravel version 4.7.9.x
<Unravel installation directory>/unravel/manager activate<version>Note
For on-prem platforms (CDH, CDP, HDP, or MapR), If you have used an automatic Hadoop configuration, run auto-configuration and refresh to reload the updates automatically.
<unravel_installation_directory>/unravel/manager config auto --refreshSet Unravel license. Changing the license is mandatory. Contact Unravel Customer Support to get a new license file.
<Unravel installation directory>/unravel/manager config license set
<path to license file>For example:
Example: /opt/unravel/manager config license set /tmp/license.txt
For more information about setting the license file, see Setting Unravel license.
Apply the changes.
<unravel_installation_directory>/unravel/manager config applyStart all the services.
<unravel_installation_directory>/unravel/manager startCheck the status of the services.
<unravel_installation_directory>/unravel/manager reportThe following service statuses are reported:
OK: Service is up and running.
Not Monitored: Service is not running. (Has stopped or has failed to start)
Initializing: Services are starting up.
Does not exist: The process unexpectedly disappeared. A restart will be attempted 10 times.
Validate the JAVA version that Unravel is using now.
Delete the previous installation directory from
unravel/versions/<THE.OLD.VERSION>.
Upgrade Unravel in multi-cluster deployment (v4.7.x to v4.7.9.x)
To upgrade Unravel in a multi-cluster environment, you must upgrade all the edge nodes, upgrade the core node, and pull all the edge node updates to the core node.
Edge nodes Run the following steps to upgrade Unravel on the edge nodes involved in Unravel monitoring.
Go to the Download page.
Click the Unravel version you want to upgrade to and run the commands provided to download Unravel.
Extract the Unravel binaries of the Unravel version you want to upgrade.
tar zxf unravel-
<version>tar.gz -C</path/to/installation/directory>For example: tar zxf unravel-4.7.9.x.tar.gz -C /opt
Note
The default installation directory is
/usr/localfor RPM installation. This might have changed during the initial deployment. Make sure that you use the same installation directory when you upgrade Unravel.Stop Unravel.
<Unravel installation directory>/unravel/manager stopActivate the version that you want to upgrade.
<Unravel installation directory>/unravel/manager activate
<version>Caution
You may get a Network port failed precheck error if you run the manager activate command immediately after executing the manager stop command.
To avoid this precheck error, stop Unravel and wait a minute or two before executing the manager activate command.
Retry the manager activate command in case of the Network port failed precheck error.
Set Unravel license. Changing the license is mandatory. Contact Unravel Customer Support to get a new license file.
<Unravel installation directory>/unravel/manager config license set
<path to license file>For example:
Example: /opt/unravel/manager config license set /tmp/license.txt
For more information about setting the license file, see Setting Unravel license.
If you have used an automatic Hadoop configuration, run auto-configuration and refresh to reload the updates automatically.
<unravel_installation_directory>/unravel/manager config auto --refreshApply the changes.
<unravel_installation_directory>/unravel/manager config applyStart all the services.
<unravel_installation_directory>/unravel/manager startCheck the status of services.
<unravel_installation_directory>/unravel/manager reportThe following service statuses are reported:
OK: Service is up and running.
Not Monitored: Service is not running. (Has stopped or has failed to start)
Initializing: Services are starting up.
Does not exist: The process unexpectedly disappeared. Restarts will be attempted 10 times.
Validate the JAVA version that Unravel is using now.
Core node Run the following steps only on the core node.
Download Unravel.
Extract the Unravel binaries of the Unravel version you want to upgrade.
tar zxf unravel-
<version>tar.gz -C</path/to/installation/directory>For example: tar zxf unravel-4.7.9.x.tar.gz -C /opt
Stop Unravel.
<Unravel installation directory>/unravel/manager stopActivate the version that you want to upgrade.
<Unravel installation directory>/unravel/manager activate<version>Set Unravel license. Changing the license is mandatory. Contact Unravel Customer Support to get a new license file.
<Unravel installation directory>/unravel/manager config license set
<path to license file>For example:
Example: /opt/unravel/manager config license set /tmp/license.txt
For more information about setting the license file, see Setting Unravel license.
Run auto-configuration on the core node and refresh to reload the updates automatically. Run this command only if you have previously run the config auto command on the cluster. This is an optional step.
<unravel_installation_directory>/unravel/manager config auto --refreshCaution
If you have NOT run the manager config auto earlier on the core node, an error will be displayed, which you can ignore.
Find the edge key using the manager config edge show command, keep it handy, and run the following command for each configured edge node. This refreshes the configurations on the edge nodes. Provide the edge key when prompted:
<unravel_installation_directory>/unravel/manager config edge auto --refreshFor example:
/opt/unravel/manager config edge auto --refresh
-- Running: config edge auto --refresh
2021-09-22 03:32:25 Archiving configuration ... Ok
Edge key: edge-tnode39
The Hive metastore database password can be recovered automatically only for a cluster manager with an administrative account. Otherwise, you must manually set the password as follows:
Run the manager config edge show command to get the
<EDGE_KEY>,<HIVE_KEY>, and<CLUSTER_KEY>, which must be provided when you set the Hive metastore password.<EDGE_KEY>is the label you provide to identify the edge node when you add the edge node in Step 3.CLUSTER_KEYis the name of the cluster where you set the Hive configurations.<HIVE_KEY>is the definition of the Hive service. In the manager config edge show command output, this is shown as the <SERVICE_KEY> for Hive.
-- Running: config edge show
------------ | ---------------------------------------- | ------------
    EDGE KEY | - edge-a                                 | Enabled
             |     Cluster manager:                     | Enabled
             |     Clusters:                            |
 CLUSTER KEY |       - Cluster_Name                     | Enabled
             |           HBASE:                         |
 SERVICE KEY |             - hbase                      | Enabled
             |           HDFS:                          |
 SERVICE KEY |             - hdfs                       | Enabled
             |           HIVE:                          |
 SERVICE KEY |             - hive                       | Enabled
 SERVICE KEY |             - hive2                      | Enabled
             |           IMPALA:                        |
 SERVICE KEY |             - impala                     | Enabled
 SERVICE KEY |             - impala2                    | Enabled
             |           KAFKA:                         |
 SERVICE KEY |             - kafka                      | Enabled
 SERVICE KEY |             - kafka2                     | Enabled
             |           SPARK_ON_YARN:                 |
 SERVICE KEY |             - spark_on_yarn              | Enabled
             |           YARN:                          |
 SERVICE KEY |             - yarn                       | Enabled
             |           ZOOKEEPER:                     |
 SERVICE KEY |             - zookeeper                  | Enabled
------------ | ---------------------------------------- | ------------
-- OK
In a multi-cluster deployment, where edge nodes are monitoring, set the password on the core node as follows:
<Unravel installation directory>/unravel/manager config edge hive metastore password<EDGE_KEY><CLUSTER-KEY><HIVE-KEY><password>##Example: /opt/unravel/manager config edge hive metastore password local-node cluster1 hive passwordIn case the core node is monitoring the Hadoop cluster directly, run the following command from the core node.
<Unravel installation directory>/unravel/manager config hive metastore password<CLUSTER_KEY><HIVE_KEY><password>##Example: /opt/unravel/unravel/manager config edge hive metastore password cluster1 hive P@SSw0rd
Apply the changes.
<unravel_installation_directory>/unravel/manager config applyStart all the services.
<unravel_installation_directory>/unravel/manager startCheck the status of services.
<unravel_installation_directory>/unravel/manager reportDelete the old install directory from
unravel/versions/<THE.OLD.VERSION>.
Important
Ensure to perform the post-upgrade steps. Refer to Post upgrade steps for on-prem platforms (v4.7.x to v4.7.9.x).
After you upgrade Unravel, set the following:
Refer to Upgrading sensors.
Important
In a multi-cluster deployment, upgrading the core node is mandatory before upgrading the sensors on the edge node.
If you have configured the custom JDK, then after upgrading, validate the JAVA version of Unravel.
Go to Unravel node and sign in as unravel user. In the case of multi-cluster, go to Unravel edge node.
Run the following command:
ps -ef | grep unravel | grep java
For example, the following output is shown:
unravel 26871 1 1 Jul05 ? 00:30:43 /tmp/jdk1.8.0_112/jre/bin/java -server -Dident=unravel_taw_1 -Dunravel.log.dir=/opt/unravel/logs -Dhadoop.version= -Djdbc.driver.jar=com.mysql.jdbc.Driver -Dhadoop.conf.dir=/etc/hadoop/conf -Djava.awt.headless=true -Djava.net.preferIPv4Stack=true -Dnetworkaddress.cache.ttl=30 -Dsun.net.inetaddr.ttl=30 -Xmx6g -Xms1g -Dvertx.cacheDirBase=/opt/unravel/tmp/ver
In the above example, Unravel has selected the Java version
/tmp/jdk1.8.0_112/jre/bin/java.You can further validate the Java version. For example, run the following command:
/tmp/jdk1.8.0_112/jre/bin/java -version
If you had migrations reports on CDH or CDP clusters, you must run the following steps to continue using the migration reports.
Stop Unravel.
<Unravel installation directory>/unravel/manager stopEnable the Migration reports as an admin user. Run the following command:
<Unravel installation directory>/unravel/manager config ondemand cloud-migration enableApply changes.
<Unravel installation directory>/unravel/manager config apply
Start Unravel.
<Unravel installation directory>/unravel/manager startThe Migration tab will be visible on the Unravel UI. Also, refer to the Migrations topics for more details.
After you upgrade, you can set the SSL/TLS support for external MySQL.
Important
You can enable the SSL/TLS support only for MySQL version 8.
Stop Unravel.
<Unravel installation directory>/unravel/manager stopUse an editor to open
<Installation_directory>/unravel/data/conf/unravel.yamlfile.In the
unravel.yamlfile, change tls value to true.database: external: true hostname:<hostname>port: 'port' schema: unravel_db_prod tls: true type: mysql username:<username>password:<encrypted password>Apply the changes.
<Unravel installation directory>/unravel/manager config applyStart Unravel.
<Unravel installation directory>/unravel/manager start
In case, for an Unravel version prior to v4.6.1.9, you have a customized UI port, for example, 4000, then after the upgrade, this port reverts to the default 3000. Hence, after you upgrade to 4.7.9.x, you must reconfigure the custom port.
Stop Unravel.
<Unravel installation directory>/unravel/manager stopDisplay the list of ports and keys.
<Unravel installation directory>/unravel/manager config ports showSet the port using the following command with the port and port key.
<Unravel installation directory>/unravel/manager config ports set <port key> <port>For example, if you run the following command, NGUI listens on port 1234.
<Unravel installation directory>/unravel/manager config ports set /hosts/host_main/instances/ngui_1/config/network/port 1234Note
Run manager config ports unset <port key> command to return the ports to their default values.
<Unravel installation directory>/unravel/manager config ports unset /hosts/host_main/instances/appstore_1/config/flask/port
Apply the changes.
<Unravel installation directory>/unravel/manager config applyStart Unravel.
<Unravel installation directory>/unravel/manager start
Refer to Custom ports for more details.
After you have migrated from an Hortonworks Data Platform (HDP) to a Cloudera Data Platform (CDP) cluster, there are some properties you must unset and new properties that you must set on an edge node of the migrated cluster.
On the edge node, set the following property:
<Unravel installation directory>/unravel/manager config properties set com.unraveldata.cluster.type CDPIn case HBase was configured earlier, then set the following property:
<Unravel installation directory>/unravel/manager config properties set com.unraveldata.hbase.source.type=CDPUnset the following properties:
<Unravel installation directory>/unravel/manager config properties unset com.unraveldata.ambari.manager.url<Unravel installation directory>/unravel/manager config properties unset com.unraveldata.ambari.manager.username<Unravel installation directory>/unravel/manager config properties unset com.unraveldata.ambari.manager.password<Unravel installation directory>/unravel/manager config properties unset com.unraveldata.yarn.timeline-service.webapp.address<Unravel installation directory>/unravel/manager config properties unset com.unraveldata.yarn.timeline-service.port<Unravel Installation Directory>/unravel/manager config properties unset yarn.resourcemanager.webapp.addressRun the manager config auto command to pull in all the Hadoop configurations automatically. You will be prompted to provide the location and credentials for the CDP Cloudera manager URL.
<Unravel installation directory>/unravel/manager config autoIf there are more than one clusters that the CDP Cloudera manager handles, you are prompted to enable the cluster you want to monitor. Run the following command to enable a cluster:
<Unravel installation directory>/unravel/manager config cluster enable<CLUSTER KEY>Example: /opt/unravel/manager config cluster enable cluster1
Apply the changes.
<Unravel installation directory>/unravel/manager config applyStart Unravel.
<Unravel installation directory>/unravel/manager startEnsure to make the following changes in the Cloudera manager:
HDP/CDH has hive hooks under HIVE service, but for CDP, it is under HIVE_ON_TEZ. Hence, you must update the properties accordingly.
Update CDP Version for sensor parcel in Parcel Repository & Network from Cloudera Manager to https://xxx.unraveldata.com:3000/parcels/cdh7.1/.
Check for new parcels and distribute them.
In case of a multi-cluster environment, do the following:
Log in to the core node as an Unravel user.
Unset the following properties on the core node:
<Unravel installation directory>/unravel/manager config properties unset com.unraveldata.cluster.type<Unravel installation directory>/unravel/manager config properties unset com.unraveldata.ambari.manager.url<Unravel installation directory>/unravel/manager config properties unset com.unraveldata.ambari.manager.username<Unravel installation directory>/unravel/manager config properties unset com.unraveldata.ambari.manager.password<Unravel installation directory>/unravel/manager config properties unset com.unraveldata.ambari.manager.<EDGE KEY>.url<Unravel installation directory>/unravel/manager config properties unset com.unraveldata.ambari.manager.<EDGE KEY>.username<Unravel installation directory>/unravel/manager config properties unset com.unraveldata.ambari.manager.<EDGE KEY>.password<Unravel installation directory>/unravel/manager config properties unset com.unraveldata.ambari.manager.listTip
Run the following commands to obtain the
<EDGE KEY>and<CLUSTER KEY><unravel_installation_directory>/unravel/manager config edge showNote
For a multi-cluster environment, if your cluster name changes after the migration from HDP to CDP, you must unset the following properties on the core node:
<Unravel installation directory>/unravel/manager config properties unset javax.jdo.option.<EDGE KEY>_<CLUSTER KEY>_HIVE.ConnectionURL<Unravel installation directory>/unravel/manager config properties unset javax.jdo.option.<EDGE KEY>_<CLUSTER KEY>_HIVE.ConnectionDriverName<Unravel installation directory>/unravel/manager config properties unset javax.jdo.option.<EDGE KEY>_<CLUSTER KEY>_HIVE.ConnectionUserName<Unravel installation directory>/unravel/manager config properties unset javax.jdo.option.<EDGE KEY>_<CLUSTER KEY>_HIVE.ConnectionPassword<Unravel installation directory>/unravel/manager config properties unset hive.metastore.<EDGE KEY>_<CLUSTER KEY>_HIVE.cluster.ids<Unravel installation directory>/unravel/manager config properties unset hive.metastore.<EDGE KEY>_<CLUSTER KEY>_HIVE.cluster.ids<Unravel installation directory>/unravel/manager config properties unset com.unraveldata.hive.metastore.listRun the following command:
<Unravel installation directory>/unravel/manager config edge auto<EDGE KEY><Unravel installation directory>/unravel/manager config edge auto refreshApply the changes.
<Unravel installation directory>/unravel/manager config applyStart Unravel.
<Unravel installation directory>/unravel/manager startDo the following on the edge node:
Set the following property:
<Unravel installation directory>/unravel/manager config properties set com.unraveldata.cluster.type CDPIn case HBase was configured earlier, then set the following property:
<Unravel installation directory>/unravel/manager config properties set com.unraveldata.hbase.source.type=CDPUnset the following properties:
<Unravel installation directory>/unravel/manager config properties unset com.unraveldata.ambari.manager.url<Unravel installation directory>/unravel/manager config properties unset com.unraveldata.ambari.manager.username<Unravel installation directory>/unravel/manager config properties unset com.unraveldata.ambari.manager.password<Unravel installation directory>/unravel/manager config properties unset com.unraveldata.yarn.timeline-service.webapp.address<Unravel installation directory>/unravel/manager config properties unset com.unraveldata.yarn.timeline-service.port<Unravel Installation Directory>/unravel/manager config properties unset yarn.resourcemanager.webapp.addressRun manager config auto command to pull in all the Hadoop configurations automatically. You will be prompted to provide the location and credentials for the CDP Cloudera manager URL.
<Unravel installation directory>/unravel/manager config autoIf there are more than one clusters that the CDP Cloudera manager handles, you are prompted to enable the cluster you want to monitor. Run the following command to enable a cluster:
<Unravel installation directory>/unravel/manager config cluster enable<CLUSTER KEY>Example: /opt/unravel/manager config cluster enable cluster1
Apply the changes.
<Unravel installation directory>/unravel/manager config applyStart Unravel.
<Unravel installation directory>/unravel/manager startEnsure to make the following changes in the Cloudera manager:
HDP/CDH has hive hooks under the HIVE service, but for CDP, it is under HIVE_ON_TEZ. Hence, you must update the properties accordingly.
Update CDP Version for sensor parcel in Parcel Repository & Network from Cloudera Manager to https://xxx.unraveldata.com:3000/parcels/cdh7.1/.
Check for new parcels and distribute them.
Regrouping multiple Spark worker instances for enhanced performance (Optional)
Caution
The following task requires planning and should be performed only in collaboration with Unravel support team. This is a one-time task.
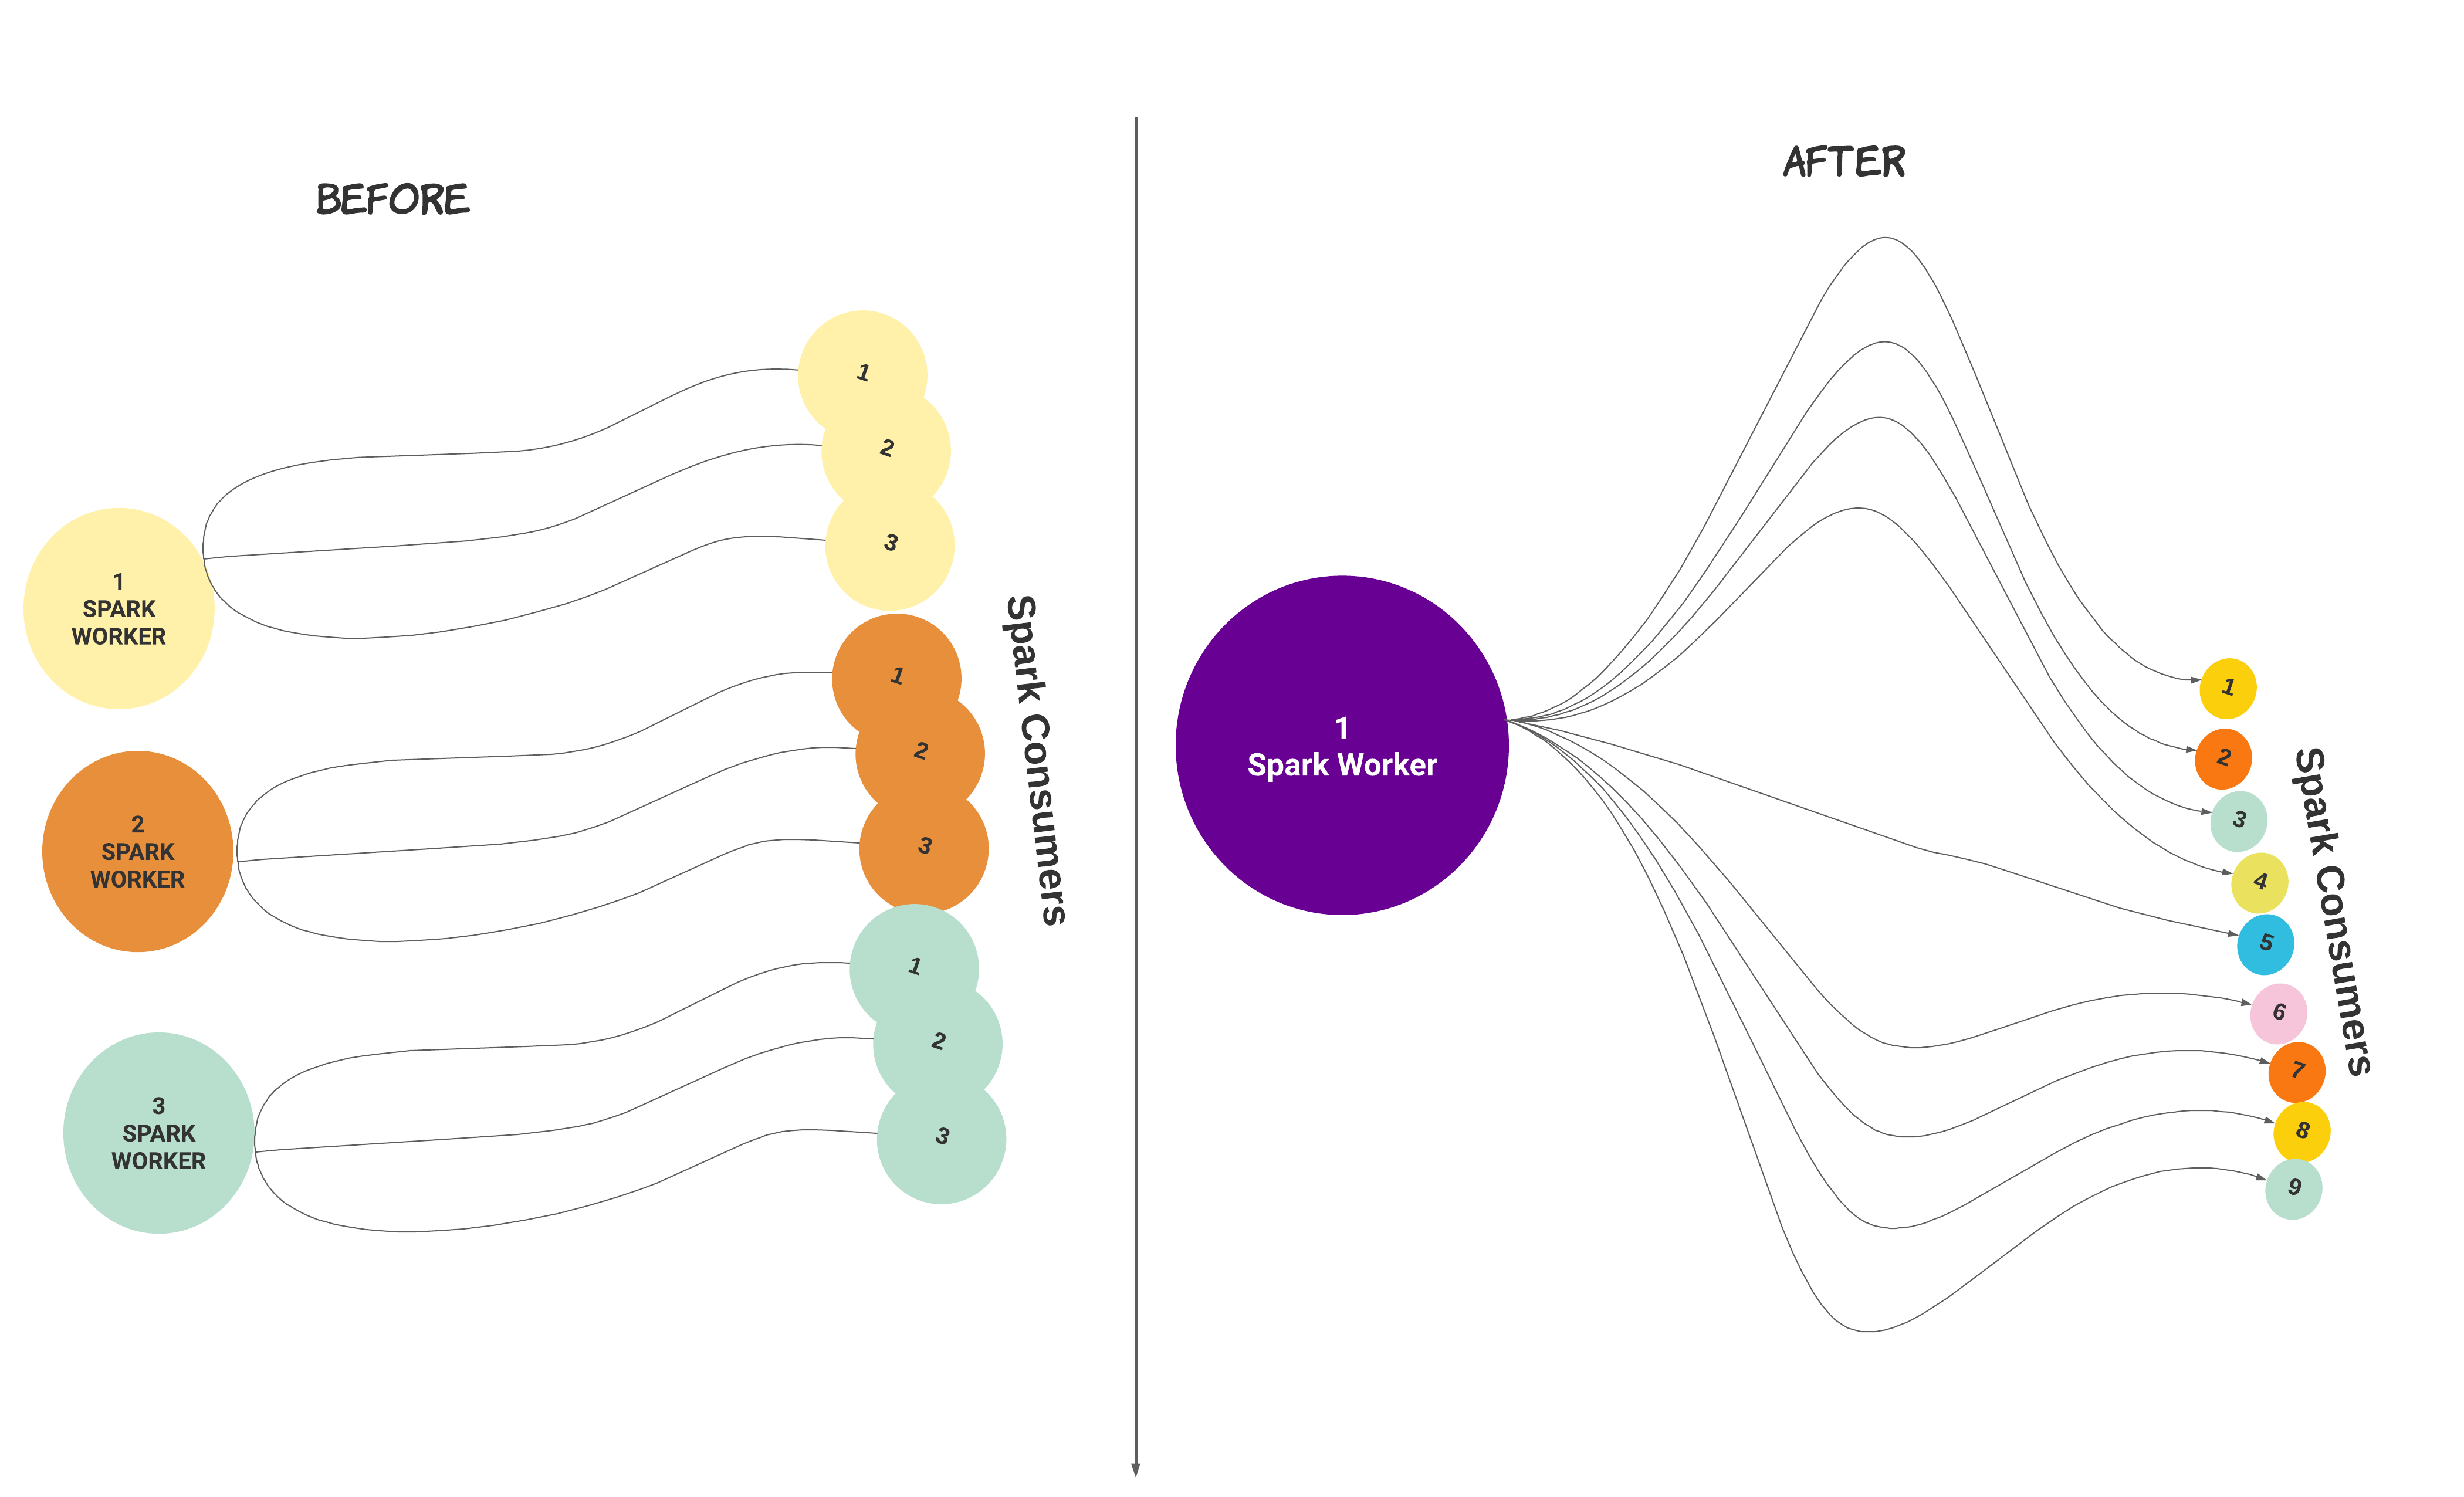
Spark worker is multi-threaded from Unravel version 4.7.8.0. After installation or upgrade, you can migrate a setup with multiple Spark worker instances with consumers to a setup with a single Spark Worker with multiple consumers.
When you run the following command, the number of Spark workers and the number of consumers configured get regrouped under a single Spark worker with an equivalent number of consumers.
In the following illustrated example, three Spark workers with three consumers each get regrouped into one Spark worker with nine consumers.
Caution
To avoid out-of-memory issues, you must review the memory configuration and ensure that you have sufficient memory.
To regroup multiple Spark worker instances with consumers, do the following:
Stop Unravel on the worker node.
/
<unravel_installation_directory>/unravel/manager stopCheck the number of Spark workers that are configured.
/
<unravel_installation_directory>/unravel/manager config worker showCheck the status of memory.
/
<unravel_installation_directory>/unravel/manager config memory showRun the following command:
<unravel_installation_directory>/unravel/manager config worker coalesce spark_workerApply the changes.
<Unravel installation directory>/unravel/manager config applyCheck the status of memory again to ensure that the total memory for the Spark worker is sufficient. If you want to set more memory per consumer, refer to Set memory for Spark worker per consumer.
/
<unravel_installation_directory>/unravel/manager config memory showStart Unravel on the Spark worker node.
/
<unravel_installation_directory>/unravel/manager start