Role Types
Unravel supports the following roles for RBAC:
admin: has complete access to UI and data.
readonlyAdmin: has complete access to the UI except for the Manage page and data.
user: has restricted access to UI and data after configuring the permissions.
Custom roles: roles that you can configure in Unravel. Provide more fine-grained UI and data access to users.
Workflow for RBAC
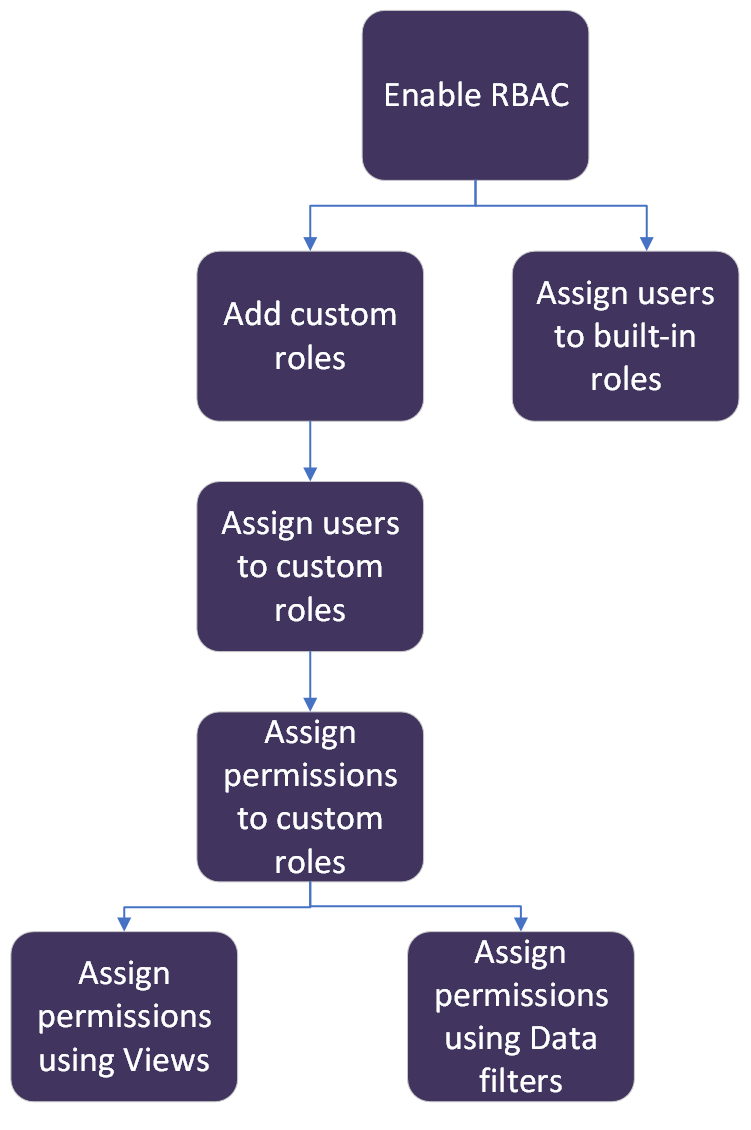
By default, RBAC is disabled, and every user has assumed a readonlyAdmin role. To manage more roles and permissions, you must enable RBAC.
From the installation directory, run the following command to enable RBAC.
<Unravel installation directory>/unravel/manager config properties set com.unraveldata.rbac.enabled true
Notice
The differences in the available roles when RBAC is disabled or enabled are listed in the following table:
RBAC Disabled
RBAC Enabled
The default role is readonlyAdmin role.
The default role is user role.
The following roles are available:
admin
readonlyAdmin
The following roles are available:
admin
readonlyAdmin
user
Custom roles
Stop Unravel, apply the changes and start Unravel.
<Unravel installation directory>/unravel/manager stop then config apply then start
Users are assigned to roles based on user names or user groups of logged-in users.
From the installation directory, run the following command:
Assign using
Command
Assign using user names
<Unravel installation directory>/unravel/manager config properties set com.unraveldata.rbac.role.<role>.users '<user1>,<user2>,<regex>...'
Examples:
Assigning users to the admin role
./manager config properties set com.unraveldata.rbac.role.admin.users 'user1, user2'
Assigning users to the readonlyAdmin role
./manager config properties set com.unraveldata.rbac.role.readonlyAdmin.users 'user1, user2'
Assigning users to readonlyAdmin role using regex
./manager config properties set com.unraveldata.rbac.role.readonlyAdmin.users 'user[0-9]+, user-ra'
Assign using groups
<Unravel installation directory>/unravel/manager config properties set com.unraveldata.rbac.role.<role>.groups '<group1>,<group2>,<regex>...'
Examples:
Assigning users to the admin role
./manager config properties set com.unraveldata.rbac.role.admin.groups 'group-dev,group-qa'
Assigning users to the readonlyAdmin role
./manager config properties set com.unraveldata.rbac.role.readonlyAdmin.groups 'group-dev,group-qa'
Assigning users to readonlyAdmin role using regex
./manager config properties set com.unraveldata.rbac.role.readonlyAdmin.groups 'group-[dev|qa]'
Assigning users to the admin role using a regex that matches any group name containing red_team.
./manager config properties set com.unraveldata.rbac.role.admin.groups '^.*red_team.*$'
Assigning users to the admin role when group names contain commas (exact match)
./manager config properties set com.unraveldata.rbac.role.admin.groups '"red_team,abc","blue_team,123"'
Important
These properties support regex values.
If a user belongs to the admin and readonlyAdmin roles, the admin role is assigned.
When RBAC is disabled, every user assumes a readonlyAdmin role. Therefore, you do not need to assign users to the readonlyAdmin role explicitly.
When RBAC is enabled, every user assumes a user role. Therefore, you do not need to assign users to the user role explicitly.
Stop Unravel, apply the changes, and start Unravel.
<Unravel installation directory>/unravel/manager stop then config apply then start
Custom roles are only available when RBAC is enabled.
Note
The admin, readonlyAdmin, and user roles are built-in roles. These roles are ignored for custom roles.
From the installation directory, run the following command to add custom roles:
./manager config properties set com.unraveldata.rbac.roles '<custom-role1>,<custom-role3>, ...'
Example:
./manager config properties set com.unraveldata.rbac.roles 'dev, sales, prod'
Stop Unravel, apply the changes, and start Unravel.
<Unravel installation directory>/unravel/manager stop then config apply then start
Views are Unravel UI pages. You can enable or disable the views based on your role as an admin. The users can only see the views enabled for their assigned roles. Each view has an ID which you must include in the configuration. Refer to the View ID list. If you do not configure the Views, then the following default Views are shown:
Clusters>Resources
Clusters>Chargeback
Compute
Jobs
From the installation directory, run the following command to set the views for the users in a role.
<Unravel installation directory>/unravel/manager config properties set com.unraveldata.rbac.role.
<role>.views<view ID1>,<view ID2>,<view ID3>For example:
<Unravel installation directory>/unravel/manager config properties set com.unraveldata.rbac.role.role1.views cost.trends,clusters.overview
In
<role>, you must specify the role for which you want to set the views.In
<view ID>, specify the view ID you want to set the role. Refer to the View ID list.Note
If you set a view ID of the main tab on Unravel UI, for example, the Clusters tab, then all the sub-tabs within the Cluster tab, such as Overview, Resources, Workload, are automatically included in the view that is set for the role.
If you provide the view ID of the main tab and the sub-tab, the view of the main tab is included.
If you provide only the view ID of the sub-tab, then only those sub-tabs are included in the view settings for the role.
Stop Unravel, apply the changes, and start Unravel.
<Unravel installation directory>/unravel/manager stop then config apply then start
Unravel UI tabs | View ID |
|---|---|
App Store | appstore |
AutoActions | autoactions |
Cost | cost |
Clusters | clusters |
Clusters>Overview | clusters.overview |
Clusters>Resources | clusters.resources |
Clusters>Job Trends | clusters.jobstrends |
Clusters>Workload | clusters.workload |
Clusters>Chargeback | clusters.chargeback |
Clusters>ElasticSearch | clusters.elasticsearch |
Clusters>Logstash | clusters.logstash |
Clusters>Kibana | clusters.kibana |
Clusters>Kafka | clusters.kafka |
Clusters>HBase | clusters.hbase |
Clusters>Insights | clusters.clusterinsights |
Compute | compute |
Data | data |
Data>Overview | data.overview |
Data>Tables | data.tables |
Data>Forecasting | data.forecasting |
Data>Small Files | data.smallfiles |
Data>File Reports | data.filereports |
Jobs | jobs |
Jobs>Applications | jobs.applications |
Jobs>Pipelines | jobs.pipelines |
Jobs>Sessions | jobs.sessions |
Jobs>Schedule Jobs | jobs.schedulejobs |
Jobs>Jobs | jobs.jobs |
Jobs>Runs | jobs.runs |
Insights Overview | insightsoverview |
Manage | manage |
Manage>Daemons | manage.daemons |
Manage>Stats | manage.stats |
Manage>Run Diagnostics | manage.rundiagnostics |
Manage>Monitoring | manage.monitoring |
Manage>AWS Account Settings | manage.awsaccountsettings |
Manage>Audit | manage.audit |
Manage>Workspaces | manage.workspaces |
Manage>Unravel Billing | manage.unravelbilling |
Migration | migration |
Migration>Cluster Discovery | migration.clusterdiscovery |
Migration>Cloud Mapping Per Host | migration.cloudmappingperhost |
Migration>Workload Fit | migration.workloadfit |
Migration>Services And Versions Compatibility | migration.servicesandversionscompatibility |
Reports | reports |
Reports>Archived | reports.archived |
Reports>Scheduled | reports.scheduled |
Reports>TopX | reports.topx |
Data is the app content displayed on the Unravel UI pages. You can use data filters to configure permissions for a role to restrict access to data.
If you enable the App Data Fields data filter, then the data filtering is enabled for the specified ElasticSearch fields and values. Currently, only the following ElasticSearch fields are supported:
From the installation directory, run the following command:
<Unravel installation directory>/unravel/manager config properties set com.unraveldata.rbac.role.<
role>.data.field.<field><field_value1>,<field_value2>In
<role>, you must specify the role for which set the data filterIn
<field>specify any of the supported ElasticSearch fields.In
<field_value1>,<field_value2>, etc., specify the ElasticSearch field values.For example:
/opt/unravel/manager config properties set com.unraveldata.rbac.role.role1.data.field.queue "queue1, queue2"
/opt/unravel/manager config properties set com.unraveldata.rbac.role.role1.data.field.clusterUid "cluster1, cluster2"
You can also use substitute tokens when you set the App Data Fields data filter. For example:
opt/unravel/manager config properties set com.unraveldata.rbac.role.role1.data.field.queue "queue1, queue2, \$tags.rbac_queue"
/opt/unravel/manager config properties set com.unraveldata.rbac.role.role1.data.field.userName \$user
Stop Unravel, apply the changes, and start Unravel.
<Unravel installation directory>/unravel/manager stop then config apply then start
Fields | Description |
|---|---|
clusterId | Cluster name |
clusterUid | Cluster UID |
user | App user name |
userName | App real user name |
queue | App queue. In the case of Databricks, it is the workspace name. |
kind | App type |
If you enable the Username data filter, then the data filtering by username is enabled.
From the installation directory, run the following command:
<Unravel installation directory>/unravel/manager config properties set com.unraveldata.rbac.role.
<role>.data.user.filter trueIn
<role>, you must specify the role for which you set the data filter.Stop Unravel, apply the changes, and start Unravel.
<Unravel installation directory>/unravel/manager stop then config apply then start
If you enable the App Tags data filter, then the data filtering by app tags is enabled.
From the installation directory, run the following command:
<Unravel installation directory>/unravel/manager config properties set com.unraveldata.rbac.role.
<role>.data.tags.filter trueIn
<role>, you must specify the role for which set the data filterStop Unravel, apply the changes, and start Unravel.
<Unravel installation directory>/unravel/manager stop then config apply then start
If you enable the Elasticsearch Query data filter, then the data filtering is enabled for the specified ElasticSearch query. You can set this data filter using a property value that must be a valid Elasticsearch query.
From the installation directory, run the following command:
<Unravel installation directory>/unravel/manager config properties set com.unraveldata.rbac.role.<
role>.data.es.query<STRING>In
<role>, you must specify the role for which you want to set the data filterIn
<STRING>specify a valid ElasticSearch query.For example:
/opt/unravel/manager config properties set com.unraveldata.rbac.role.role1.data.es.query "{ terms: { kind: [\"spark\"] } }"You can also use substitute tokens when you set the Query data filters.
Note
Use \ to escape special characters ! $ " ' ` \ .
Stop Unravel, apply the changes, and start Unravel.
<Unravel installation directory>/unravel/manager stop then config apply then start
Similar to the built-in roles, users are assigned to custom roles based on user names or user groups of logged-in users.
From the installation directory, run the following command:
Assign using
Command
Assign using user names
<Unravel installation directory>/unravel/manager config properties set com.unraveldata.rbac.role.<custom-role>.users '<user1>,<user2>,<regex>,...'
Examples:
Users with user names: user1 or user2
./manager config properties set com.unraveldata.rbac.role.admin.users 'user1, user2'
Assigning users to the sales role using regex
./manager config properties set com.unraveldata.rbac.role.sales.users 'user[0-9]+, user-ra'
Assign using groups
Examples:
Users with group-dev or group-qa groups are assigned to the dev role
./manager config properties set com.unraveldata.rbac.role.dev.groups 'group-dev,group-qa'
Assigning users to the sales group role using regex
./manager config properties set com.unraveldata.rbac.role.sales.groups 'group-[dev|qa]'
Important
These properties support regex values.
If a user falls into multiple roles, only one role with the highest priority is assigned. The priority of roles is admin > readonlyAdmin > custom roles > user. Where custom roles are the order in which custom roles are added.
Stop Unravel, apply the changes, and start Unravel.
<Unravel installation directory>/unravel/manager stop then config apply then start