Installing Unravel for GCP BigQuery
Before setting up Unravel for BigQuery, ensure that the installation requirements are completed.
Follow the instructions to install and set up Unravel to receive BigQuery data.
Install and set up Unravel on the GCP instance
Do the following to set up Unravel on the GCP instance.
1. Create and configure the GCE
On your GCP console, go to the GCE dashboard and click Create Instance.
Select the following options based on Unravel's instance requirements:
Base OS
Instance type and size
Ports
Networking
The instance must be HTTPS and publicly accessible.
Firewall rules or policies
Sample inbound rule Type
Protocol
Port range
Source
All traffic
All
All
For example, 10.10.0.0/16
SSH
TCP
22
0.0.0.0/0 or trusted public IP for SSH access
Custom TCP Rule
TCP
3000
Custom TCP Rule
TCP
4043
Custom TCP Rule
TCP
4443
Sample outbound rule Type
Protocol
Port range
Source
All traffic
All
All
0.0.0.0/0
Note
The GCP instance should have all TCP access to the BigQuery cluster (server/parent or worker) nodes. You can grant access by inserting adding firewall rules of the BigQuery server/parent and worker with all TCP, all port range.
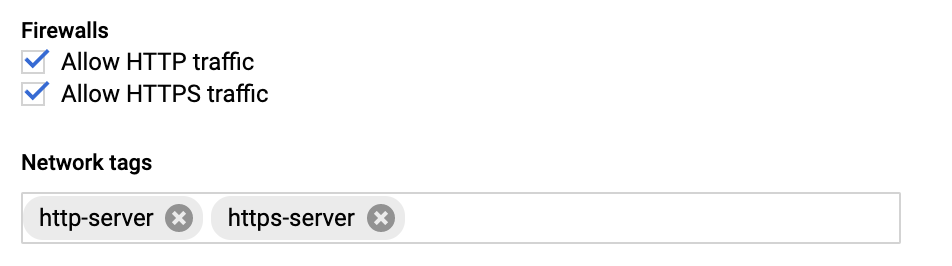
While creating the GCP instance add the Firewall properties, Enable the HTTP and HTTPS traffic Go to Network tab and add Network tags. (This is the firewall rule that is already created.)
Disable
selinux.sudo setenforce Permissive
Edit
/etc/selinux/configto ensure the setting persists after reboot and ensureSELINUX=permissive.sudo vi /etc/selinux/config
Install
libaio.x86_64,lzop.x86_64, andntp.x86_64.sudo yum install -y libaio.x86_64 sudo yum install -y lzop.x86_64 sudo yum install -y ntp.x86_64
If you are using Unravel-managed MySQL or MariaDB, run sudo yum install numactl-devel.x86_64 command. Also refer to Integrating Database.
Set
vm.max_map_countto262144Set nproc limit to unlimited.
Add
unravel.conffile with the following settings to/etc/security/limits.d:unravel soft nproc unlimited
Start ntpd and check the system time.
sudo service ntpd start
sudo ntpq -p
Create a new Unravel user, which should not be a root user. For example:
sudo useradd unravel
2. Download Unravel
Download Unravel onto the VM instance that you have created.
3. Deploy Unravel
Deploy Unravel on the GCP instance that you have created.
4. Install Unravel
You can also manually install Unravel, Refer to 4. Run setup
5. Enable Transport Layer Security (TLS) for Unravel UI
Refer to Enabling Transport Layer Security (TLS) for Unravel UI.
7. Configure an HTTPS Load Balancer for Unravel Endpoint
Note
The HTTPS load balancer for Unravel endpoint must be configured only when using the Push model.
Unravel LR endpoint should be available over a publically accessible HTTPS endpoint to receive messages from BigQuery PubSub. The Load Balancer is an easier and more secure method to push the log messages between the Google Cloud Platform (GCP) and Unravel. Use the following instructions to configure an HTTPS load balancer for Unravel with public endpoint and SSL termination.
You must have the following information handy before you configure the Load Balancer:
Region and Zone where the Unravel VM is running.
Network and Subnet-network where the Unravel VM is running.
A valid SSL certificate in GCP.
Do the following to create a Load Balancer
Create an instance group. Refer to Create a managed instance group for detailed instructions.
In the New unmanaged instance group page, ensure to keep the following items the same as that of Unravel VM.
Location > Region
Location > Zone
Network and Instances > Network
Network and Instances > SubNetwork
Under Port Mapping, enter the following:
Port Name: http4043
Port Number: 4043
Set up an HTTPS Load Balancer. Refer to Set up an HTTPS Load Balancer for detailed instructions. Ensure to do the following:
Under Name, update the name as unravel-loadbalancer.
In Backends > New Backend > Instance groups, select the Unravel instance group that you had created in Step 1.
Under Health check, do the following:
Select Create a health check, and then add the name as unravel-4043-hc
Update the Protocol as HTTP and Port as 4043.
Update the Request Path as /lr/status.
Ensure that Port is set to 443 to allow HTTPS traffic.
After the Load Balancer is created, find the public IP address of the Load Balancer that is mentioned under Frontend section of the Load Balancer. Add the IP address of the Load Balancer to a valid DNS name.
7. Set up Unravel to receive BigQuery data automatically
Unravel can be set up to automatically create and configure resources in more than 100 projects at a time. You can either add single projects or multiple projects at a time for Unravel monitoring. These projects can be added either with customer-supplied credentials or with Unravel-generated credentials.
You must separately configure the BigQuery projects that you want to track from the Data page. The Data page on Unravel UI can show data for only up to 100 BigQuery projects.
Unravel ships the following resources, which are required to automatically set up Unravel to receive BigQuery data.
Terraform
Open-source software for infrastructure provisioning.
gcloud CLI
Set of tools to create and manage Google Cloud resources.
Note
You can also manually set up Unravel to receive BigQuery data. Refer to Set up Unravel to receive BigQuery data
BigQuery projects can be set in Unravel using either one of the following:
Unravel-generated credentials
Customer-supplied credentials
For projects added with Unravel-generated credentials, all the resources are created and handled by Unravel. However, for the customer-supplied credentials, you must create and provide all the resources.
Ensure to have the following handy before you add the projects:
Google account with required IAM role permissions for gcloud CLI authentication
Project ID file in case you are integrating multiple projects at a time with Unravel.
Customer-supplied credential files in case you are integrating projects using customer-supplied credentials.
Log Receiver (LR) endpoint
This is required only when you are adding projects.
Subscription ID (Optional)
The subscriber ID that you want to configure with a pub/sub topic. This is optional. If this is not provided then the default subscription ID unravel-bigquery-sub is considered.
Note
If you have created the resources on GCP, then the Subscription ID is mandatory.
Stop Unravel.
<Unravel installation directory>/unravel/manager stop
Set the Log Receiver (LR) endpoint. This step is required only if you are using customer-supplied credentials to add the projects.
Important
Ensure that the LR end point supports HTTPS.
<Unravel installation directory>/unravel/manager config bigquery set-lr-endpoint<host><port>For example: /opt/unravel/manager config bigquery set-lr-endpoint myhostname.unraveldata.com 1234
Run
<Unravel installation directory>/unravel/manager config bigquery show to verify. The following output is shown— Running: config bigquery show BigQuery support: Enabled LR endpoint: https://myhostname.unraveldata.com:1234 No project configured.
Add BigQuery projects.
Configure the BigQuery projects that you want to be monitored by Unravel. Single or multiple BigQuery projects can be added for monitoring. You can configure the projects either with the customer-supplied credentials or with Unravel-generated credentials.
Also, refer to Remove BigQuery projects from Unravel
Add projects to Data page.
You must separately configure the BigQuery projects that you want to track from the Data page. The Data page on Unravel UI can show data for only up to 100 BigQuery projects.
Also, refer to Remove BigQuery projects from Data page on Unravel UI.
To add single projects to Data page, run the following:
<Unravel installation directory>/unravel/manager config bigquery enable-datapage<project-id>For example: /opt/unravel/manager config bigquery enable-datapage myproject
To add multiple projects to Data page, run the following:
<Unravel installation directory>/unravel/manager config bigquery enable-datapage --batch</path/to/project-id-file>For example: /opt/unravel/manager config bigquery enable-datapage --batch /opt/unravel/project-id-file
Run
<Unravel installation directory>/unravel/manager config bigquery show to verify if the project IDs are enabled for Data page. The following sample output is shown:$ /opt/unravel/manager config bigquery show — Running: config bigquery show BigQuery support: Enabled LR endpoint: https://myhost.unraveldata.com:1234 Project: project-id-file integration: true subscription.id: a-sub-id Project: first-project credentials.file: /opt/unravel/data/conf/bigquery/credentials/first-project subscription.id: a-sub-id Project: second-project credentials.file: /opt/unravel/data/conf/bigquery/credentials/second-project subscription.id: a-sub-id Datapage projects: 2 out of 100
Integrate BigQuery projects for Unravel monitoring. This is a mandatory step for Unravel-generated credentials.
Note
When the following command is run, you can configure all the projects added for Unravel monitoring at once i.e projects with customer-supplied credentials as well as with Unravel managed credentials.
<Unravel installation directory>/unravel/manager config bigquery integrateA URL will be provided in the output.

Note
If you want to skip the interactive gcloud authentication by Unravel and handle the gcloud authentication on your own, then run the command as follows:
<Unravel installation directory>/unravel/manager config bigquery integrate --skip-authorizationAuthenticate gcloud CLI.
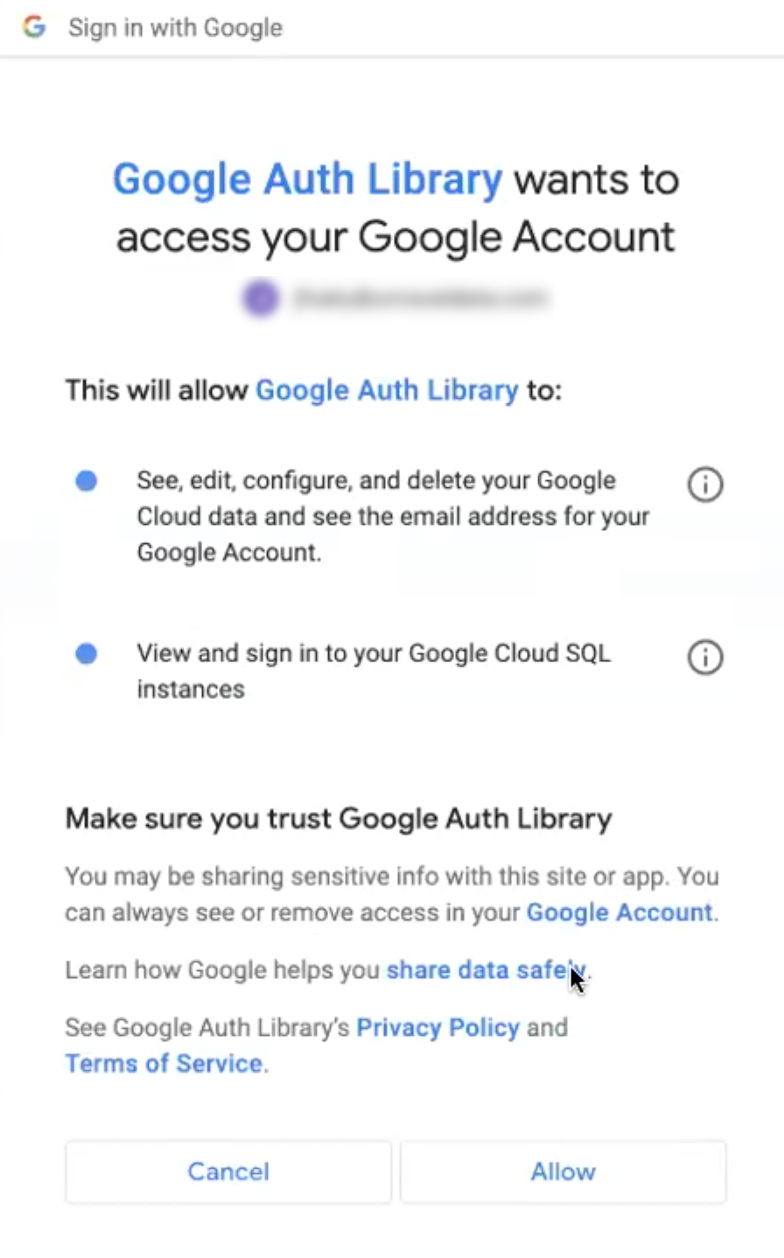
On a Google Chrome browser, copy the URL provided in the output, and in the sign-in dialog box, click Allow. Ensure to sign in to the gcloud CLI from the account that is authenticated with the required permissions.
From the Sign in to the glcoud CLI box, click Copy button to copy the authorization code.
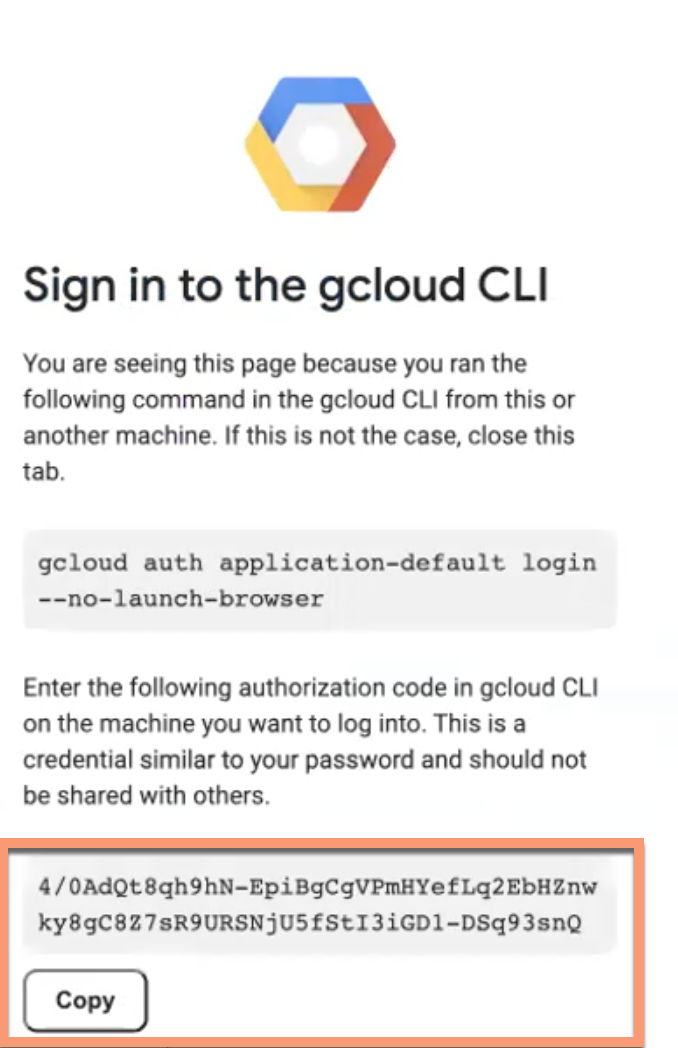
Go back to the terminal and paste the authorization code in the Enter authorization code field and press ENTER. This will run the following actions in the background:
Authenticate the user with Google Cloud.
Configure the required resources on the GCP.
Encrypt the credentials (service account keys) and then integrate them with Unravel.
Integrate all the added BigQuery projects with Unravel.
Securely sign out the end user from the gcloud session.
Apply the changes.
<Unravel installation directory>/unravel/manager config applyStart Unravel.
<Unravel installation directory>/unravel/manager start
Also, see a complete list of manager commands for BigQuery installation.
Also, see Set up Unravel to receive BigQuery data manually.
Note
When you remove a BigQuery project from Unravel, then the associated data also gets deleted from ElasticSearch.
Stop Unravel.
<Unravel installation directory>/unravel/manager stop
Run the following command from the Unravel installation directory.
For single project
<Unravel installation directory>/unravel/manager config bigquery remove
<project-ID>For example: /opt/unravel/manager config bigquery remove my-project
For multiple projects
<Unravel installation directory>/unravel/manager config bigquery remove --batch
</path/to/project-id-file>For example: /opt/unravel/manager config bigquery remove --batch /opt/unravel/my-projects.txt
Apply the changes.
<Unravel installation directory>/unravel/manager config apply
Start Unravel.
<Unravel installation directory>/unravel/manager start
Note
When you remove a BigQuery project from Data page, then the associated data also gets deleted from ElasticSearch.
Stop Unravel.
<Unravel installation directory>/unravel/manager stop
Run the following command from the Unravel installation directory.
For single project
<Unravel installation directory>/unravel/manager config bigquery delete-datapage
<project-ID>For example: /opt/unravel/manager config bigquery delete-datapage --batch my-project
For multiple projects
<Unravel installation directory>/unravel/manager config bigquery delete-datapage --batch
</path/to/project-id-file>For example: /opt/unravel/manager config bigquery delete-datapage --batch /opt/unravel/my-projects.txt
Apply the changes.
<Unravel installation directory>/unravel/manager config apply
Start Unravel.
<Unravel installation directory>/unravel/manager start
8. Verify BigQuery integration
To verify BigQuery integration with Unravel, do the following:
On the GCP console, run test queries from the project integrated with Unravel.
Using a supported web browser, navigate to Unravel URL (For example, https://
<unravel-host>:3000) and log onto Unravel UI using the credentials.Navigate to Jobs tab > Applications , and under Application type, select BigQuery. The details of the test queries run from the GCP console will be listed under the All tab.
