Manually install Unravel in Amazon Elastic MapReduce (EMR)
Before installing Unravel on EMR, check and ensure that the Unravel installation requirements are completed and follow the instructions to install and configure Unravel:
1. Create and configure an EC2 instance
5. Connect a new or existing EMR cluster to Unravel
6. Add AWS account details in Unravel for EMR chargeback data and cluster insights
Run the following steps to create an EC2 instance:
Run the following steps to configure the EC2 instance:
Disable
selinux.sudo setenforce Permissive
Edit
/etc/selinux/configto make sure the setting persists after reboot and make sureSELINUX=permissive.sudo vi /etc/selinux/config
Install
libaio.x86_64,lzop.x86_64, andntp.x86_64.sudo yum install -y libaio.x86_64 (##Only required if you use Unravel managed MySQL) sudo yum install -y lzop.x86_64 sudo yum install -y ntp.x86_64
Start ntpd and check the system time.
sudo service ntpd start
sudo ntpq -p
Create a new user named
hadoop.sudo useradd hadoop
You can run the setup command to install Unravel. The setup command allows you to do the following:
Runs Precheck automatically to detect possible issues that prevent a successful installation. Suggestions are provided to resolve issues. Refer to Precheck filters for the expected value for each filter.
Let you run extra parameters to integrate the database of your choice.
The setup command allows you to use a managed database shipped with Unravel or an external database. When run without any additional parameters, the setup uses the Unravel managed PostgreSQL database. Otherwise, you can specify one of the following types of databases in the setup command:
MySQL (Unravel managed as well as external MySQL database)
MariaDB (Unravel managed)
PostgreSQL (Unravel managed)
Amazon RDS
Refer to Integrate database for details.
Let you specify a separate path for the data directory other than the default path.
The Unravel data and configurations are located in the
datadirectory. By default, the installer maintains the data directory under<Unravel installation directory>/data. You can also change the data directory's default location by running additional parameters with the setup command.Provides more setup options.
Notice
The Unravel user who owns the installation directory should run the setup command to install Unravel.
To install Unravel with the setup command, do the following:
After deploying the binaries, if you are the root user, switch to Unravel user.
su -
<unravel user>Run setup command:
Note
Refer to setup Options for all the additional parameters that can be run with the setup command
Refer to Integrate database topic and complete the pre-requisites before running the setup command with any other database other than Unravel managed PostgreSQL, which is shipped with the product. Extra parameters must be passed with the setup command when you use another database.
Tip
Optionally, if you want to provide a different data directory, you can pass an extra parameter (--data-directory) with the setup command as shown below:
<unravel_installation_directory>/unravel/versions/
<Unravel version>/setup --data-directory/the/data/directorySimilarly, you can configure separate directories for other unravel directories. Contact support for assistance.
PostgreSQL
Unravel managed PostgreSQL
<unravel_installation_directory>/unravel/versions/
<Unravel version>/setup --enable-emr
MySQL
Unravel managed MySQL
<unravel_installation_directory>/unravel/versions/
<Unravel version>/setup --enable-emr --extra /tmp/mysql
MariaDB
Unravel managed MariaDB
<unravel_installation_directory>/unravel/versions/
<Unravel version>/setup --enable-emr --extra /tmp/mariadb
Amazon Relational Database Service (RDS)
Amazon RDS can be used optionally as an external database. To set up Amazon RDS with Unravel, do the following:
From the Unravel installation directory, run the following command to configure Amazon RDS with Unravel.
<unravel_installation_directory>unravel/versions/
<Unravel version>/setup --enable-emr --extra /tmp/mysql --external-database mysql<HOST><PORT><SCHEMA><USERNAME><PASSWORD>##TheHOST,PORT,SCHEMA,USERNAME,PASSWORDare optional fields and are prompted if missing. ##Example: /opt/unravel/versions/abcd-1234/setup --enable-emr --extra /tmp/mysql --external-database mysql unravelmysqlprod.csfws86cxagh.us-east-1.xyz.amazonaws.com 3306 unravel_mysql_prod unravel 1234
Precheck is automatically run when you run the setup command. Refer to Precheck filters for the expected value for each filter.
Set the following property:
<unravel_installation_directory>/unravel/manager config properties set com.unraveldata.process.event.log false
Apply changes
<unravel_installation_directory>/unravel/manager config apply
Start all the services.
<unravel_installation_directory>/unravel/manager start
Check the status of services.
<unravel_installation_directory>/unravel/manager report
The following service statuses are reported:
OK: Service is up and running.
Not Monitored: Service is not running. (Has stopped or has failed to start)
Initializing: Services are starting up.
Does not exist: The process unexpectedly disappeared. Restarts will be attempted 10 times.
You can also get the status and information for a specific service. Run the manager report command as follows:
<unravel_installation_directory>/unravel/manager report <service>
## For example: /opt/unravel/manager report auto_action
The Precheck output displays the issues that prevent a successful installation and also provides suggestions to resolve them. You must resolve each of the issues before proceeding. See Precheck filters.
After the prechecks are resolved, you must re-login or reload the shell to execute the setup command again.
Here is a sample of the Precheck run result:
/opt/unravel/versions/abcd.1004/setup
2021-04-05 15:51:30 Sending logs to: /tmp/unravel-setup-20210405-155130.log
2021-04-05 15:51:30 Running preinstallation check...
2021-04-05 15:51:31 Gathering information ................. Ok
2021-04-05 15:51:51 Running checks .................. Ok
--------------------------------------------------------------------------------
system
 Check limits        : PASSED
 Clock sync          : PASSED
 CPU requirement     : PASSED, Available cores: 8 cores
 Disk access         : PASSED, /opt/unravel/versions/develop.1004/healthcheck/healthcheck/plugins/system is writable
 Disk freespace      : PASSED, 229 GB of free disk space is available for precheck dir.
 Kerberos tools      : PASSED
 Memory requirement  : PASSED, Available memory: 79 GB
 Network ports       : PASSED
 OS libraries        : PASSED
 OS release          : PASSED, OS release version: centos 7.6
 OS settings         : PASSED
 SELinux             : PASSED
--------------------------------------------------------------------------------
Healthcheck report bundle: /tmp/healthcheck-20210405155130-xyz.unraveldata.com.tar.gz
2021-04-05 15:51:53 Prepare to install with: /opt/unravel/versions/abcd.1004/installer/installer/../installer/conf/presets/default.yaml
2021-04-05 15:51:57 Sending logs to: /opt/unravel/logs/setup.log
2021-04-05 15:51:57 Instantiating templates ................................................................................................................................................................................................................................ Ok
2021-04-05 15:52:05 Creating parcels .................................... Ok
2021-04-05 15:52:20 Installing sensors file ............................ Ok
2021-04-05 15:52:20 Installing pgsql connector ... Ok
2021-04-05 15:52:22 Starting service monitor ... Ok
2021-04-05 15:52:27 Request start for elasticsearch_1 .... Ok
2021-04-05 15:52:27 Waiting for elasticsearch_1 for 120 sec ......... Ok
2021-04-05 15:52:35 Request start for zookeeper .... Ok
2021-04-05 15:52:35 Request start for kafka .... Ok
2021-04-05 15:52:35 Waiting for kafka for 120 sec ...... Ok
2021-04-05 15:52:37 Waiting for kafka to be alive for 120 sec ..... Ok
2021-04-05 15:52:42 Initializing pgsql ... Ok
2021-04-05 15:52:46 Request start for pgsql .... Ok
2021-04-05 15:52:46 Waiting for pgsql for 120 sec ..... Ok
2021-04-05 15:52:47 Creating database schema ................. Ok
2021-04-05 15:52:50 Generating hashes .... Ok
2021-04-05 15:52:52 Loading elasticsearch templates ............ Ok
2021-04-05 15:52:55 Creating kafka topics .................... Ok
2021-04-05 15:53:36 Creating schema objects ....................................................................................................................................................................................................................................................................................................................................................................................................................................................................................................................................................................................................................................................................................................................................................................................................................................................................................................................................................................................................................................................................................................................................................................................................................................................................................................................................................................................................................................................................................................................................................................................................................................................................................................................................................................................................................................................................................................................................................................................................................................................... Ok
2021-04-05 15:54:03 Request stop ....................................................... Ok
2021-04-05 15:54:16 Done
[unravel@xyz ~]$
Note
In certain situations, you can skip the precheck using the setup --skip-precheck command
For example:
/opt/unravel/versions/<Unravel version>/setup --skip-precheck
You can also skip the checks that you know can fail. For example, if you want to skip the Check limits option and the Disk freespace option, pick the command within the parenthesis corresponding to these failed options and run the setup command as follows:
setup --filter-precheck ~check_limits,~check_freespace
Tip
Run --help with the setup command and any combination of the setup command for complete usage details.
<unravel_installation_directory>/unravel/versions/<Unravel version>/setup --help
This topic explains how to set up and configure your EMR cluster, so Unravel can begin monitoring jobs running on the cluster.
Assumptions
The EC2 instance for Unravel is created.
Unravel services are running.
The nodes in the EMR cluster allow all traffic from the Unravel EC2 instance. This implies either of the following configurations:
The EMR cluster and Unravel EC2 instance are on the same VPC and same subnet, and their security group allows all traffic from the same subnet.
The EMR cluster is on a different VPC, and you've configured VPC peering, route table creation, and updated your security policy.
Network ACL on VPC allows all traffic.
Warning
If you encounter any EMR cluster configuration issues, see the Troubleshooting guide to resolve the issues.
Follow the steps below to run Unravel's bootstrap script, unravel_emr_bootstrap.py, on all nodes in the cluster. The bootstrap script makes the following changes:
On the master node:
On Hive clusters, it updates
/lib/hive/conf/hive-site.xmlOn Spark clusters, it updates
/lib/spark/conf/spark-defaults.confIt updates
/lib/hadoop/etc/hadoop/mapred-site.xmlIt updates
/lib/hadoop/etc/hadoop/yarn-site.xmlIf Tez is installed, it updates
/etc/tez/conf/tez-site.xmlIt installs and starts the
unravel_esdaemon in/usr/local/unravel_esIt installs the Spark and MapReduce sensors in
/usr/local/unravel-agent/jarsIt installs the Hive Hook sensor in
/usr/lib/hive/lib/.
On all other nodes:
It installs the Spark and MapReduce sensors in
/usr/local/unravel-agent/jars.
Run the following steps to connect Unravel to a new EMR cluster. Simultaneously, you can watch the following video tutorial:
Download Unravel's bootstrap script,
unravel_emr_bootstrap.py.curl https://s3.amazonaws.com/unraveldatarepo/unravel_emr_bootstrap.py -o /tmp/unravel_emr_bootstrap.py
Upload the bootstrap script to an S3 bucket.
Permissions needed
You need to write access to the S3 bucket if you want to upload the bootstrap script to. Also, the AWS account you use to create the EMR cluster must have read access to the bootstrap script to execute its directives.
To upload the bootstrap script to the default EMR logging bucket,
s3://aws-logs-, execute the following command:account_number-region/elasticmapreduceaws s3 cp unravel_emr_bootstrap.py s3://aws-logs-
account_number-region/elasticmapreduceOn the AWS console, select the EMR service and click Create cluster.
On the Create Cluster - Quick Options page, click Go to advanced options.
In Step 1: Software and Steps, select emr-6.2 release.
In Step 2: Hardware, enter the following configuration for your EMR cluster and click Next.
Settings
Action
Instance group configuration
By default, the Uniform instance groups option is selected.
Network
EC2 Subnet
The default configuration works for Network and EC2 Subnet if you have a virtual machine hosted in AWS in the same subnet.
If your virtual machine is hosted on a different subnet in AWS or on GCP or Azure, then the virtual machine and the cloud platform must have access to the public IP.
In Step 3: General Cluster Settings, specify the following settings in Bootstrap Actions > Add Bootstrap Action, click Custom Action Add and then click Configure and add.
In the Add Bootstrap Action window, enter the following details and click Add:
Settings
Action
Name
Select Custom action.
Script location
Specify the following bootstrap location:
s3://unraveldatarepo/unravel_emr_bootstrap.pyNote
If you want to monitor MR jobs, then you must pass an additional optional argument --all
Optional arguments
Enter the following:
--unravel-server
UNRAVEL-INSTANCE-IP--all --bootstrapThe Amazon EMR cluster starts with this bootstrap action.
In Step 4: Security, edit the configuration for the cluster as required. For example:
Choose the EC2 key pair.
Select the EC2 security groups. AWS EMR service automatically applies additional rules that are required for EMR nodes.
Click Create cluster. Your new EMR cluster finishes the bootstrap process and is in the Waiting state.
To connect the Unravel EC2 instance to an existing EMR cluster, follow the steps below to run the Unravel EMR Ansible playbook on either the EMR master node or your Mac/Linux workstation.
Important
The following process is for existing clusters created without Unravel bootstrap. Only those clusters of this type that do not have auto-scaling enabled are currently supported.
Repeat the steps below to upgrade Unravel Sensors whenever you upgrade Unravel Server.
Note
In case you have to run unravel_emr_bootstrap.py manually, you must run it with the full path of the system default python, that is /usr/bin/python, as follows:
sudo /usr/bin/python unravel_emr_bootstrap.py
To view the chargeback data and cluster insights for EMR clusters, you must add your AWS account details in Unravel.
On the Unravel UI, from the top right, click
 .
.Click AWS Account Settings. The AWS Account Settings page is displayed.

Click
 .
.Follow the instructions provided to set up an IAM user. You can use key-based access to enable access to your Amazon account. Unravel uses the access keys to make secure requests to the AWS service API.
You must generate Access key ID and Secret access key that Unravel can use to get AWS metrics.
To set up the key access, do the following in the given sequence:
Create Policy
The AWS monitoring policy defines the minimal scope of permissions that you need to give to Unravel to monitor the services running in your AWS account. Create it once and use it anytime when enabling Unravel access to your AWS account.
On your Amazon console, go to Identity and Access Management (IAM).
Go to Policies and click Create Policy.
Select the JSON tab, and paste the following policy:
{
    "Version": "2012-10-17",
    "Statement": [
        {
            "Effect": "Allow",
            "Action": [
                "pricing:GetProducts",
                "elasticmapreduce:ListClusters",
                "elasticmapreduce:DescribeCluster",
                "elasticmapreduce:ListInstanceFleets",
                "elasticmapreduce:ListInstanceGroups",
                "elasticmapreduce:ListInstances",
                "ec2:DescribeSpotPriceHistory",
                "ec2:DescribeInstances",
                "cloudwatch:GetMetricData",
                "cloudwatch:GetMetricStatistics"
              ],
            "Resource": "*"
        }
    ]
}
Provide a name for the policy and create it.
Create User
On your Amazon console, click Users > Add User.
Enter a name for the key you want to create.
In Select AWS access type, select Programmatic access, and click Next:Permissions.
Click Attach existing policies directly and choose the monitoring policy you defined earlier.
Click Next:Review.
Review the user details and click Create user.
Store the Access Key ID name (AKID) and Secret access key values. These keys are used for setting up your Account in Unravel.
Provide the following details in Step 2: AWS Account details:
Field
Description
Name
Provide a name
Region
Select a region.
Account key
Specify the Access key ID name (AKID).
Secret key
Enter the Secret access key.
Namespace to Monitor
Select EMR as namespace.
Click Save.
You can configure the CloudWatch agent for Unravel monitoring of your EMR clusters.
If you already have CloudWatch agent setup in your environment, then you must add metrics and dimensions to the CloudWatch agent configuration file.
If you do not have the CloudWatch agent setup, then you can run the Unravel bootstrap script, which will set up the CloudWatch agent in your environment.
If CloudWatch agent setup is available in your environment
Add the following metrics and dimensions to the CloudWatch agent configuration file:
{
  "agent": {
    "metrics_collection_interval": 60
  },
  "metrics": {
    "append_dimensions": {
      "AutoScalingGroupName": "${aws:AutoScalingGroupName}",
      "ImageId": "${aws:ImageId}",
      "InstanceId": "${aws:InstanceId}",
      "InstanceType": "${aws:InstanceType}",
      "InstanceName": "${aws:InstanceName}"
    },
    "metrics_collected": {
      "mem": {
        "measurement": [
          "mem_used_percent"
        ],
        "metrics_collection_interval": 60
      },
      "cpu": {
        "measurement": [
          "cpu_usage_idle",
          "cpu_usage_iowait",
          "cpu_usage_user",
          "cpu_usage_system"
        ],
        "metrics_collection_interval": 60,
        "resources": [
          "*"
        ],
        "totalcpu": False
      }
    }
  }
}
If CloudWatch agent setup is NOT available in your environment
CloudWatch agent is packaged as part of the Unravel bootstrap script so to enable the setup of the CloudWatch agent, you must add the following optional argument within the bootstrap action:
Edit the bootstrap action and provide the following location to the bootstrap script:
s3://unraveldatarepo/unravel_emr_bootstrap.pyIn the Optional arguments text box, add the following arguments as shown in the image:
-cwa or --cloud-watch-agent
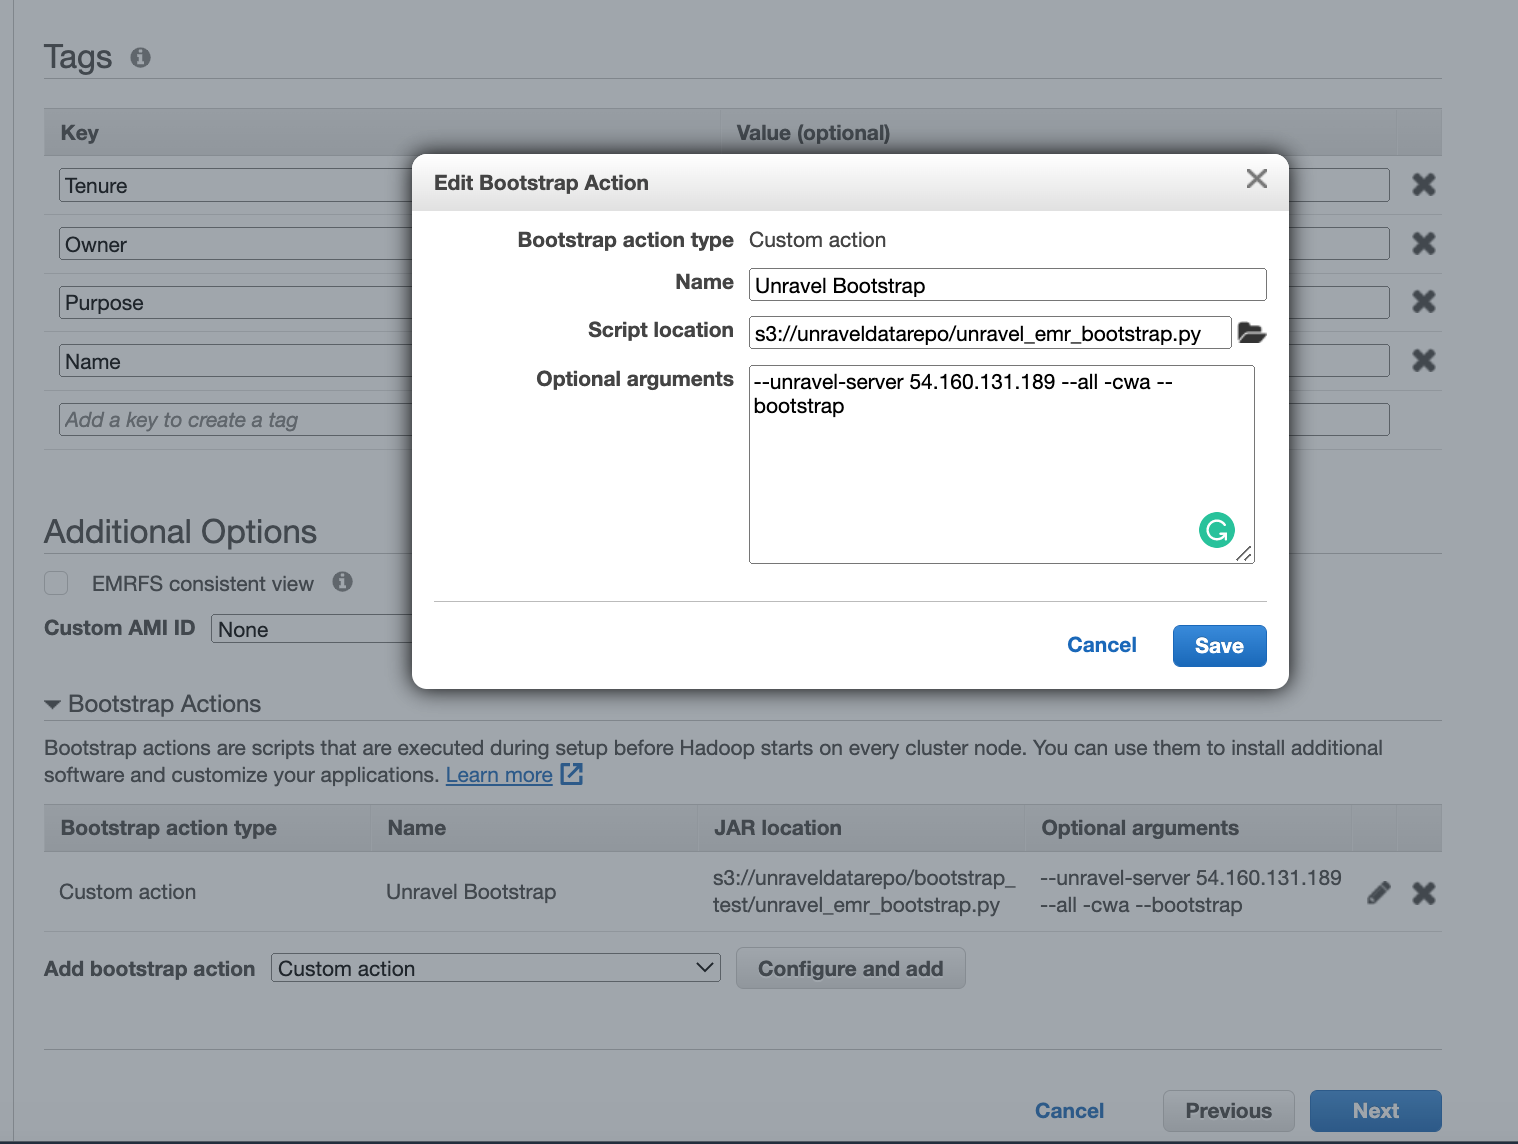
Unravel bootstrap script will automatically deploy the CloudWatch Agent to all the EMR cluster nodes.