Hortonworks Data Platform (HDP)
Before installing Unravel, ensure to check and complete the installation requirements. See the following instructions to download, install, and set up Unravel for the HDP platform.
Notice
The following instructions are for a single cluster environment. For installing Unravel on a multi-cluster environment, refer to Multi-cluster install.
1. Download Unravel
2. Deploy Unravel binaries
Unravel binaries are available as a tar file or RPM package. You can deploy the Unravel binaries in any directory on the server. However, the user who installs Unravel must have the write permissions to the directory where the Unravel binaries are deployed.
If the binaries are deployed to <Unravel_installation_directory>, Unravel will be available in <Unravel_installation_directory>/unravel. The directory layout for the Tar and RPM will be unravel/versions/<Directories and files>.
The following steps to deploy Unravel from a tar file must be performed by a user who will run Unravel.
Create an Installation directory.
mkdir
/path/to/installation/directoryFor example: mkdir /opt/unravel
Note
Some locations may require root access to create a directory. In such a case, after the directory is created, change the ownership to unravel user and continue with the installation procedure as the unravel user.
chown -R
username:groupname/path/to/installation/directoryFor example: chown -R unravel:unravelgroup /opt/unravel
Extract and copy the Unravel tar file to the installation directory, which was created in the first step. After you extract the contents of the tar file,
unraveldirectory is created within the installation directory.tar -zxf unravel-
<version>tar.gz -C/<Unravel-installation-directory>For example: tar -zxf unravel-4.7.x.x.tar.gz -C /opt The Unravel directory will be available within /opt
Important
A root user should perform the following steps to deploy Unravel from an RPM package. After the RPM package is deployed, the remaining installation procedures should be performed by the unravel user.
Create an installation directory.
mkdir /usr/local/unravel
Run the following command:
rpm -i unravel-
<version>.rpmFor example: rpm -i unravel-4.7.x.x.rpm
In case you want to provide a different location, you can do so by using the --prefix command. For example:
mkdir /opt/unravel chown -R
username:groupname/opt/unravel rpm -i unravel-4.7.0.0.rpm --prefix /optThe Unravel directory is available in /opt.
Grant ownership of the directory to a user who runs Unravel. This user executes all the processes involved in Unravel installation.
chown -R
username:groupname/usr/local/unravelFor example: chown -R unravel:unravelgroup /usr/local/unravel The Unravel directory is available in /usr/local.
Continue with the installation procedures as Unravel user.
3. Install Unravel
You can install Unravel either with Interactive Precheck utility or manually.
Note
Unravel recommends installation with Interactive Precheck. However, if you have missed setting any configuration with this method, you can set them later manually.
To install Unravel manually, do the following:
The setup command allows you to do the following:
Runs Precheck automatically to detect possible issues that prevent a successful installation. Suggestions are provided to resolve issues. Refer to Precheck filters for the expected value for each filter.
Let you run extra parameters to integrate the database of your choice.
The setup command allows you to use a managed database shipped with Unravel or an external database. When you run the setup command without additional parameters, the Unravel managed PostgreSQL database is used. Otherwise, you can specify any of the following databases, which is supported by Unravel, with the setup command:
MySQL (Unravel managed as well as external MySQL database)
MariaDB (Unravel managed as well as external MariaDB database)
PostgreSQL (External PostgreSQL)
Refer to Integrate database for details.
Let you specify a separate path for the data directory other than the default path.
The Unravel data and configurations are located in the
datadirectory. By default, the installer maintains the data directory under<Unravel installation directory>/data. You can also change thedatadirectory's default location by running additional parameters with the setup command. To install Unravel with the setup command.Provides more options for setup.
Notice
The Unravel user who owns the installation directory should run the setup command to install Unravel.
To install Unravel with the setup command, do the following:
Switch to Unravel user.
su -
<unravel user>Run setup command:
Note
Refer to setup Options for all the additional parameters that you can run with the setup command
Refer to Integrate database topic and complete the pre-requisites before running the setup command with any other database other than Unravel managed PostgreSQL, which is shipped with the product. Extra parameters must be passed with the setup command when using another database.
Tip
Optionally, if you want to provide a different data directory, you can pass an extra parameter (--data-directory) with the setup command as follows:
<unravel_installation_directory>/unravel/versions/<Unravel version>/setup --data-directory/the/data/directorySimilarly, you can configure separate directories for other unravel directories —contact support for assistance.
PostgreSQL
Unravel managed PostgreSQL
<unravel_installation_directory>/unravel/versions/<Unravel version>/setupExternal PostgreSQL
<unravel_installation_directory>/unravel/versions/<Unravel version>/setup --external-database postgresql<HOST><PORT><SCHEMA><USERNAME><PASSWORD>The
HOST,PORT,SCHEMA,USERNAME, andPASSWORDare optional fields and are prompted if missing. For example: /opt/unravel/versions/abcd.992/setup --external-database postgresql xyz.unraveldata.com 5432 unravel_db_prod unravel unraveldata
MySQL
Unravel managed MySQL
<unravel_installation_directory>/unravel/versions/<Unravel version>/setup --extra /tmp/mysqlExternal MySQL
<unravel_installation_directory>/unravel/versions/<Unravel version>/setup --extra /tmp/<MySQL-directory> --external-database mysql<HOST><PORT><SCHEMA><USERNAME><PASSWORD>The
HOST,PORT,SCHEMA,USERNAME, andPASSWORDare optional fields and are prompted if missing.
MariaDB
Unravel managed MariaDB
<unravel_installation_directory>/unravel/versions/<Unravel version>/setup --extra /tmp/mariadbExternal MariaDB
<unravel_installation_directory>unravel/versions/<Unravel version>/setup --extra /tmp/<MariaDB-directory>--external-database mariadb<HOST><PORT><SCHEMA><USERNAME><PASSWORD>The
HOST,PORT,SCHEMA,USERNAME, andPASSWORDare optional fields and are prompted if missing.
Precheck is automatically run when you run the setup command. Refer to Precheck filters for the expected value for each filter.
Apply the changes.
<Unravel installation directory>/unravel/manager config applyStart all the services.
<unravel_installation_directory>/unravel/manager startCheck the status of services.
<unravel_installation_directory>/unravel/manager reportThe following service statuses are reported:
OK: Service is up and running.
Not Monitored: Service is not running. (Has stopped or has failed to start)
Initializing: Services are starting up.
Does not exist: The process unexpectedly disappeared. A restart will be attempted ten times.
You can also get the status and information for a specific service. Run the manager report command as follows:
<unravel_installation_directory>/unravel/manager report <service>
For example: /opt/unravel/manager report auto_action
The Precheck output displays the issues that prevent a successful installation and provides suggestions to resolve them. You must resolve each of the issues before proceeding. See Precheck filters.
After resolving the precheck issues, you must re-login or reload the shell to execute the setup command again.
Note
You can skip the precheck using the setup --skip-precheck command in certain situations.
For example:
/opt/unravel/versions/<Unravel version>/setup --skip-precheck
You can also skip the checks that you know can fail. For example, if you want to skip the Check limits option and the Disk freespace option, pick the command within the parenthesis corresponding to these failed options and run the setup command as follows:
setup --filter-precheck ~check_limits,~check_freespace
Tip
Run --help with the setup command and any combination of the setup command for complete usage details.
<unravel_installation_directory>/unravel/versions/<Unravel version>/setup --help
/opt/unravel/versions/abcd.1004/setup
2021-04-05 15:51:30 Sending logs to: /tmp/unravel-setup-20210405-155130.log
2021-04-05 15:51:30 Running preinstallation check...
2021-04-05 15:51:31 Gathering information ................. Ok
2021-04-05 15:51:51 Running checks .................. Ok
--------------------------------------------------------------------------------
system
 Check limits        : PASSED
 Clock sync          : PASSED
 CPU requirement     : PASSED, Available cores: 8 cores
 Disk access         : PASSED, /opt/unravel/versions/develop.1004/healthcheck/healthcheck/plugins/system is writable
 Disk freespace      : PASSED, 229 GB of free disk space is available for precheck dir.
 Kerberos tools      : PASSED
 Memory requirement  : PASSED, Available memory: 79 GB
 Network ports       : PASSED
 OS libraries        : PASSED
 OS release          : PASSED, OS release version: centos 7.6
 OS settings         : PASSED
 SELinux             : PASSED
--------------------------------------------------------------------------------
Healthcheck report bundle: /tmp/healthcheck-20210405155130-xyz.unraveldata.com.tar.gz
2021-04-05 15:51:53 Prepare to install with: /opt/unravel/versions/abcd.1004/installer/installer/../installer/conf/presets/default.yaml
2021-04-05 15:51:57 Sending logs to: /opt/unravel/logs/setup.log
2021-04-05 15:51:57 Instantiating templates ................................................................................................................................................................................................................................ Ok
2021-04-05 15:52:05 Creating parcels .................................... Ok
2021-04-05 15:52:20 Installing sensors file ............................ Ok
2021-04-05 15:52:20 Installing pgsql connector ... Ok
2021-04-05 15:52:22 Starting service monitor ... Ok
2021-04-05 15:52:27 Request start for elasticsearch_1 .... Ok
2021-04-05 15:52:27 Waiting for elasticsearch_1 for 120 sec ......... Ok
2021-04-05 15:52:35 Request start for zookeeper .... Ok
2021-04-05 15:52:35 Request start for kafka .... Ok
2021-04-05 15:52:35 Waiting for kafka for 120 sec ...... Ok
2021-04-05 15:52:37 Waiting for kafka to be alive for 120 sec ..... Ok
2021-04-05 15:52:42 Initializing pgsql ... Ok
2021-04-05 15:52:46 Request start for pgsql .... Ok
2021-04-05 15:52:46 Waiting for pgsql for 120 sec ..... Ok
2021-04-05 15:52:47 Creating database schema ................. Ok
2021-04-05 15:52:50 Generating hashes .... Ok
2021-04-05 15:52:52 Loading elasticsearch templates ............ Ok
2021-04-05 15:52:55 Creating kafka topics .................... Ok
2021-04-05 15:53:36 Creating schema objects ....................................................................................................................................................................................................................................................................................................................................................................................................................................................................................................................................................................................................................................................................................................................................................................................................................................................................................................................................................................................................................................................................................................................................................................................................................................................................................................................................................................................................................................................................................................................................................................................................................................................................................................................................................................................................................................................................................................................................................................................................................................................... Ok
2021-04-05 15:54:03 Request stop ....................................................... Ok
2021-04-05 15:54:16 Done
[unravel@xyz ~]$
Run manager config auto command to automatically pull in all the Hadoop configurations. You will be prompted to provide the location and credentials for Cloudera Manager or Ambari UI.
<unravel_installation_directory>/unravel/manager config autoIf there are more than one clusters that are handled by Cloudera Manager or Ambari, you will be prompted to enable the cluster that you want to monitor. Run the following command to enable a cluster.
<unravel_installation_directory>/unravel/manager config cluster enable<CLUSTER_KEY>Example: /opt/unravel/manager config cluster enable cluster1
Tip
Here <CLUSTER_KEY> is the name of the cluster that you want to enable for Unravel monitoring. This can be retrieved from the output shown for the manager config auto command.
The Hive metastore database password can be recovered automatically only for a cluster manager with an administrative account. Otherwise, it must be set manually as follows:
<Unravel installation directory>/unravel/manager config hive metastore password<CLUSTER_KEY><HIVE_KEY><PASSWORD>Example: /opt/unravel/manager config hive metastore password cluster1 HIVE p@P@SsWorD
Tip
Here
<CLUSTER_KEY>is the name of the cluster where you want to set the Hive configurations.Also, refer to Connecting to Hive metastore in a single cluster environment.
Optional: Set up Kerberos to authenticate Hadoop services.
If you are using Kerberos authentication, set the principal path and keytab, enable Kerberos authentication, and apply the changes.
<Unravel installation directory>/unravel/manager config kerberos set --keytab</path/to/keytab file>--principal<server@example.com><Unravel installation directory>/unravel/manager config kerberos enable<unravel_installation_directory>/manager config applyIf you are using Truststore certificates, run the following steps from the manager tool to add certificates to the Truststore:
Download the certificates to a directory.
Provide permissions to the user, who installs unravel, to access the certificates directory.
chown -R
username:groupname/path/to/certificates/directoryUpload the certificates.
## Option 1
<unravel_installation_directory>/unravel/manager config tls trust add</path/to/the/certificate/filesor ## Option 2<unravel_installation_directory>/unravel/manager config tls trust add --pem</path/to/the/certificate/files><unravel_installation_directory>/unravel/manager config tls trust add --jks</path/to/the/certificate/files><unravel_installation_directory>/unravel/manager config tls trust add --pkcs12</path/to/the/certificate/files>Enable the Truststore
<unravel_installation_directory>/unravel/manager config tls trust<enable|disable><unravel_installation_directory>/unravel/manager config applyVerify the connection.
<unravel_installation_directory>/unravel/manager verify connect <Cluster Manager-host> <Cluster Manager-port>For example:
/opt/unravel/manager verify connect xyz.unraveldata.com 7180
-- Running: verify connect xyz.unraveldata.com 7180
 - Resolved IP: 111.17.4.123
 - Reverse lookup: ('xyz.unraveldata.com', [], ['111.17.4.123'])
 - Connection:   OK
 - TLS:      No
-- OK
If you are using TLS protocol, refer to Enabling Transport Layer Security (TLS) for Unravel UI.
Apply changes.
<unravel_installation_directory>/unravel/manager config applyStart all the services.
<unravel_installation_directory>/unravel/manager startCheck the status of services.
<unravel_installation_directory>/unravel/manager reportThe following service statuses are reported:
OK: Service is up and running
Not Monitored: Service is not running. (Has stopped or has failed to start)
Initializing: Services are starting up.
Does not exist: The process unexpectedly disappeared. Restarts will be attempted 10 times.
You can also get the status and information for a specific service. Run the manager report command as follows:
<unravel_installation_directory>/unravel/manager report <service>For example: /opt/unravel/manager report auto_action
Enable additional instrumentation for HDP.
Set additional configurations, if required.
Optionally, you can run healthcheck, at this point, to verify that all the configurations and services are running successfully.
<unravel_installation_directory>/unravel/manager healthcheck
Healthcheck is run automatically on an hourly basis in the backend. You can set your email to receive the healthcheck reports.
This topic explains how to configure Unravel to retrieve additional data from Hive, Tez, Spark, and Oozie, such as Hive queries, application timelines, Spark jobs, YARN resource management data, and logs. You can do this by generating Unravel's JARs and distributing them to every node that runs queries in the cluster. Later, after the JARs are distributed to the nodes, you can integrate Hive, Tez, and Spark data with Unravel.
Hive configurations
Import the hive hook sensor jar into the classpath
On the Ambari UI, click Hive > Configs > Advanced > Advanced hive-env. In the hive-env template, towards the end of line, add:
export AUX_CLASSPATH=${AUX_CLASSPATH}:<path to unravel hive hook sensor jar>/unravel-hive-<version>-hook.jarFor example:
export AUX_CLASSPATH=${AUX_CLASSPATH}:/usr/local/unravel-jars/unravel-hive-1.2.0-hook.jar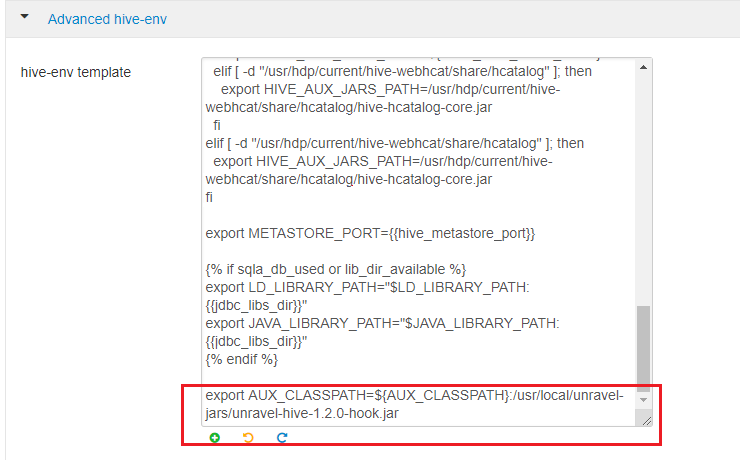
Configure hive hook
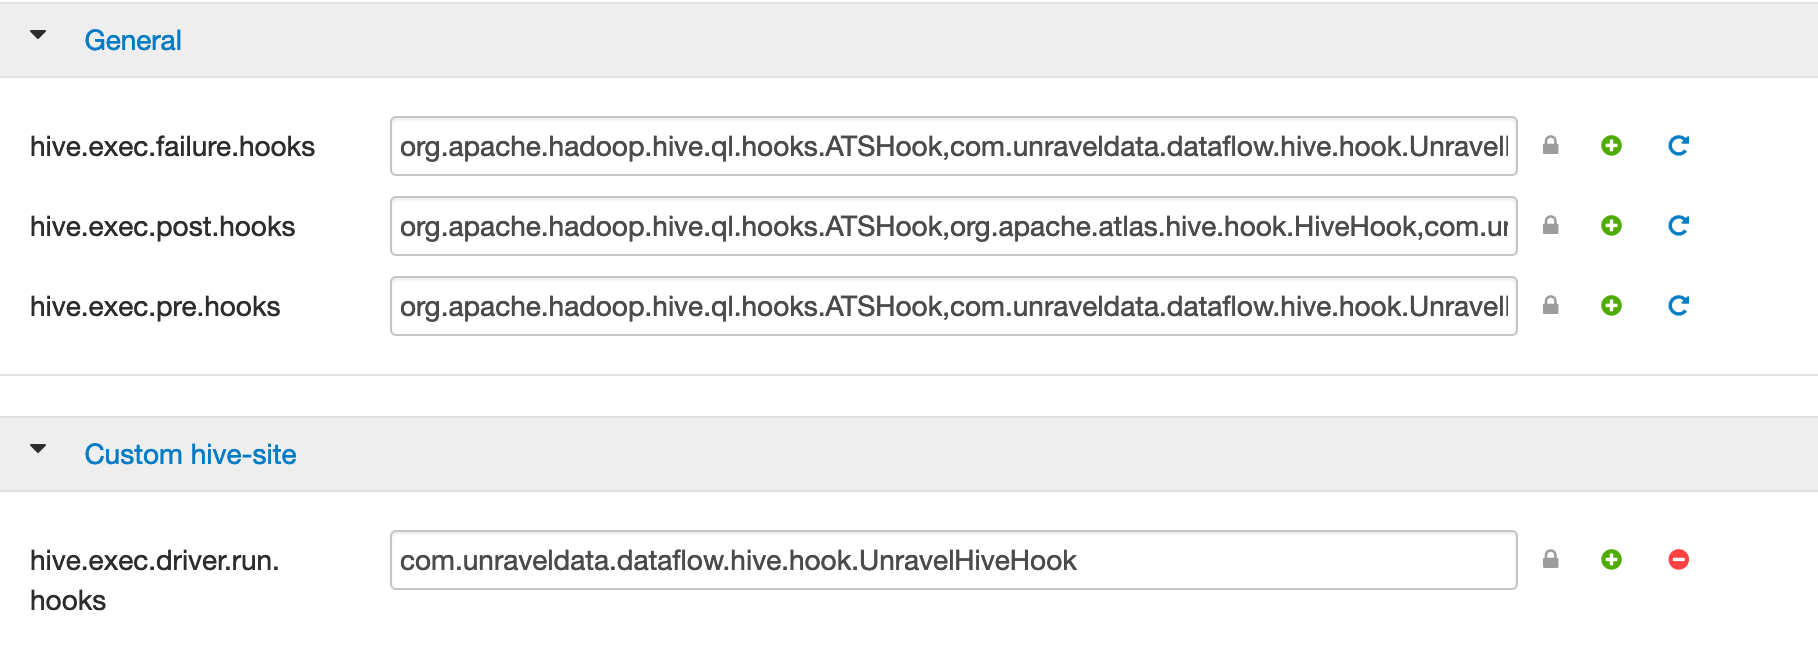
On the Ambari UI, click Hive > Configs > Advanced. In the General section, search for the following hive hooks:
hive.exec.failure.hooks hive.exec.post.hooks hive.exec.pre.hooks hive.exec.run.hooks Copy the
,com.unraveldata.dataflow.hive.hook.UnravelHiveHookproperty against each of the hooks.Important
Ensure to add the property without any space before or after the comma, for example, property=existingValue,newValue
For example:
hive.exec.failure.hooks=
existing-value,com.unraveldata.dataflow.hive.hook.UnravelHiveHook hive.exec.post.hooks=existing-value,com.unraveldata.dataflow.hive.hook.UnravelHiveHook hive.exec.pre.hooks=existing-value,com.unraveldata.dataflow.hive.hook.UnravelHiveHook hive.exec.run.hooks=existing-value,com.unraveldata.dataflow.hive.hook.UnravelHiveHookIf you do not find these hive hooks, go to the Custom hive-site section, click Add Property and add these as key and value per line in the Properties text box.
For example:
hive.exec.pre.hooks=com.unraveldata.dataflow.hive.hook.UnravelHiveHook
Similarly, in the Custom hive-site section. ensure to set com.unraveldata.host: to
<unravel-gateway-internal-IP-hostname>
Configure HDFS
Click HDFS > Configs > Advanced > Advanced hadoop-env. In the hadoop-env template, look for export HADOOP_CLASSPATH and append Unravel's JAR path as shown.
export HADOOP_CLASSPATH=${HADOOP_CLASSPATH}:<Unravel sensor installation directory>/unravel-hive-<version>-hook.jarFor example:
export HADOOP_CLASSPATH=${HADOOP_CLASSPATH}:/usr/local/unravel-jars/unravel-hive-3.1.0-hook.jar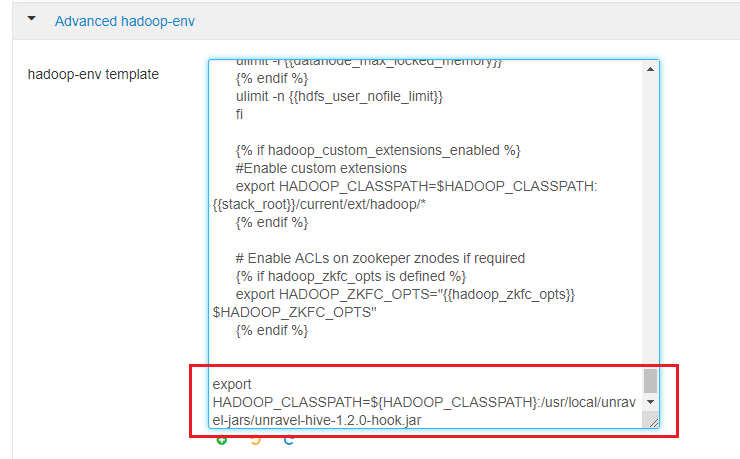
Configure the BTrace agent for Tez
From the Ambari UI, go to Tez > config and in the General section, append the Java options below to tez.am.launch.cmd-opts and tez.task.launch.cmd-opts:
-javaagent:
/usr/local/unravel-jars/jars/btrace-agent.jar=libs=mr,config=tez -Dunravel.server.hostport=<unravel-host>:4043Tip
In a Kerberos environment, you must modify tez.am.view-acls property with the "run as" user or *.
Configure the Application Timeline Server (ATS)
Note
From Unravel v4.6.1.6, this step is not mandatory.
In
yarn-site.xml:yarn.timeline-service.enabled=true yarn.timeline-service.entity-group-fs-store.group-id-plugin-classes=org.apache.tez.dag.history.logging.ats.TimelineCachePluginImpl yarn.timeline-service.version=1.5 or yarn.timeline-service.versions=1.5f,2.0f
If yarn.acl.enable is
true, addunravelto yarn.admin.acl.In
hive-env.sh, add:Use ATS Logging: true
In
tez-site.xml, add:tez.dag.history.logging.enabled=true tez.am.history.logging.enabled=true tez.history.logging.service.class=org.apache.tez.dag.history.logging.ats.ATSV15HistoryLoggingService tez.am.view-acls=*
If
tez-site.xmlis not available, you can also add these properties from the Ambari UI. Go to Tez > config > Custom tez-site and add the above properties as key and value per line in the Properties text box.Note
From HDP version 3.1.0 onwards, this Tez configuration must be done manually.
Configure Spark-on-Yarn
Tip
For
unravel-host, use Unravel Server's fully qualified domain name (FQDN) or IP address.Add the location of the Spark JARs.
Click Spark > Configs > Custom spark-defaults > Add Property and use
 Bulk property add mode, or edit
 spark-defaults.confas follows:Tip
If your cluster has only one Spark 1.X version,
spark-defaults.confis in/usr/hdp/current/spark-client/conf.If your cluster runs Spark 2.X,
spark-defaults.confis in/usr/hdp/current/spark2-client/conf.
This example uses default locations for Spark JARs. Your environment may vary.
spark.unravel.server.hostport=
unravel-host:4043 spark.driver.extraJavaOptions=-javaagent:/usr/local/unravel-jars/jars/btrace-agent.jar=config=driver,libs=<spark-version>spark.executor.extraJavaOptions=-javaagent:/usr/local/unravel-jars/jars/btrace-agent.jar=config=executor,libs=<spark-version>spark.eventLog.enabled=trueFor example:
spark.unravel.server.hostport=xyznode.unraveldata.com:4043
spark.driver.extraJavaOptions=-javaagent:/usr/local/unravel-jars/jars/btrace-agent.jar=config=driver,libs=spark-2.3
spark.executor.extraJavaOptions=-javaagent:/usr/local/unravel-jars/jars/btrace-agent.jar=config=executor,libs=spark-2.3
spark.eventLog.enabled=true
Note
If you have multiple Spark services in the same cluster, you must set the Spark default configuration on each.
Configure Oozie
In Ambari, click Oozie >Configs > Advanced .
In the Filter box, search for oozie.service.WorkflowAppService.system.libpath and check the path shown.
From a terminal application on the Unravel node, pick up the ShareLib Root Directory directory path with the latest timestamp.
hdfs dfs -ls
<path to ShareLib directory>For example:
hdfs dfs -ls /user/oozie/share/lib/Important
The jars must be copied to the
libdirectory (with the latest timestamp), which is shown inShareLib Root Directory.From a terminal application, copy the Hive Hook JAR
/usr/local/unravel-jars/unravel-hive-<version>-hook.jarand the Btrace JAR,/usr/local/unravel-jars/jars/btrace-agent.jarto the specified path in ShareLib Root Directory.hdfs dfs -copyFromLocal /usr/local/unravel-jars/unravel-hive-<version>-hook.jar /user/oozie/share/lib/
<latest timestamp lib directory>/For example:
hdfs dfs -copyFromLocal /usr/local/unravel-jars/unravel-hive-3.1.0-hook.jar /user/oozie/share/lib/lib_20210504054909hdfs dfs -copyFromLocal /usr/local/unravel-jars/jars/btrace-agent.jar /user/oozie/share/lib/
<latest timestamp lib directory>/For example:
hdfs dfs -copyFromLocal /usr/local/unravel-jars/jars/btrace-agent.jar /user/oozie/share/lib/lib_20210504054909Caution
Jobs controlled by Oozie 2.3+ fail if you do not copy the Hive Hook and BTrace JARs to the HDFS shared library path.
Define the Tez and ATS properties using the manager service.
Stop Unravel.
<Unravel installation directory>/unravel/manager stop
Set the properties, shown in the tables below, for TEZ and the Application Timeline Server (ATS) if it requires authentication. Use the manager config properties set command to set the properties.
<Unravel installation directory>/unravel/manager config properties set
<property><key>For example:
/opt/unravel/manager config properties set yarn.ats.webapp.username user1/opt/unravel/manager config properties set yarn.ats.webapp.password pa$$w0rDTez
Application Timeline Server (ATS) requires authentication
Apply the changes.
<Unravel installation directory>/unravel/manager config apply
Start Unravel.
<Unravel installation directory>/unravel/manager start
Run the
hive_test_simple.shscript on the HDP cluster or any cloud environment wherehive.execution.engine=tez.<Unravel installation directory>/unravel/manager run script hive_test_simple.sh
Log into Unravel server and go to the Applications page. Check for Tez jobs.
Unravel UI may take a few seconds to load Tez data.