Microsoft Azure Databricks
Before installing Unravel in Azure Databricks, check and ensure that the Unravel installation requirements are completed and follow the below instructions to install and configure Unravel:
1. Create Unravel VM and Azure Databricks resource
4. Install Unravel either with Interactive Precheck or manually
5. Configure Unravel Log Receiver
6. Connect Databricks cluster to Unravel
1. Create Unravel VM and Azure Databricks resource
Sign in to the Azure portal.
Select Virtual Machines > Add and enter the following information in the Basics tab:
Project Details
Subscription
Choose the applicable subscription.
Resource group
Create a new resource group or choose an existing one.
Instance Details
Virtual Machine Name:
The Unravel server name.
Region:
Select the Azure region.
Availability Options
Select
No infrastructure redundancy required.Image
Select the appropriate image. Both
Centos-based 7.x+ andRed Hat Enterprise Linux 7.x+ are supported.Size
Click Change Size. In the modal, select Memory-optimized image with at least
128 GB memoryandPremium Disk support, for example, E16s_v3 in East US 2)Administrator account
Authentication type
Select
passwordorSSH Key.Username and Password
Enter your VM login information.
Inbound Port Rules
Public inbound ports
Select Allow selected ports.
Selected Inbound ports
Select both
HTTPSandSSH.Click Next: Disks > and enter the following information in the Disks tab.
Disk Options
OS disk type: Select
Premium SSD.
Data Disk
Click Create and attach a new disk.
Caution
This disk is formatted, so do not choose the Attach an existing disk option.
Enter a Name.
Select Source type
None (empty disk).Set Size to at least 512 GiB.
Account type: Select
premium SSD.
Click Next: Networking > and enter the following information:
Virtual network: Create a new one or choose an existing one.
Subnet: Create a new or choose an existing one.
Public IP: Create a new one or choose an existing one.
Select Inbound ports: Select
HTTPSandSSH.
Click Review + create. Your deployment is now created.
Select Go to Resource > Networking > Inbound port rules > Add inbound port rule and include the following ports.
Name
Destination
Destination IP Address
Destination Port Ranges
Unravel_3000
IP Addresses
NIC Private IP
3000
Unravel_443
IP Addresses
NIC Private IP
443
Unravel_4043
IP Addresses
NIC Private IP
4043
Unravel_4443
IP Addresses
NIC Private IP
4443
Click OK.
Select Create a resource > Azure Databricks > Create. Go directly to step#3 if you already have workspaces.
Select Workspace name, Subscription, Resource group, Location, and Pricing tier.
Review VNET Peering options to connect Databricks with Unravel VM.
2. Download Unravel
3. Deploy Unravel
Unravel binaries are available as a TAR file or RPM package. You can deploy the Unravel binaries in any directory on the server. However, the user who installs Unravel must have the write permissions to the directory where the Unravel binaries are deployed.
After you extract the contents of the TAR file or RPM package, unravel directory is created within the installation directory (<unravel_installation_directory>), and Unravel will be available in <Unravel_installation_directory>/unravel. The directory layout will be unravel/versions/<Directories and files>.
The following steps to deploy Unravel from a TAR file should be performed by a user, who will run Unravel.
Create an Installation directory.
mkdir
</path/to/installation/directory>For example: mkdir /opt/
Extract Unravel tar file to the installation directory, which you have created in the first step. After you extract the contents of the TAR file,
unraveldirectory is created within the installation directory.tar zxf unravel-
<version>tar.gz -C</path/to/installation/directory>For example: tar zxf unravel-4.7.x.x.tar.gz -C /opt
The unravel directory will be available within
/optGrant ownership of the directory to a user who will run Unravel.
chown -R username:groupname
</path/to/installation/directory>For example: chown -R unravel:unravelgroup /opt/unravel
Important
The following steps to deploy Unravel from an RPM package should be performed by a root user. After the RPM package is deployed, the remaining installation procedures should be performed by the Unravel user.
Create an installation directory.
mkdir
</path/to/installation/directory>For example: mkdir /usr/local/unravel
Run the following command:
rpm -i unravel-
<version>.rpmFor example: rpm -i unravel-4.7.x.x.rpm
The unravel directory will be available in
/usr/localIf you want to provide a different location, use the --prefix command.
For example:
mkdir /opt/unravel rpm -i unravel-4.7.x.x.rpm --prefix /opt
The unravel directory will be available in
/opt.Grant ownership of the directory to a user who will run Unravel. This user executes all the processes involved in Unravel installation.
chown -R
username:groupname</path/to/installation/directory>For example:chown -R unravel:unravelgroup /usr/local/unravel
Continue with the installation procedures as unravel user.
4. Install Unravel
You can install Unravel either with Interactive Precheck or manually without Interactive Precheck.
Note
Unravel recommends installation with Interactive Precheck.
To install Unravel with Interactive precheck, you must run the Interactive Precheck utility to generate a bootstrap configuration file for installation, configure the Unravel log receiver, and then connect the Databricks cluster to Unravel.
5. Configure Unravel Log Receiver
6. Connect Databricks cluster to Unravel
Run the following steps to connect the Databricks cluster to Unravel.
Register workspace in Unravel.
Sign in to Unravel UI, and from the upper right, click
 > Workspaces. The Workspaces Manager page is displayed.
Click Add Workspace and enter the following details.
Field
Description
Workspace Id
Databricks workspace ID, which can be found in the Databricks URL.
The random numbers shown after o= in the Databricks URL become the workspace ID.
For example, in this URL:https://<databricks-instance>/?o=987654321123456, the Databricks workspace ID is the random number after o=, which is 987654321123456.
Workspace Name
Databricks workspace name. A human-readable name for the workspace. For example,
ACME-WorkspaceInstance (Region) URL
Regional URL where the Databricks workspace is deployed. Specify the complete URL. For example, https://dbc-1dbx661f-a33e.cloud.databricks.com
Tier
Select a subscription option: Standard or Premium. For Databricks Azure, you can get the pricing information from the Azure portal. For Databricks AWS, you can get detailed information about pricing tiers from Databricks AWS pricing.
Token
Use the personal access token to secure authentication to the Databricks REST APIs instead of passwords. You can generate the token from the workspace URL (Go to )
See Authentication using Databricks personal access tokens to create personal access tokens.
Note
Users with admin or non-admin roles can create personal access tokens.
Note
After you click Add, it takes around 2-3 minutes to register the Databricks Workspace with Unravel.
Add Unravel configuration to Databricks clusters using any of the following options:
Global init script
Global init script applies the Unravel configurations to all clusters in a workspace. Do the following to set up Unravel configuration as Global init scripts:
Global init is deployed automatically on the Workspace and needs to be enabled manually from the location shown in the following image:
Go to your workspace, and from the dropdown located in the upper right corner, select Admin Settings.
From Settings, click Compute and then click Manage next to Global init scripts. The Global init scripts page is shown.
Use the toggle key under the Enabled column to enable the Global init scripts.
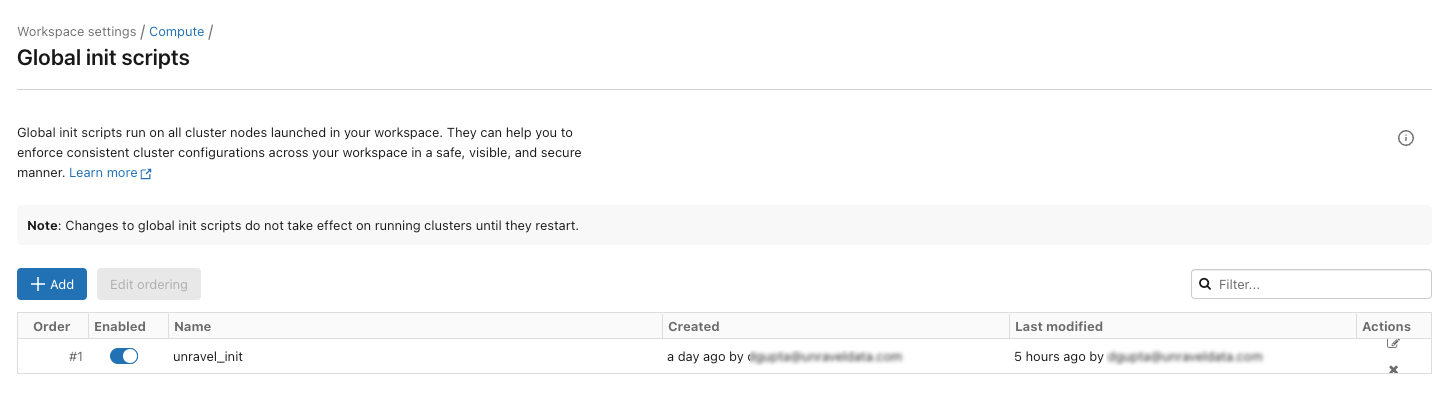
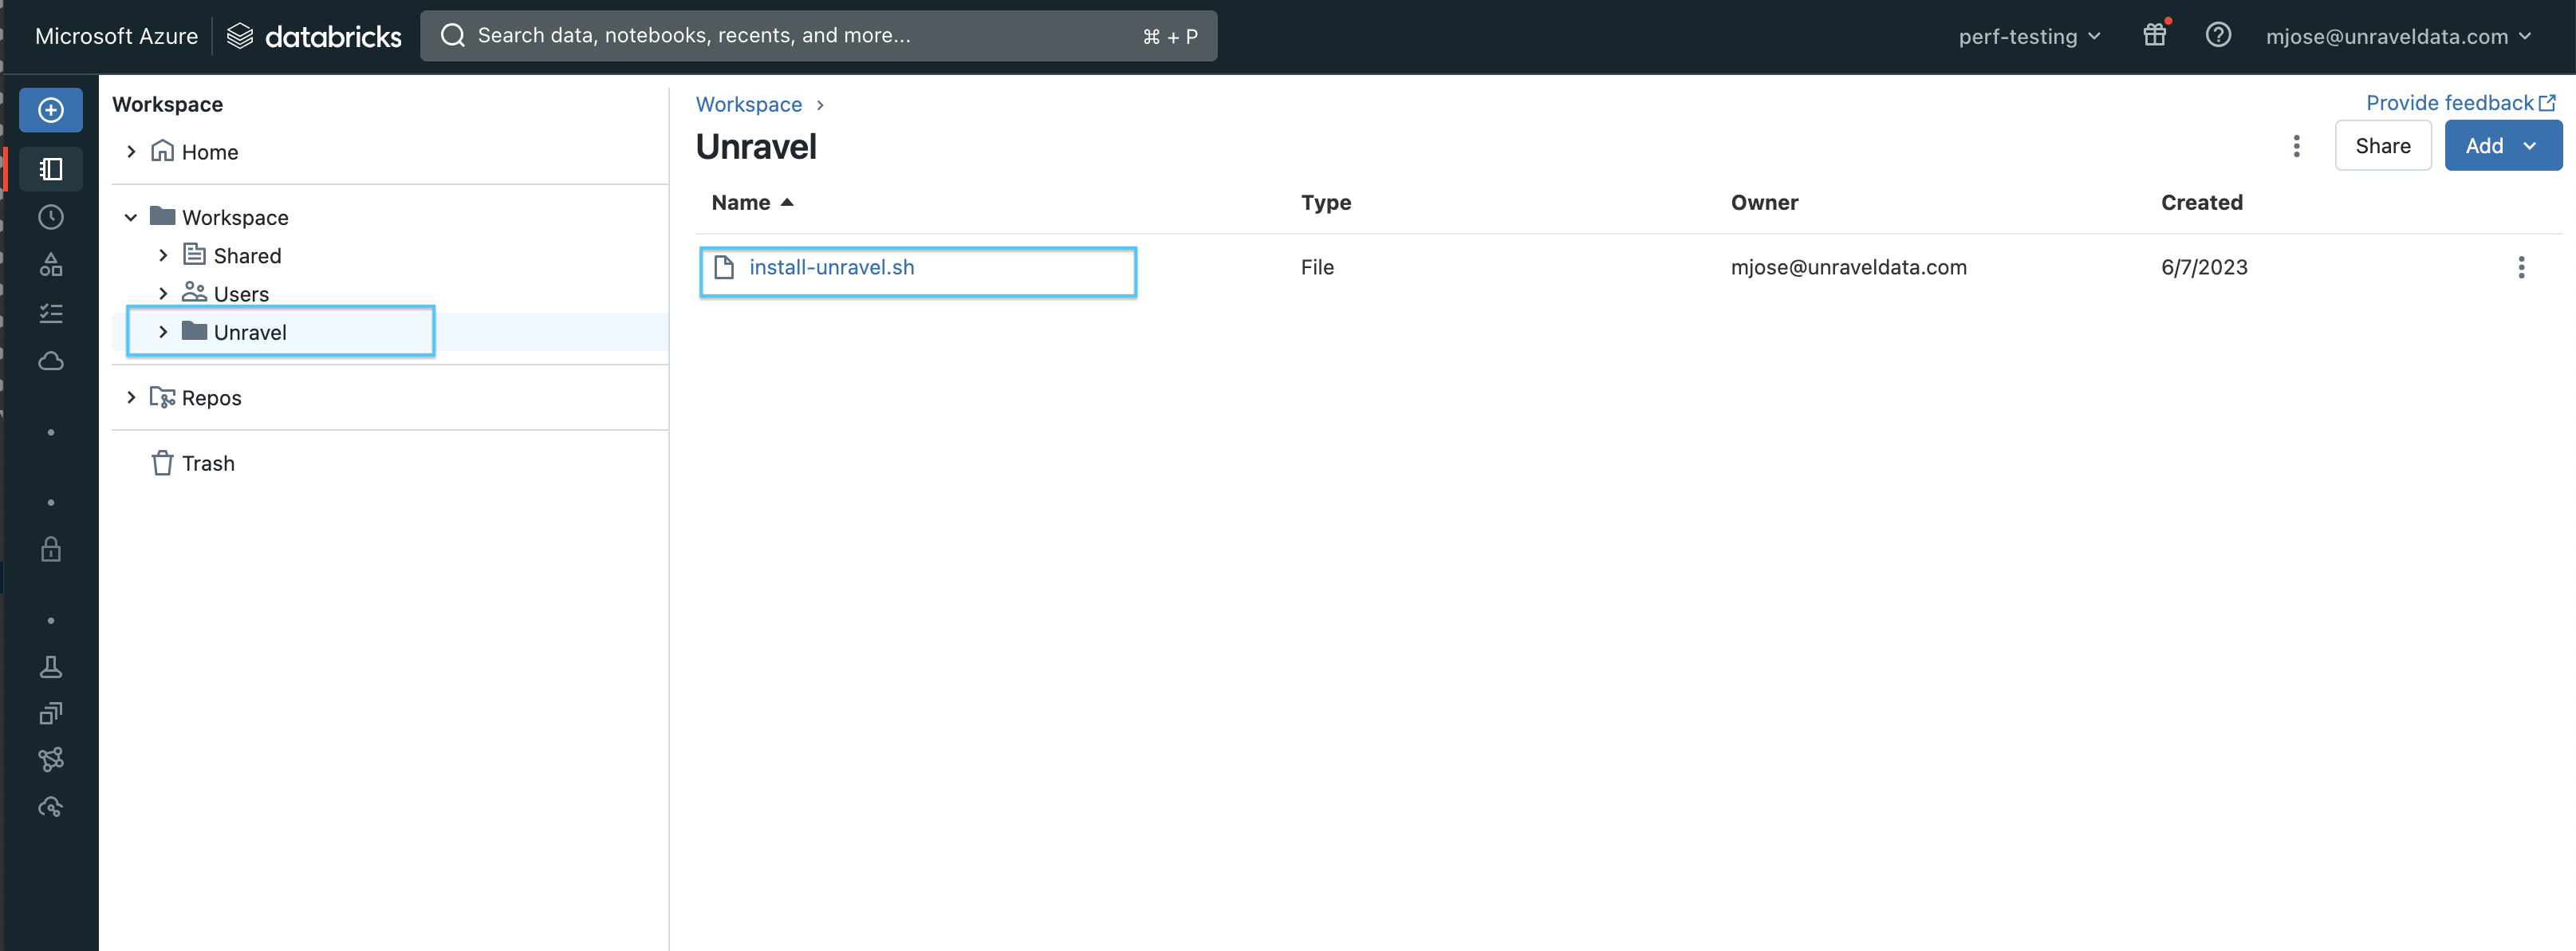
You can also find the Global initialization script in your workspace at this path: /Workspace/Unravel/install-unravel.sh
If it is not deployed automatically, you can do one of the following
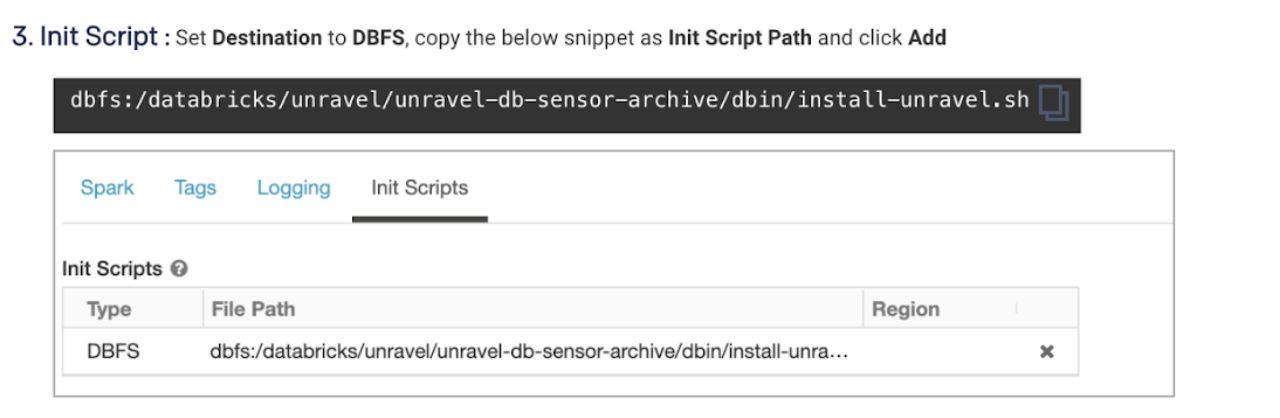
Use this script as a Cluster init script.
Add Unravel configuration to Databricks clusters using the Global init script by referring to these instructions.
Note
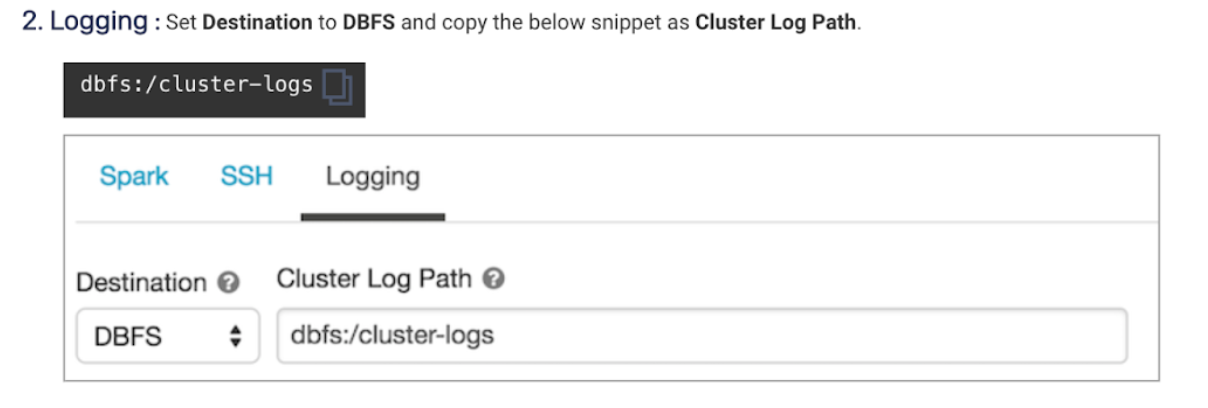
Cluster logging should be enabled at the cluster level. See Logging in Cluster init script for instructions.
Important
When you upgrade from an Unravel version below v4.7.5.0, you must disable or remove all the previously set up global init scripts (unravel_cluster_init, unravel_spark_init).
Cluster init script
The Cluster init script applies the Unravel configurations at the cluster level. To setup cluster init scripts from the cluster UI, do the following:
Go to Unravel UI, and click Manage > Workspaces.
Choose the desired workspace as the source.
Set the path as: /unravel/install-unravel.sh.
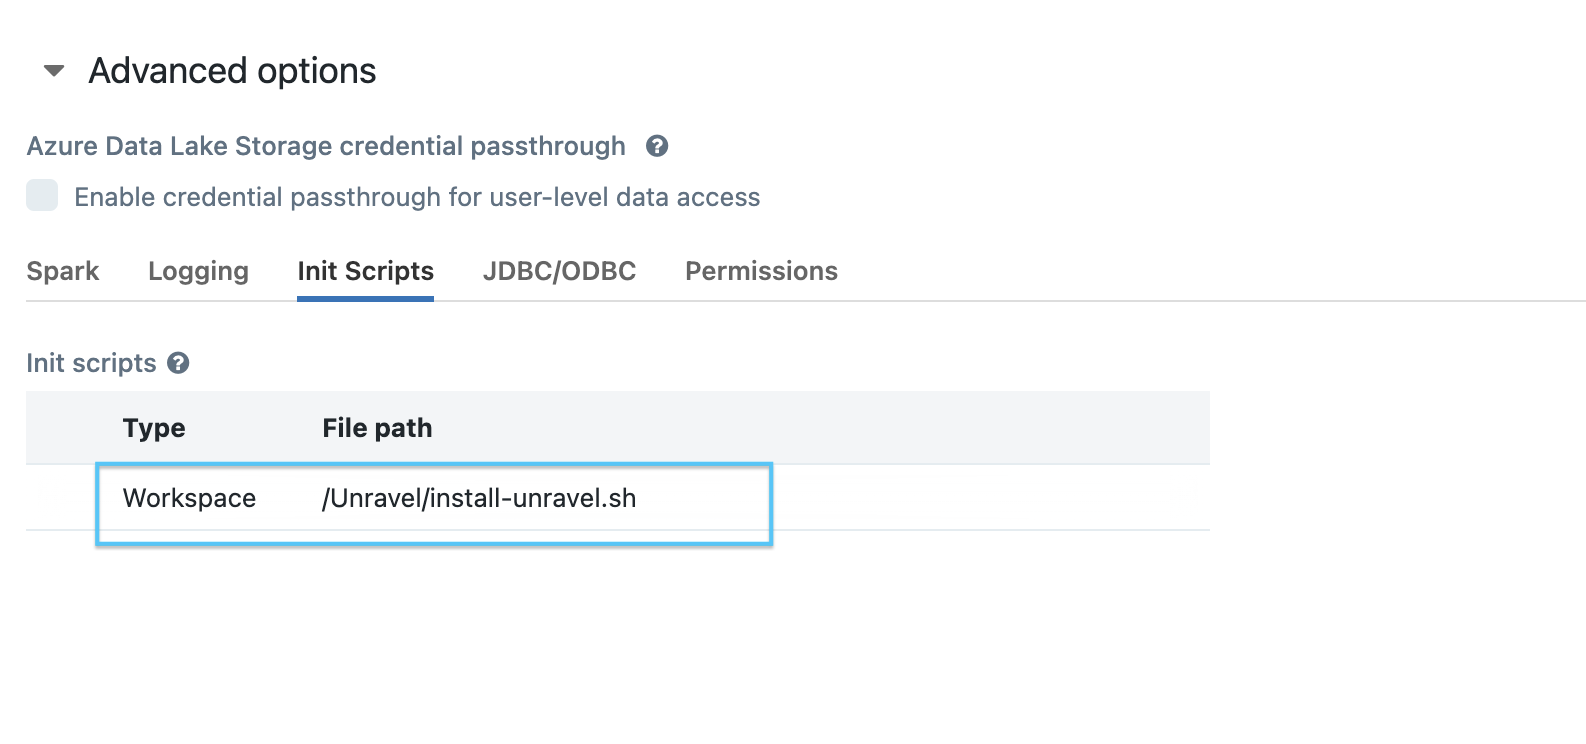
Note
Prior to configuring the new cluster-level init script, ensure you remove any existing cluster-level init script configurations that are pointing to the DBFS location. For cluster-level init script setup, make sure to configure it using the workspace file path: /unravel/install-unravel.sh.
Note
To add Unravel configurations to job clusters via API, refer How to setup cluster init scripts via cluster API.
The Cluster init script applies the Unravel configurations at the cluster level. To setup cluster init scripts from the cluster UI, do the following:
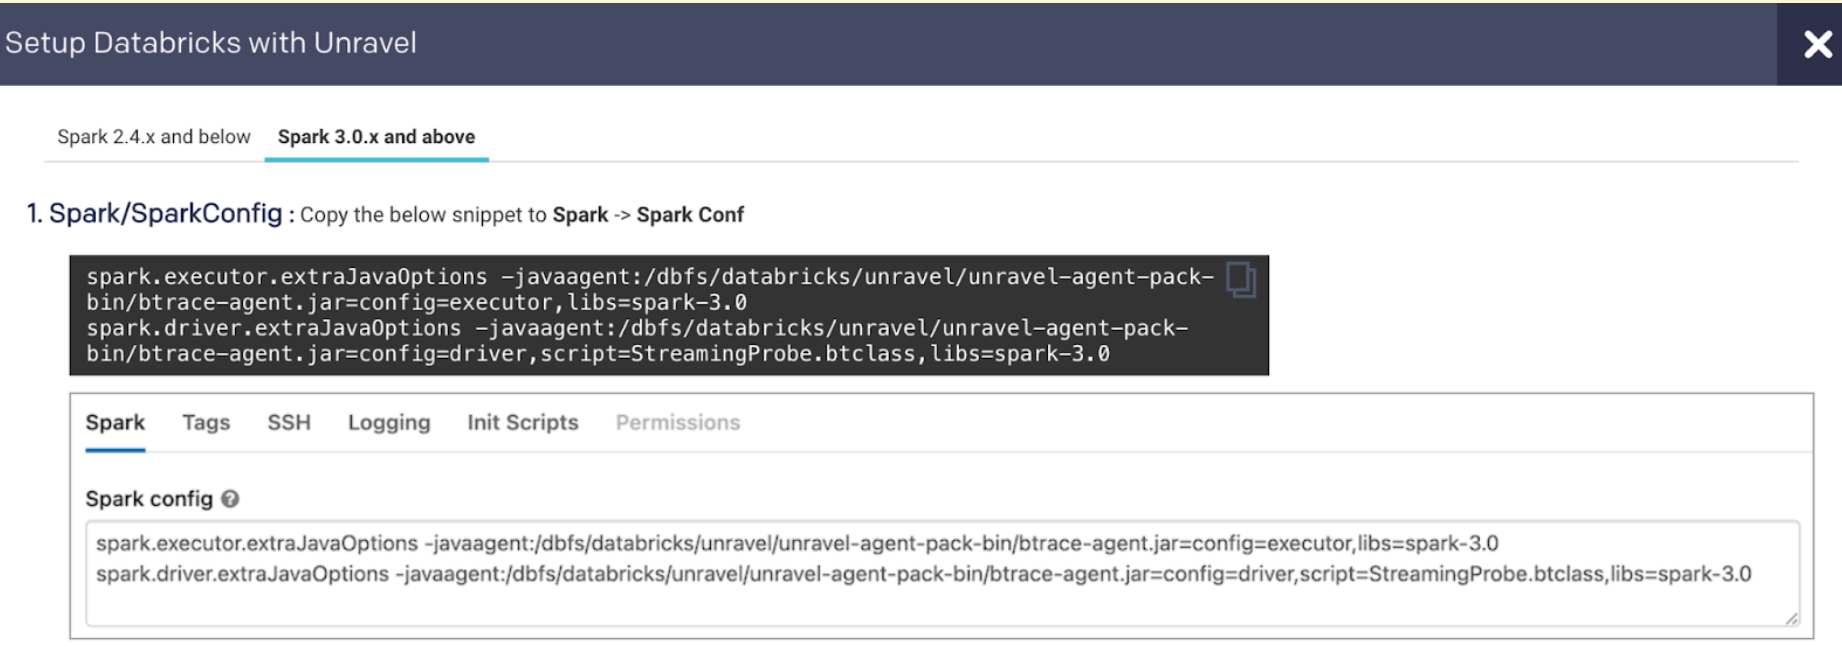
Go to Unravel UI, and click Manage > Workspaces > Cluster configuration to get the configuration details.
Follow the instructions and update each cluster (Automated /Interactive) that you want to monitor with Unravel.
Add Unravel configuration to Databricks clusters. Go to Unravel UI, and from the upper right, click Manage
> Workspaces > Cluster configuration to get the configuration details. Follow the instructions and update every cluster (Automated /Interactive) in your workspace.Tip
By default, the Ganglia metrics are enabled with Dcom.unraveldata.agent.metrics.ganglia_enabled property set to true.
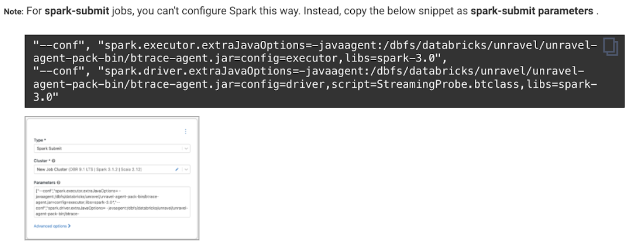
Note
To add Unravel configurations to job clusters via API, refer How to setup cluster init scripts via cluster API.
Set additional configurations if required.
Configure the Workspace for Data page.
Optionally, you can run healthcheck, at this point, to verify that all the configurations and services are running successfully.
<unravel_installation_directory>/unravel/manager healthcheckHealthcheck is run automatically on an hourly basis in the backend. You can set the healthcheck intervals and email alerts to receive the healthcheck reports.
Tip
The workspace setup can be done anytime and does not impact the running clusters or jobs.