Notification channels
You can set up notification channels to receive notifications by groups of users. Use notifications to send messages through email addresses and slack to users or user groups when certain conditions are triggered. For example, you can set up a notification channel to receive an alert when the budget cost exceeds the threshold.
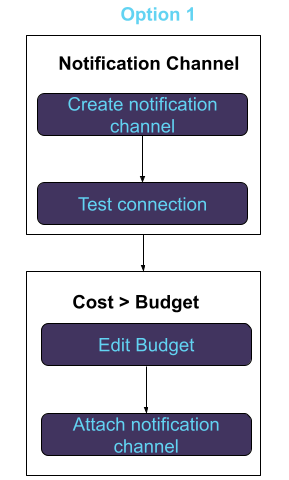
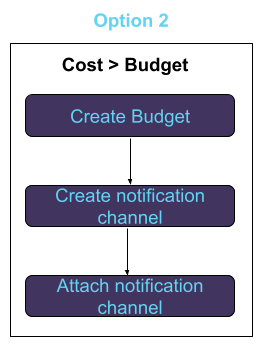
Notification channel workflow
You can set up a notification channel using the following options:
Creating a notification channel
You can set up a channel to receive alerts when certain conditions are triggered, such as the status of the budget changes to Exceeded or At Risk.
On Unravel UI, select Manage > Notification channels.
On the Notification channels page, in the upper-right corner, click New.
Note
Alternatively, you can create a notification channel when adding a new budget.
To add a notification channel when adding a new budget of EMR, see Cost Budget (EMR)
To add a notification channel when adding a new budget of Databricks, see Cost Budget (Databricks)
In the New notification channel window, enter the following details:
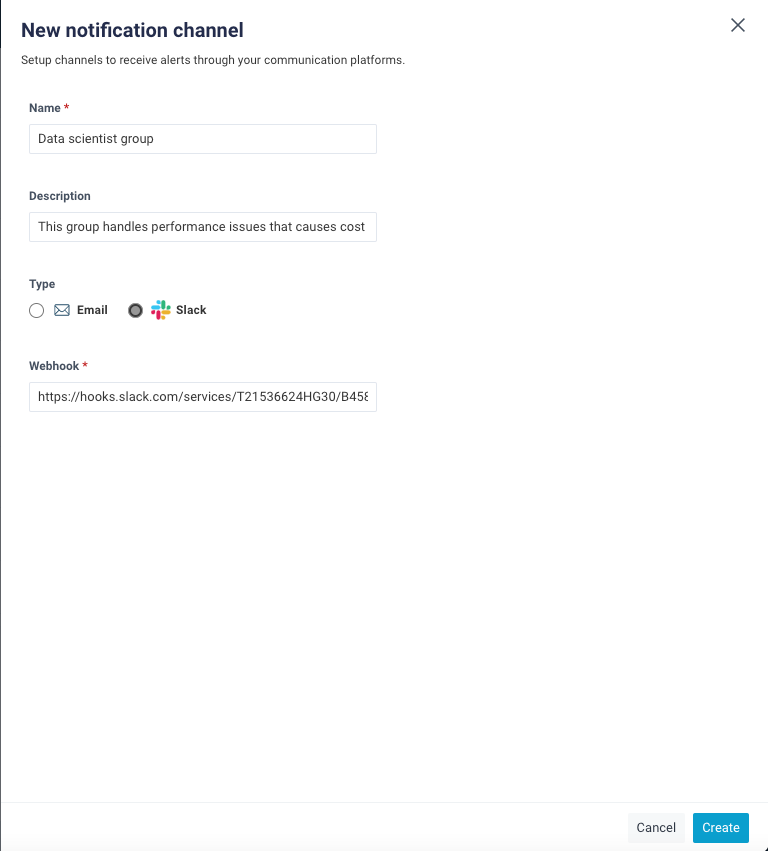
Fields
Description
Name
(Required)
Enter the name of a user or a group to whom you want to send an alert or notify.
Description
Enter the description of the channel.
Type
(Required)
Select one of the following communication options:
Email: Select to notify the user by sending an email. In the Email Addresses field, enter the email addresses of recipients. You can enter a maximum of up to 10 email addresses. To set up email alerts, see Configuring email alerts.
Slack: Select to notify the user through Slack messages. In the Webhook field, enter the Slack webhook integration URL. To learn about the webhook URL, see Slack documentation.
Click Create.
The notification channel is created and added to the list of notification channels.
Modifying the existing notification channel
You can modify the details of the existing notification channel.
On Unravel UI, from the upper right corner, click
 and select Notification channels. The Notifications page is displayed.
On the Notification channels page, click the
 toolbar next to the notification channel and select Edit.
In the Edit notification channel window, update the fields (see Create notification channels for descriptions of the fields).
Click Update.
The notification channel details are updated, and the channel information is saved and listed on the notification channel page.
Viewing notification channels
On the Unravel UI, select Manage > Notification channels.
The Notification channels page lists all notification channels.

Name: Lists the available notification channels. When you hover over a channel name, a list of associated budgets (with their categories) is displayed. You can navigate to the budgets to view more details.
Type: Lists the communication platform type: Email or Slack.
Last modified: Latest timestamp when the channel was last modified. The column is sorted by the last modified date.
Connection: Shows the result of the last test along with the timestamp. The result can be Successful, Failed, or Not tested.
From the Notification channels page, you can perform the following actions:
Icons
Action

Create a new notification channel. See Creating a notification channel.

Search for a specific notification channel using a name or description

Download the notification channels list as a CSV file
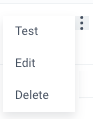
Click the toolbar next to each notification channel and perform the following actions:
Edit the details of the selected notification channel
Test the connection of the channel. The following options are displayed in the Connection column:
Not tested: The default option before testing the connection.
Successful: A successful status is displayed along with the date and time for the successful connection.
After the successful connection, an email is sent, or a message is sent to the Slack channel.
Failed: A failed status is displayed along date and time for the failed connection.
Delete the selected notification channel.
Note
You cannot delete the notification channel if the selected notification channel has associated budgets. Instead, you must remove the notification channel from its budget and then delete it.