Deploying Unravel for Azure Databricks from Azure Marketplace
Overview
This page describes how to launch an Unravel server in Azure from the Azure Marketplace and have your Azure Databricks workloads monitored by Unravel.
Unravel for Azure Databricks provides Application Performance Monitoring and Operational Intelligence for Azure Databricks. It is a complete monitoring, tuning and troubleshooting tool for Spark Applications running on Azure Databricks. Currently, Unravel only supports monitoring Automated (Job) Clusters.
Important
For best results, follow the instructions below.
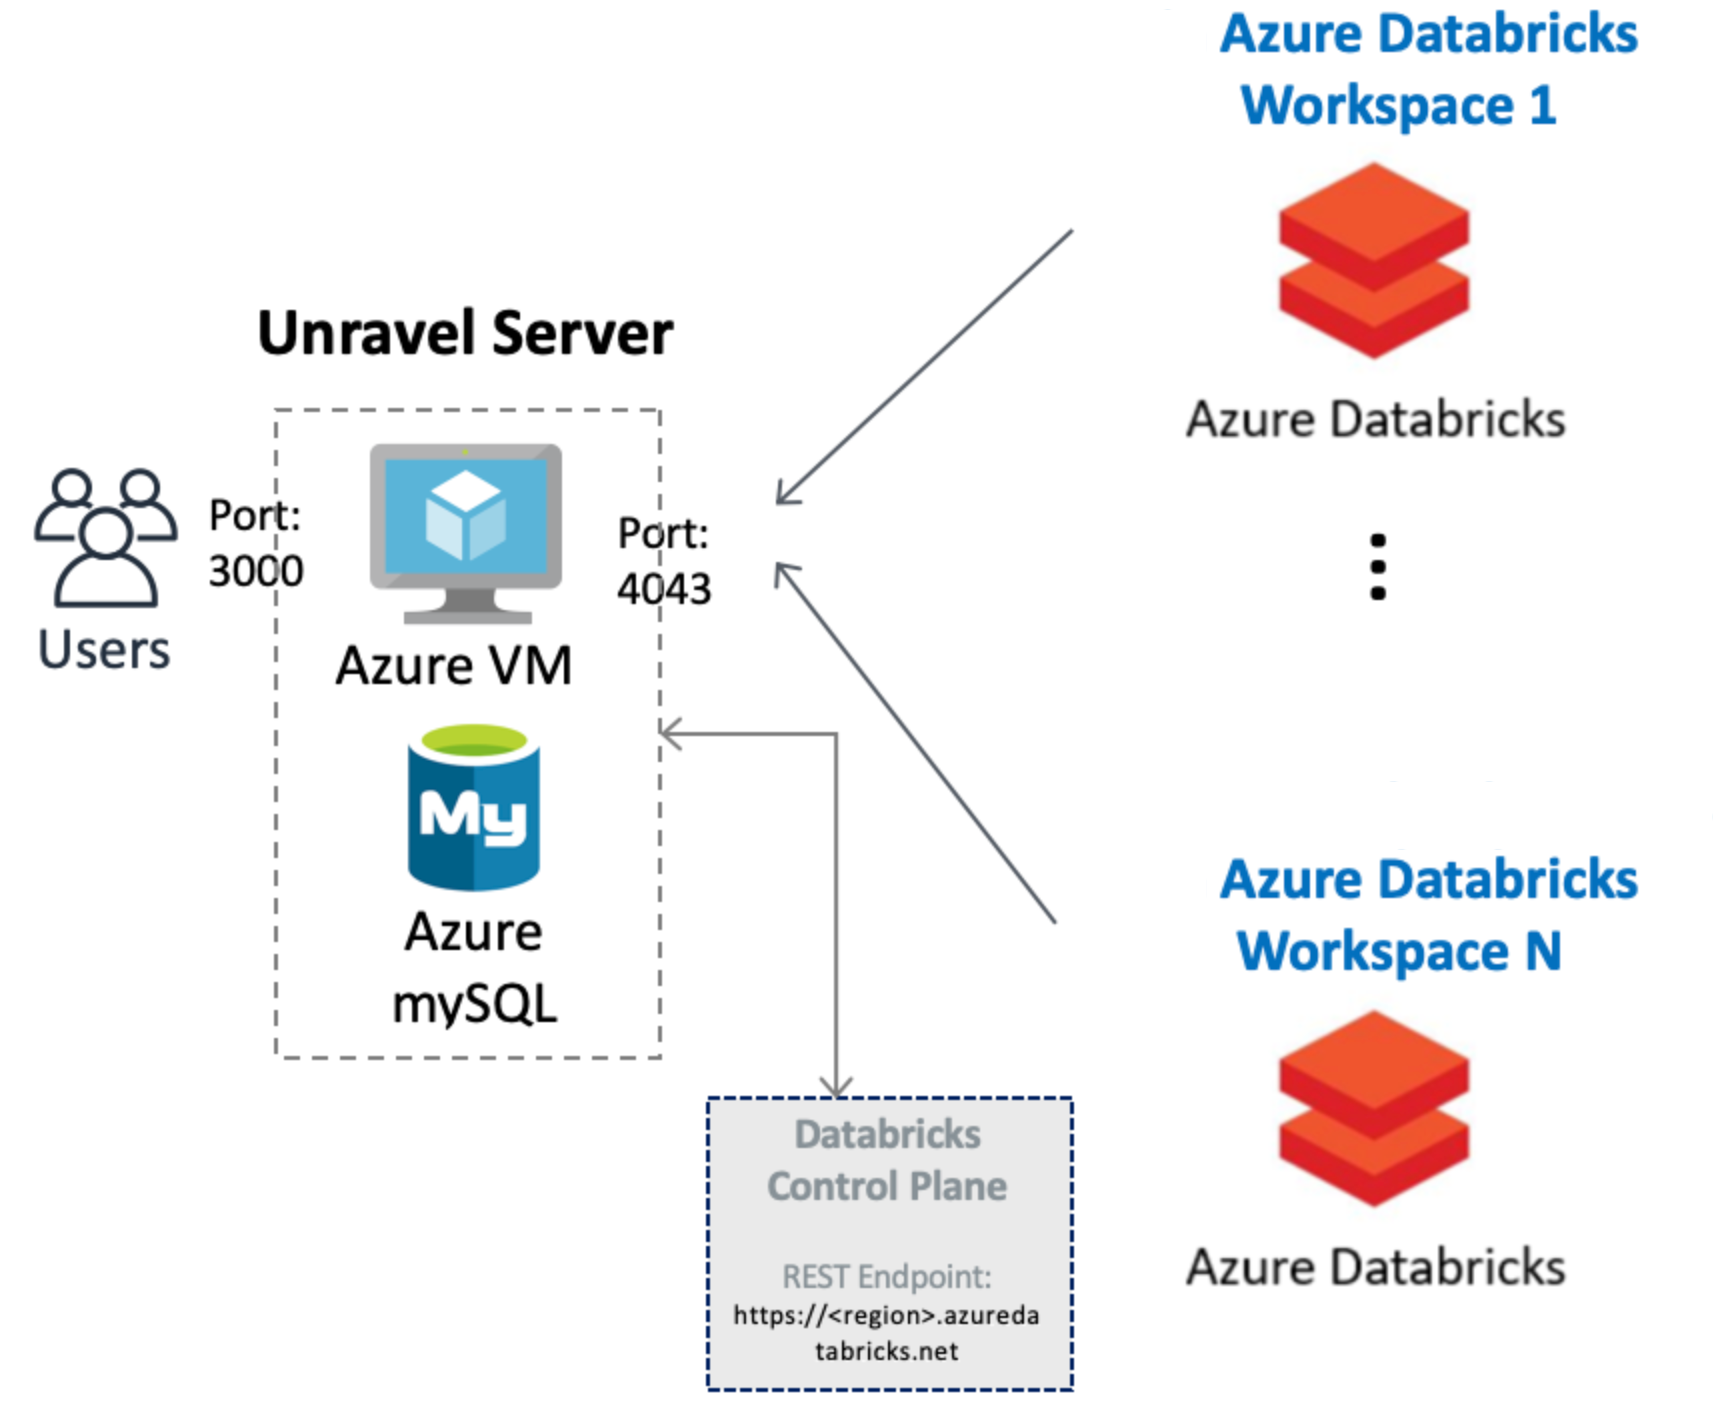
This topic helps you set up the below configuration
 |
We walk you through the following steps to get Unravel for Azure Databricks up and running via the Azure Marketplace.
 |
Background
Unravel for Azure can monitor your Azure VM Databricks Automated clusters with the following VNET peering options. Follow the options based upon your specific setup.
You must have the following ports open:
Important
Both ports are initially opened to public, you can restrict the access as needed.
Port 4043: Open to receive traffic from the workspaces so Unravel can monitor the Automated (Job) Clusters in your workspaces,
Port 3000 : Open for HTTP access in for access the Unravel UI.
Step 1: Launching and setting up Unravel Server
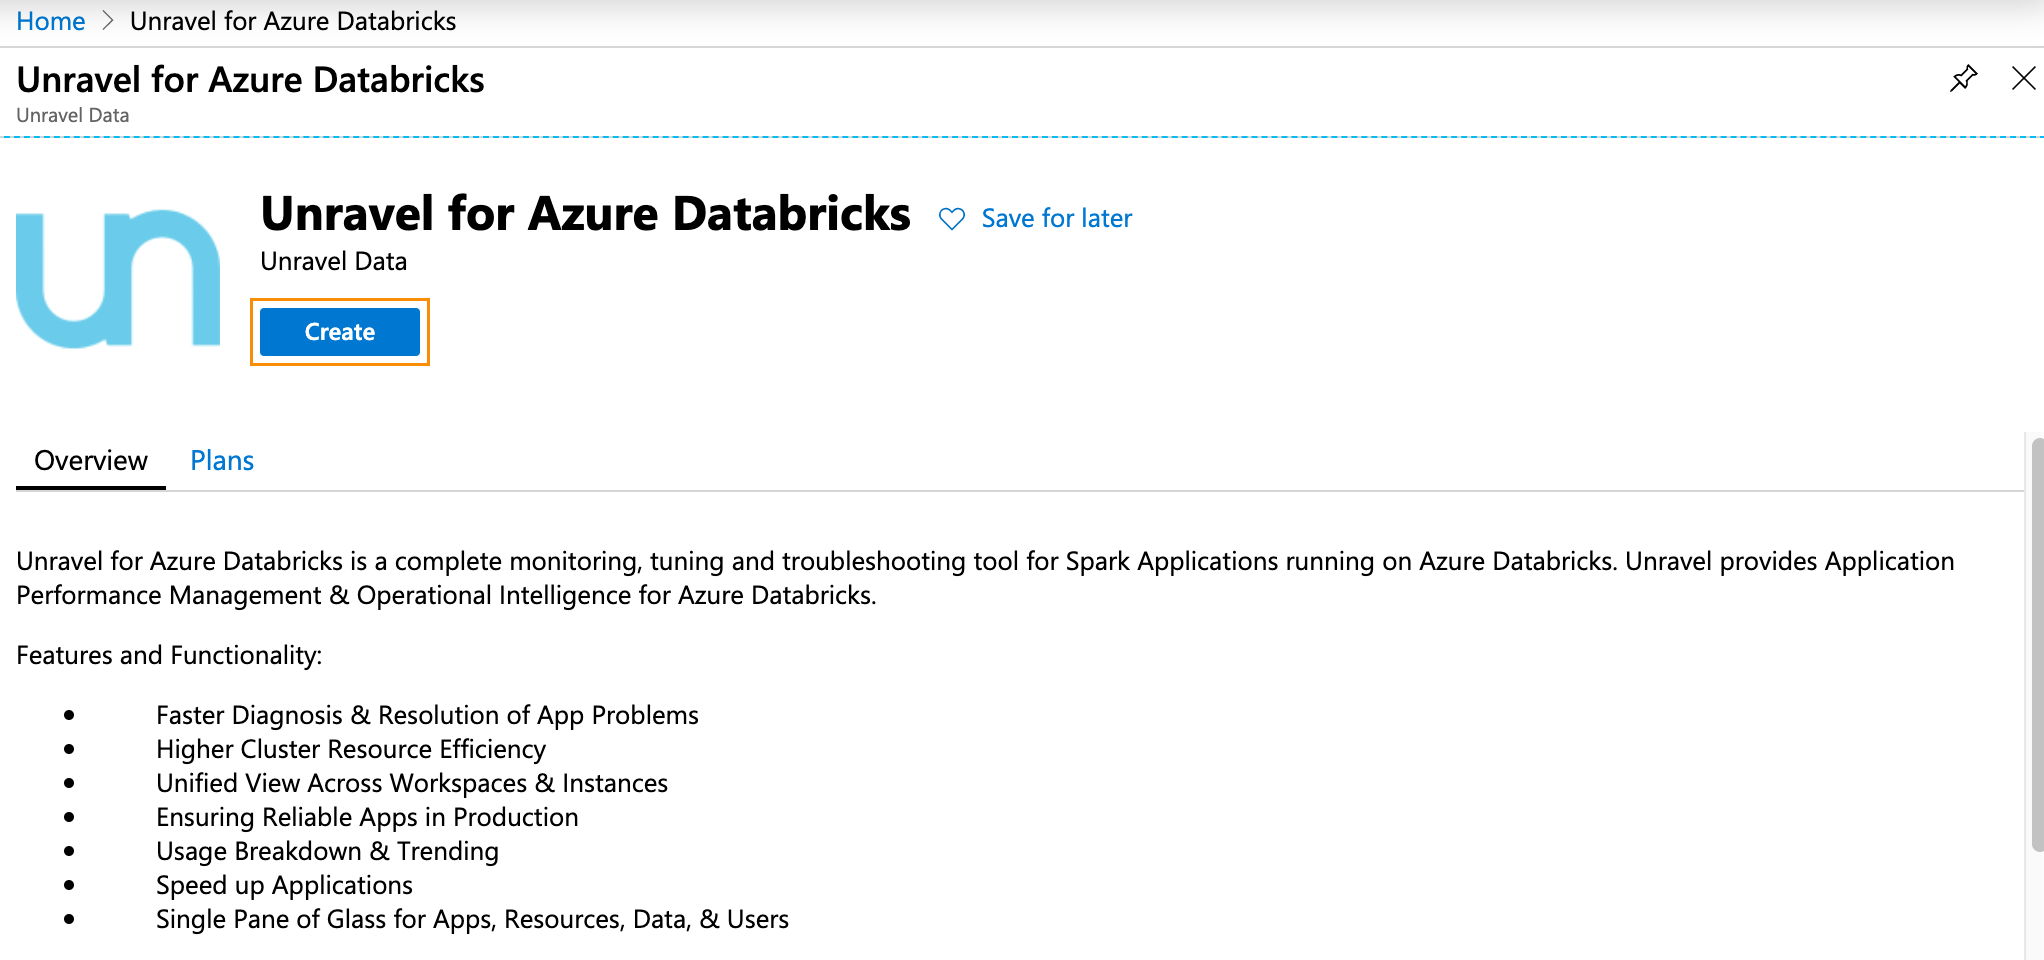
Search Unravel for Azure Databricks the Azure Marketplace.
In the Create this app in Azure modal click Continue. You are directed to the Azure portal.
In the portal click on Create to begin the Unravel Server setup.
In Home > Virtual Machine > Create step through the tabs completing the information. Be sure to keep your requirements and the background criteria in mind when completing the0 information.
In the Basics tab (default) enter the following.
Project Details
Subscription: Choose the applicable subscription.
Resource group: Create a new group or choose an existing one.
Instance Details
Region: Select the Azure region.
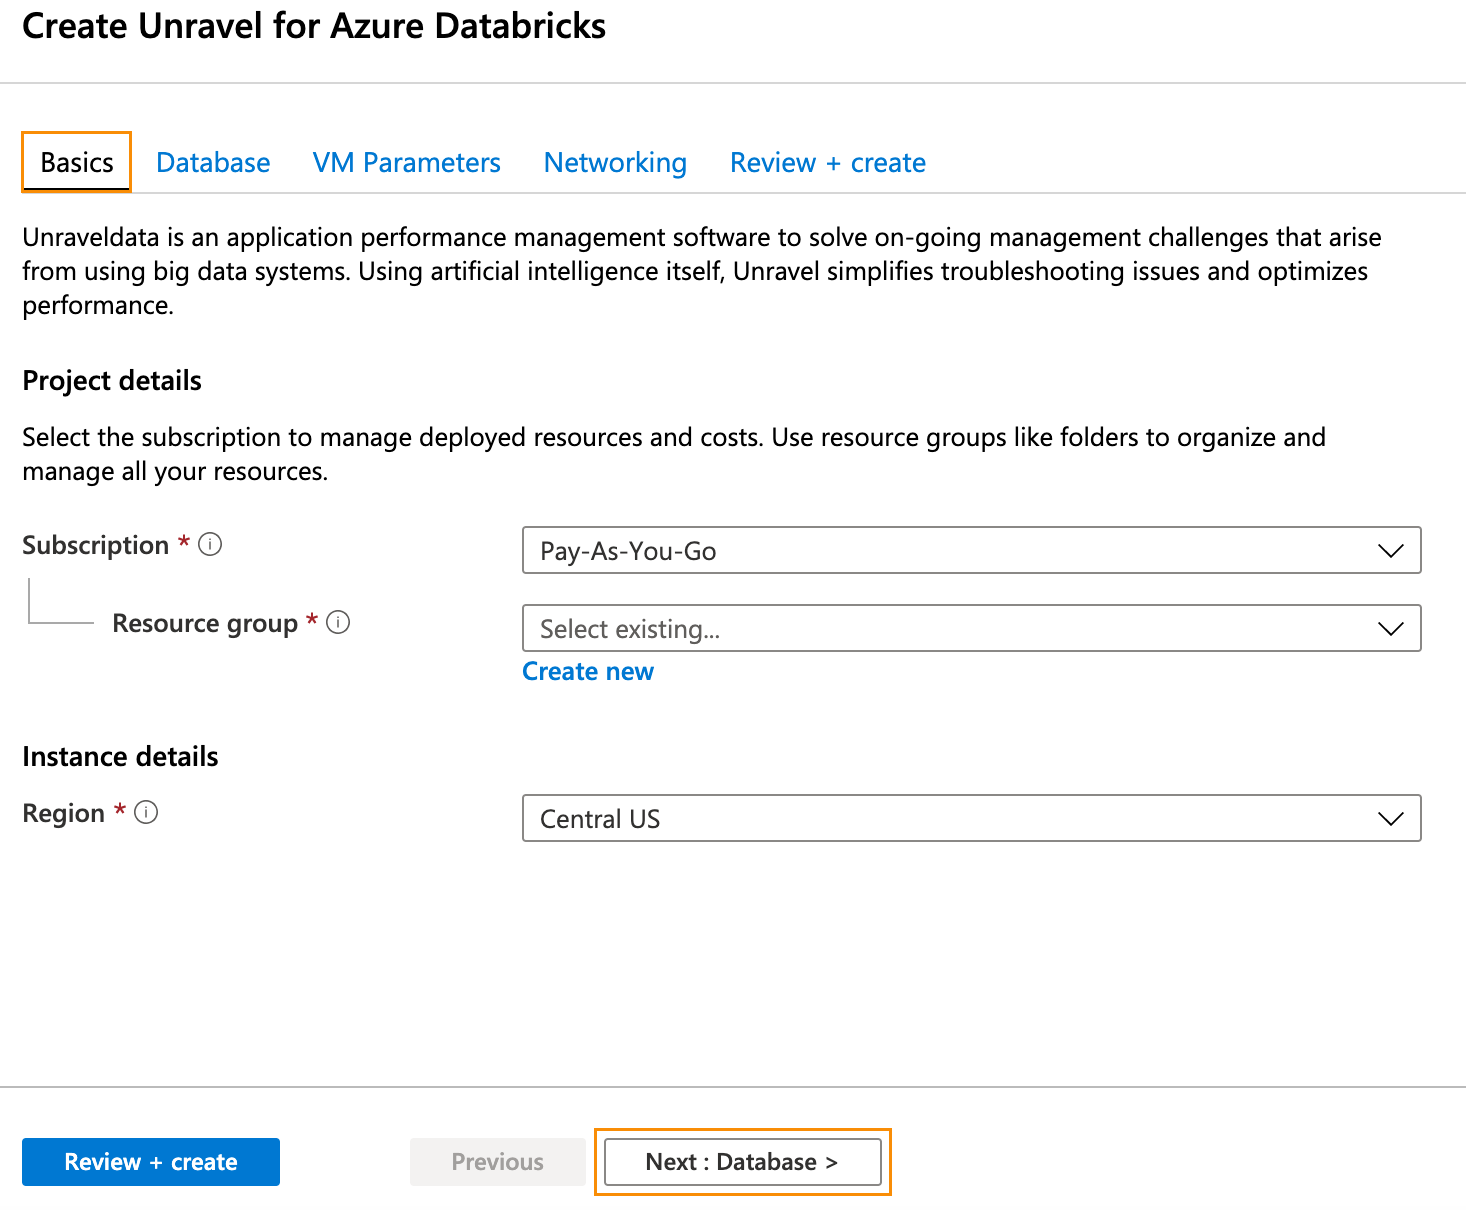
Click Next: Database > and complete the Database information. Click Next: VM Parameters >.
In the VM Parameters tab enter the following information.
Size: Click Change Size to select your desired size.
Admin Username: VM admin username.
Password: VM admin password.
Data Disk Size GB: Enter your disk size.
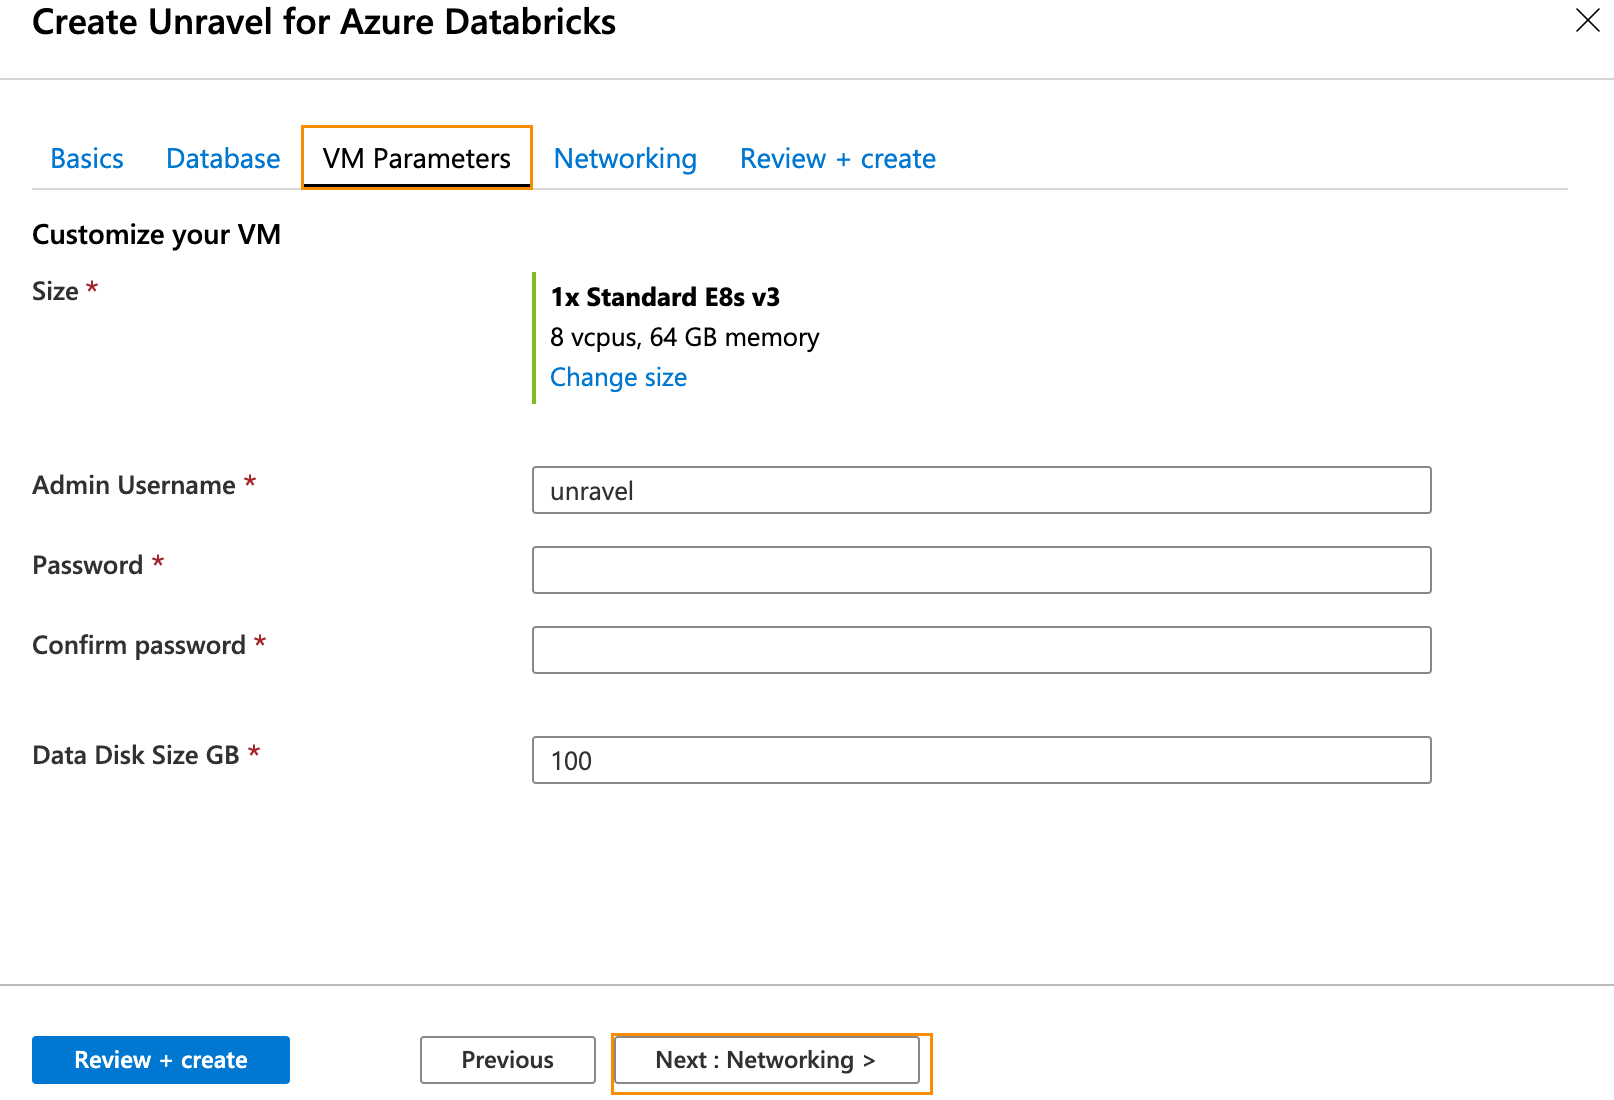
Click Next: Networking >. In the Networking tab enter the following information.
Public IP Address: Create an address or choose an existing one.
Attach Public IP to Unravel VM: Set to
true.
Important
If you set it to
falseensure you have a valid way to to connect to Unravel UI on port 3000.
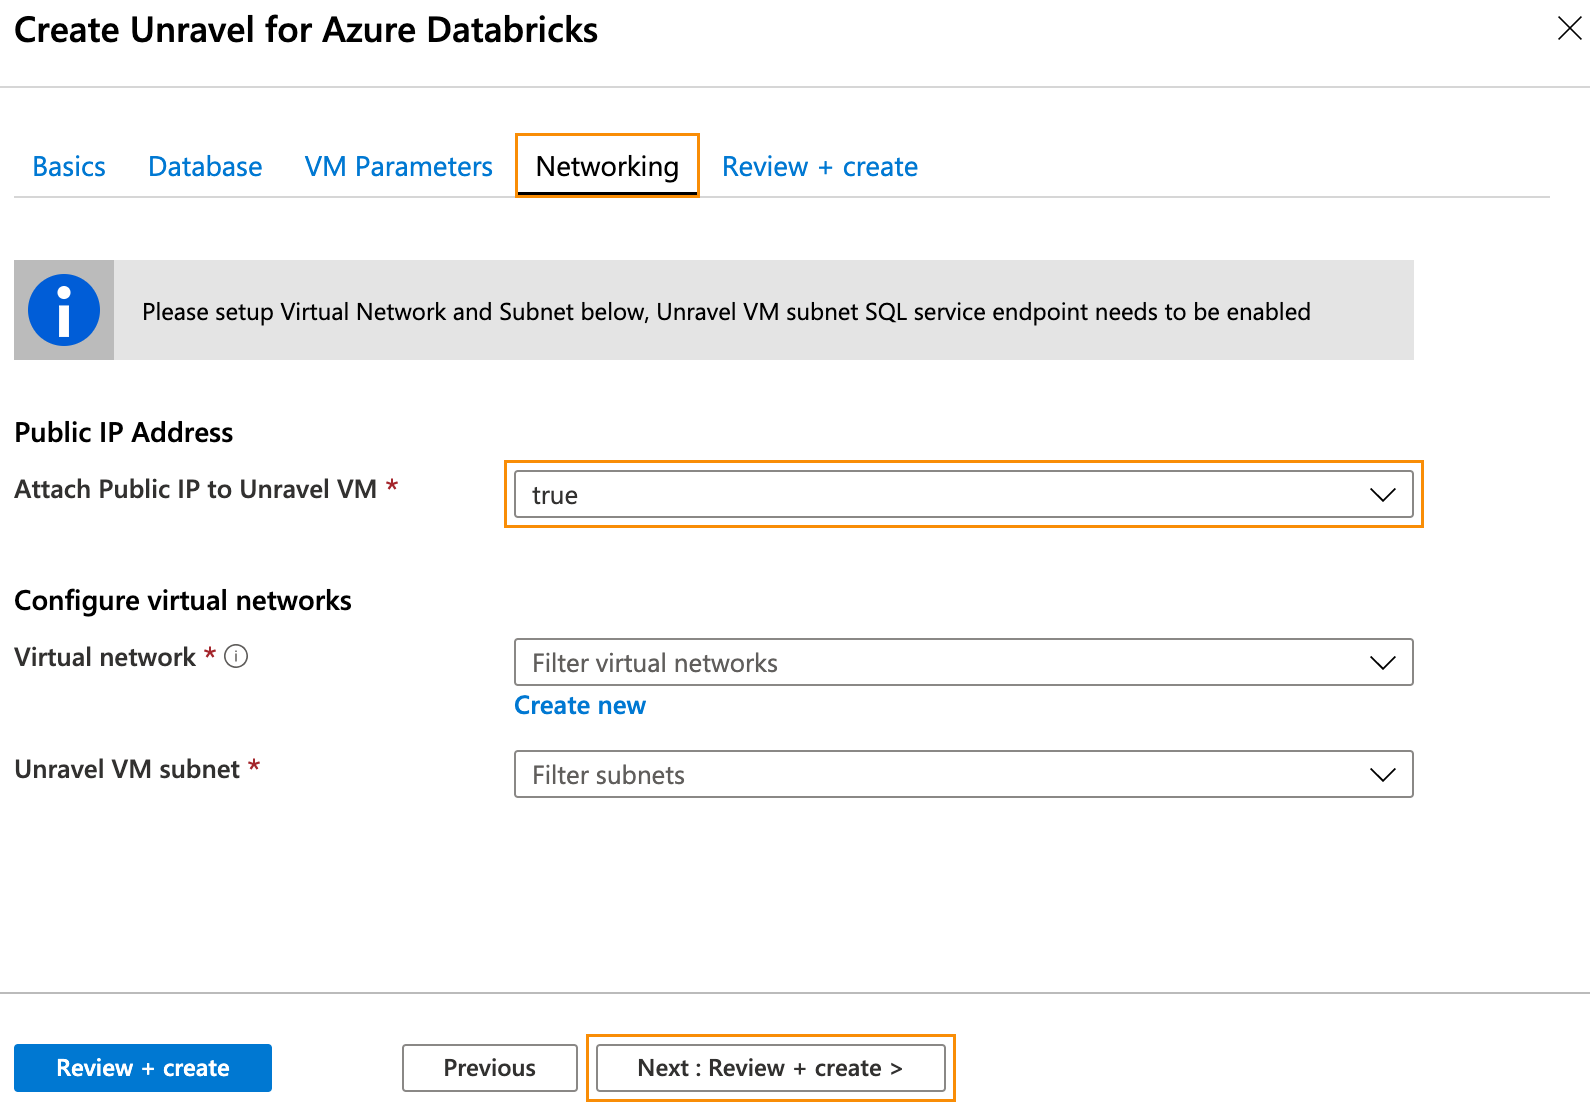
Click Next: Review + Create. After you have reviewed and verified your entries click Create for your deployment to be created. Note your resource group.
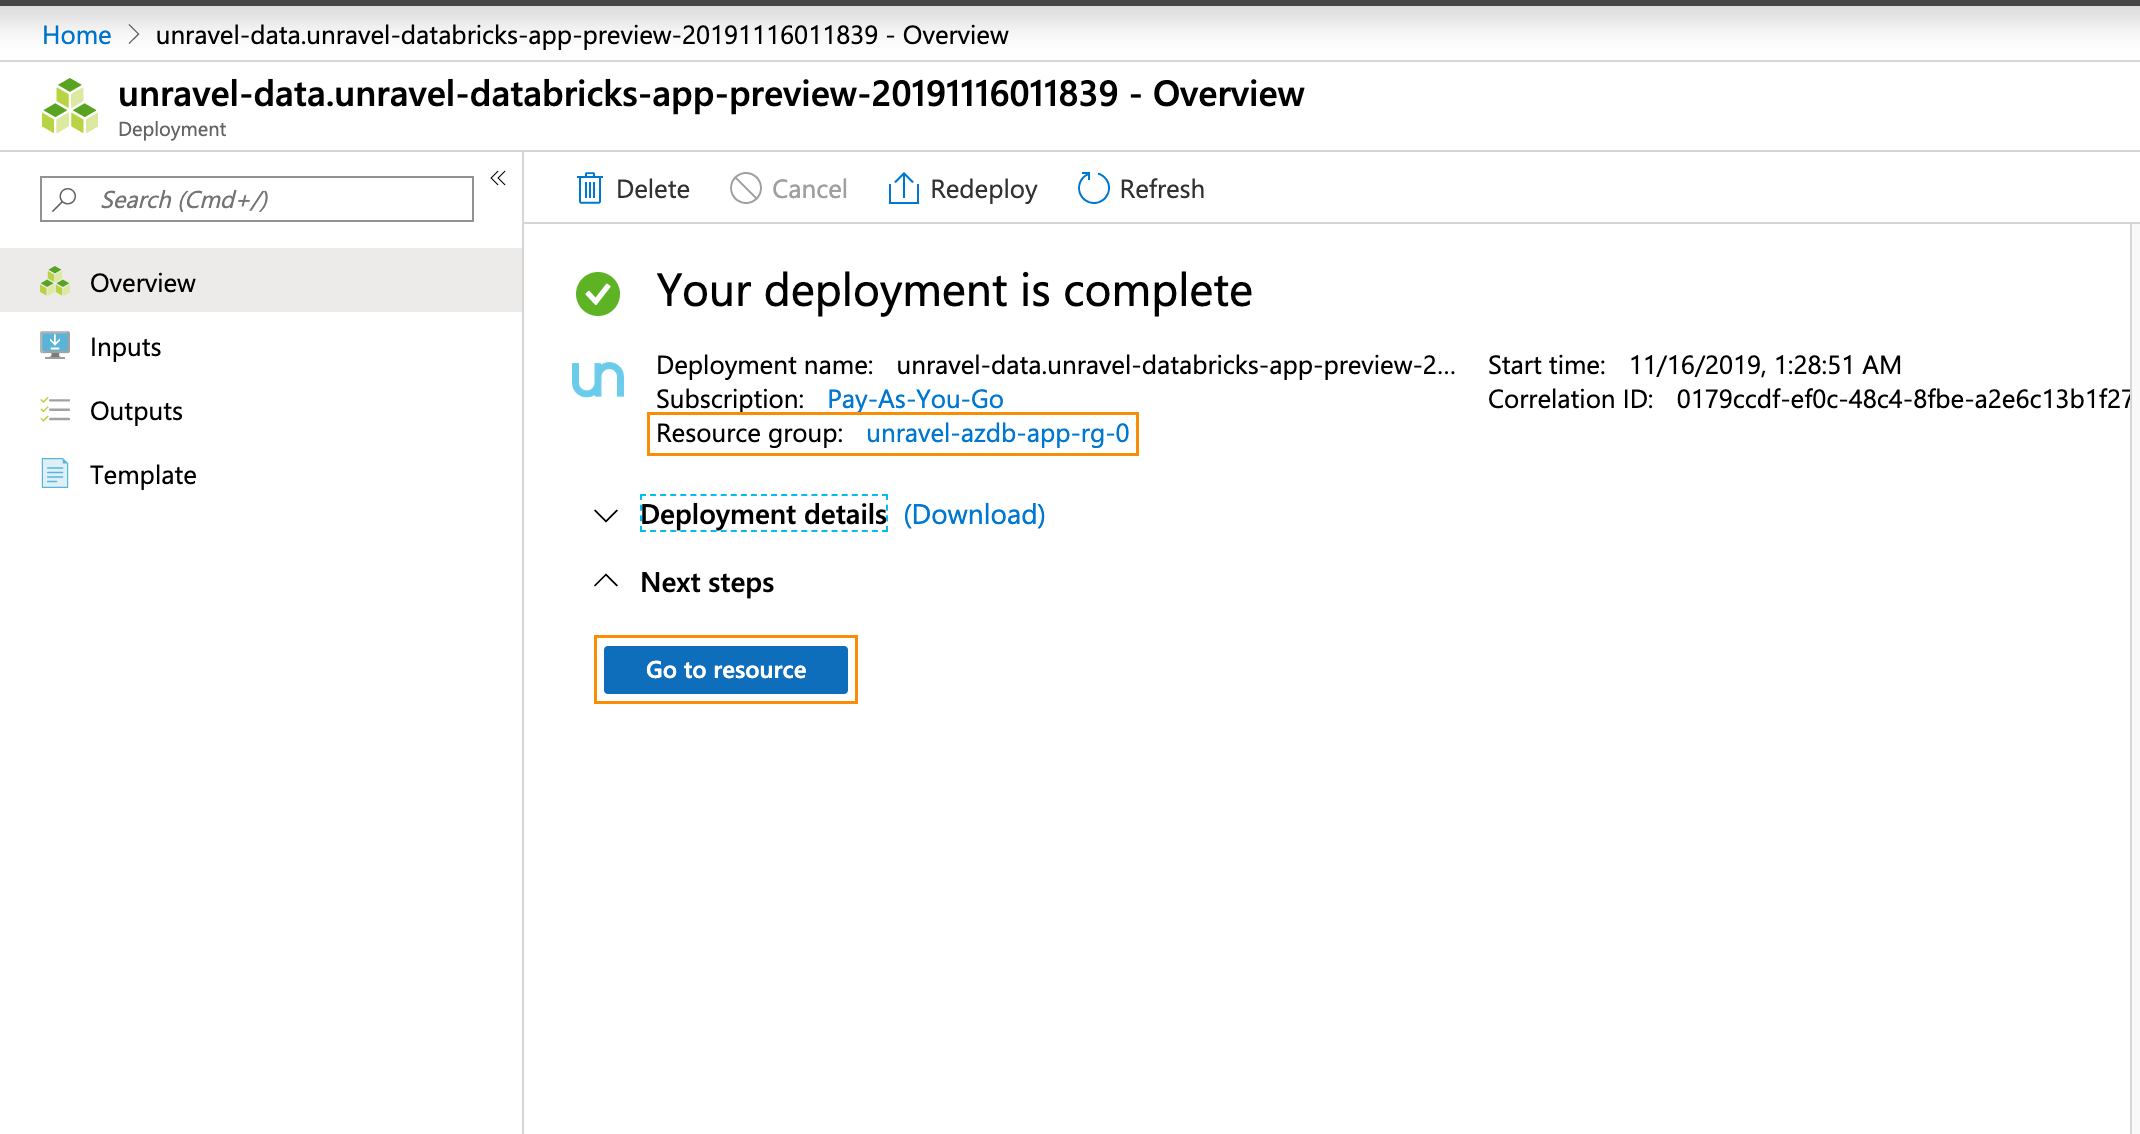
Click Go to Resource. Find the details of the Unravel VM. The name of this VM should start with
unravel-vm-databricks-.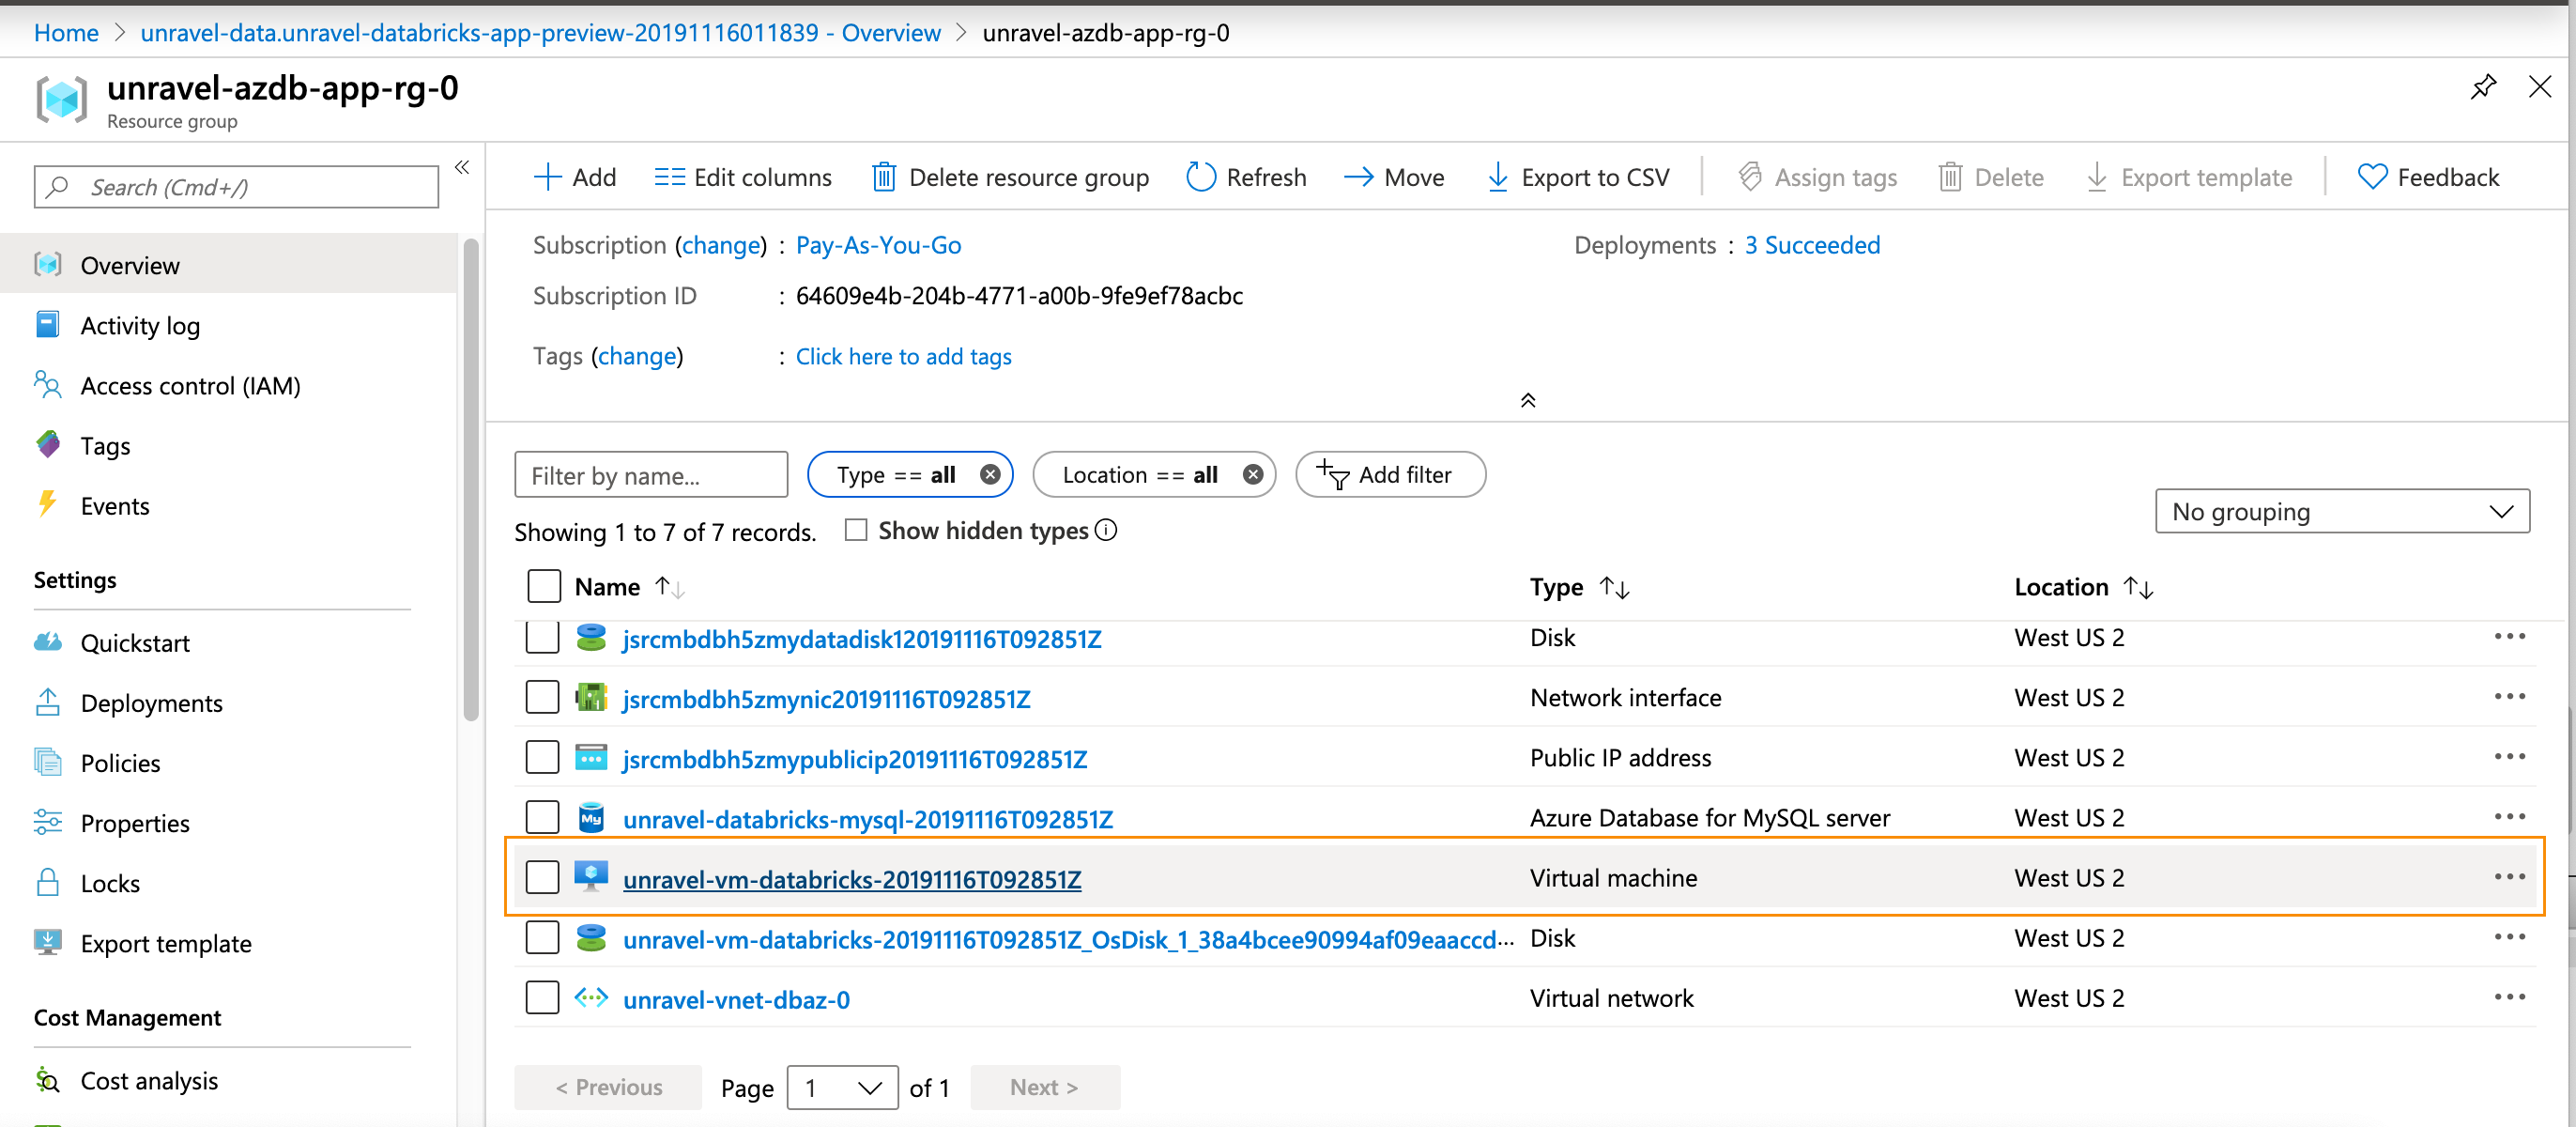
Click on the
VM nameto bring it up in the Azure portal.Notice
For the remainder of the configuration we assume you have attached a public IP address to the Unravel VM. If that is not the case, you can modify these instructions to suit your deployment.
Make a note of the Public and Private IP address.
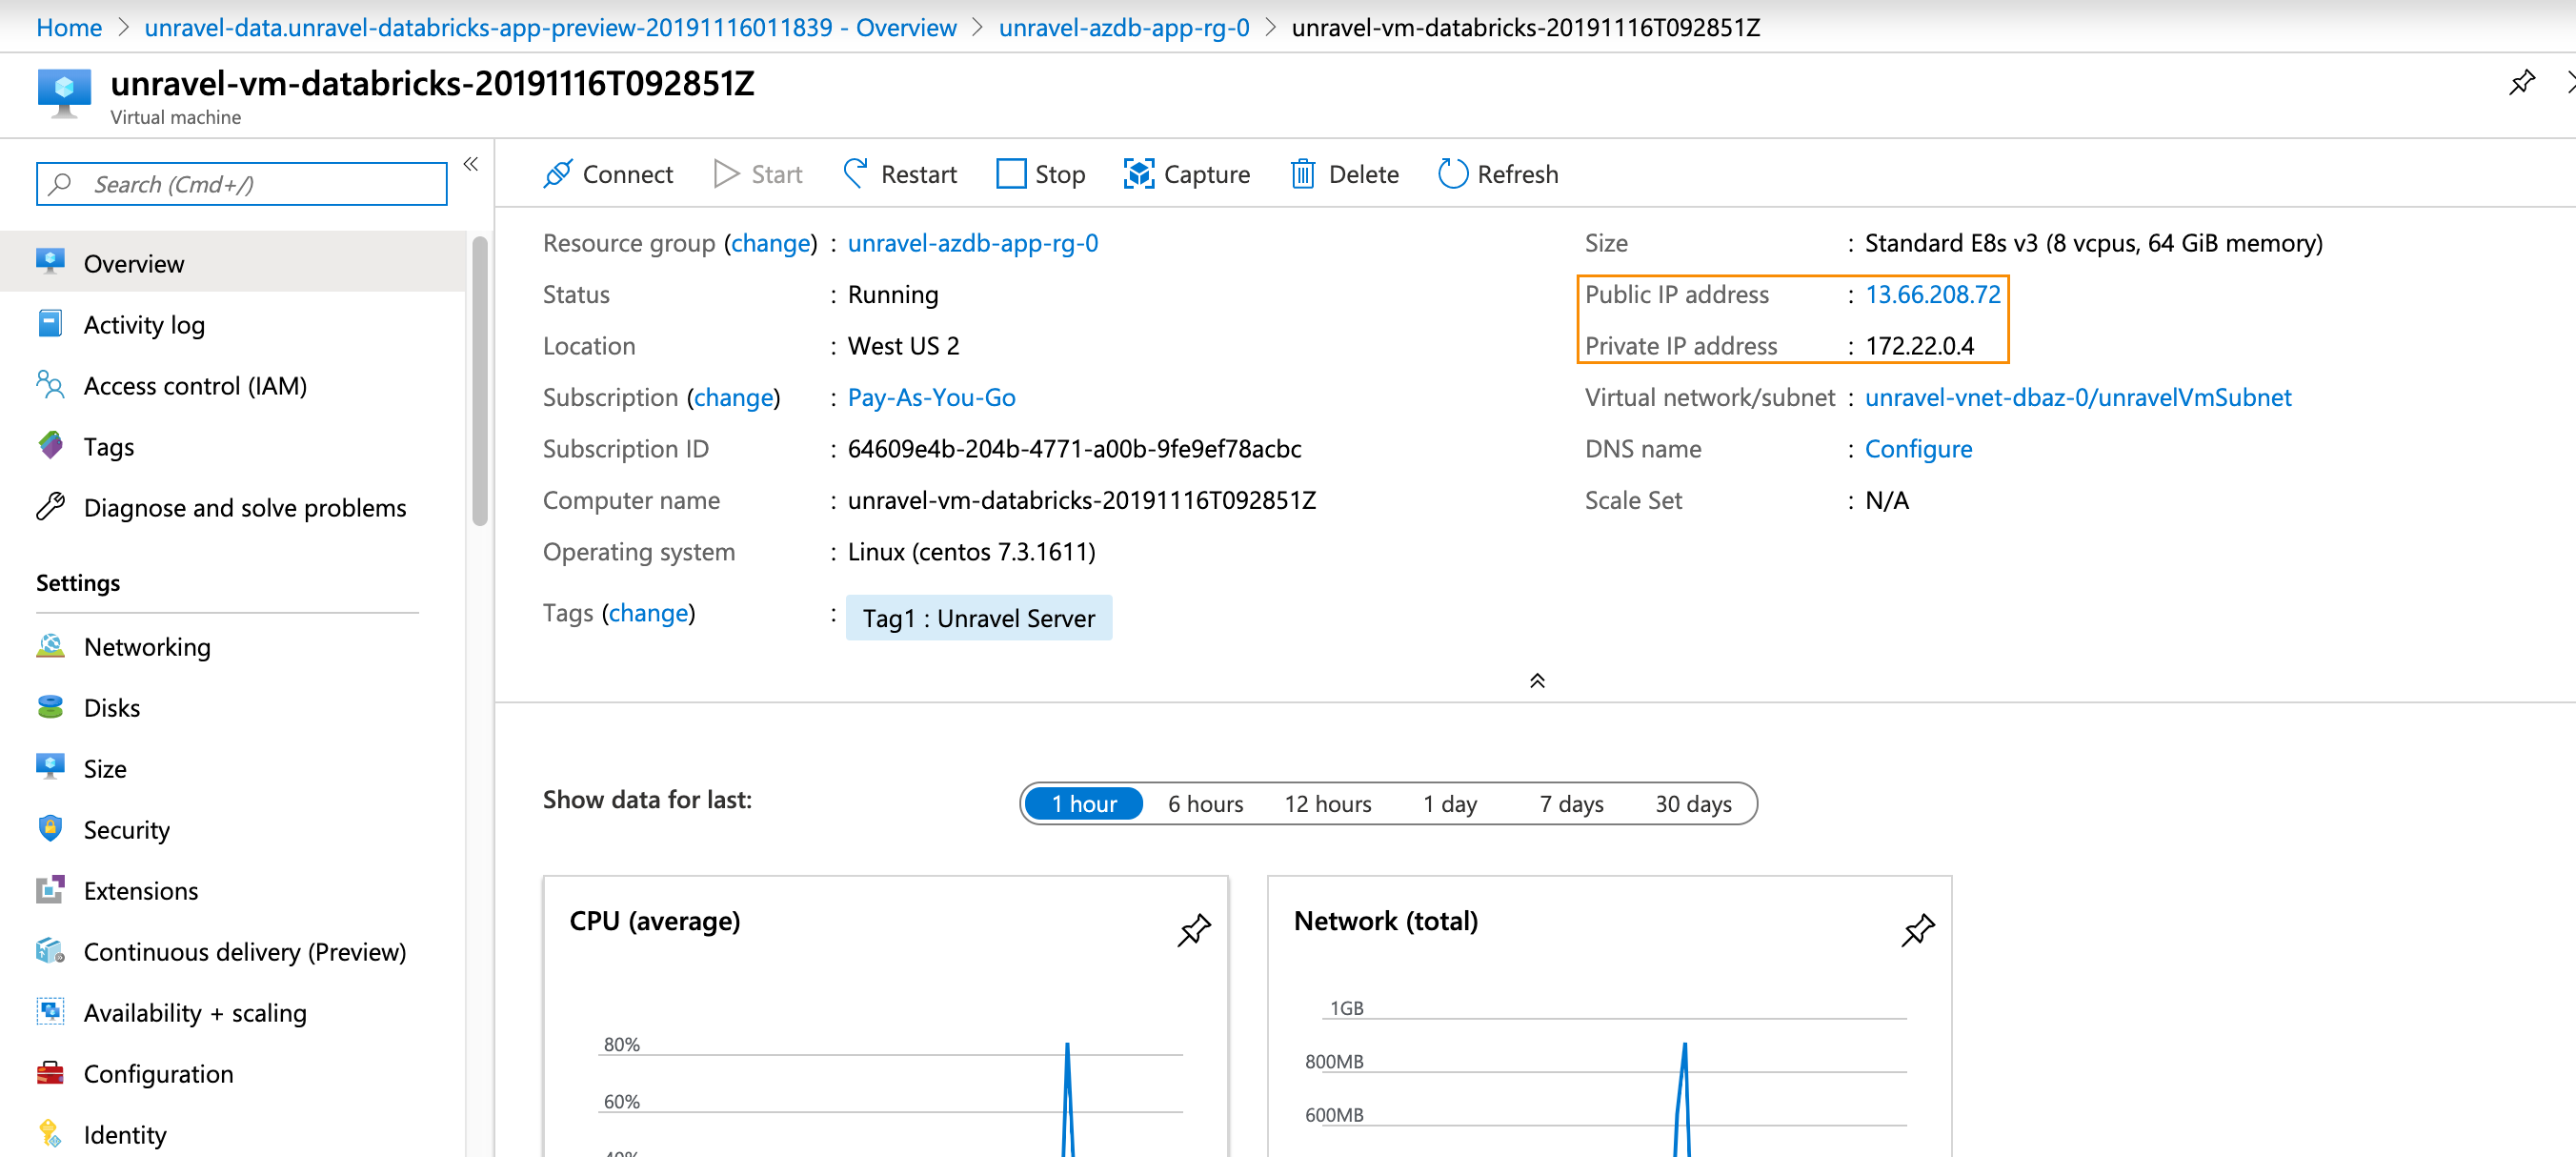
Log into the Unravel server via a web browser. Enter either http://
hostname or IP of the VM:3000. Log in using the Adminusernameandpasswordentered in the VM Parameters tab. There is no data displayed because you haven't yet configured Unravel to monitor your workspaces.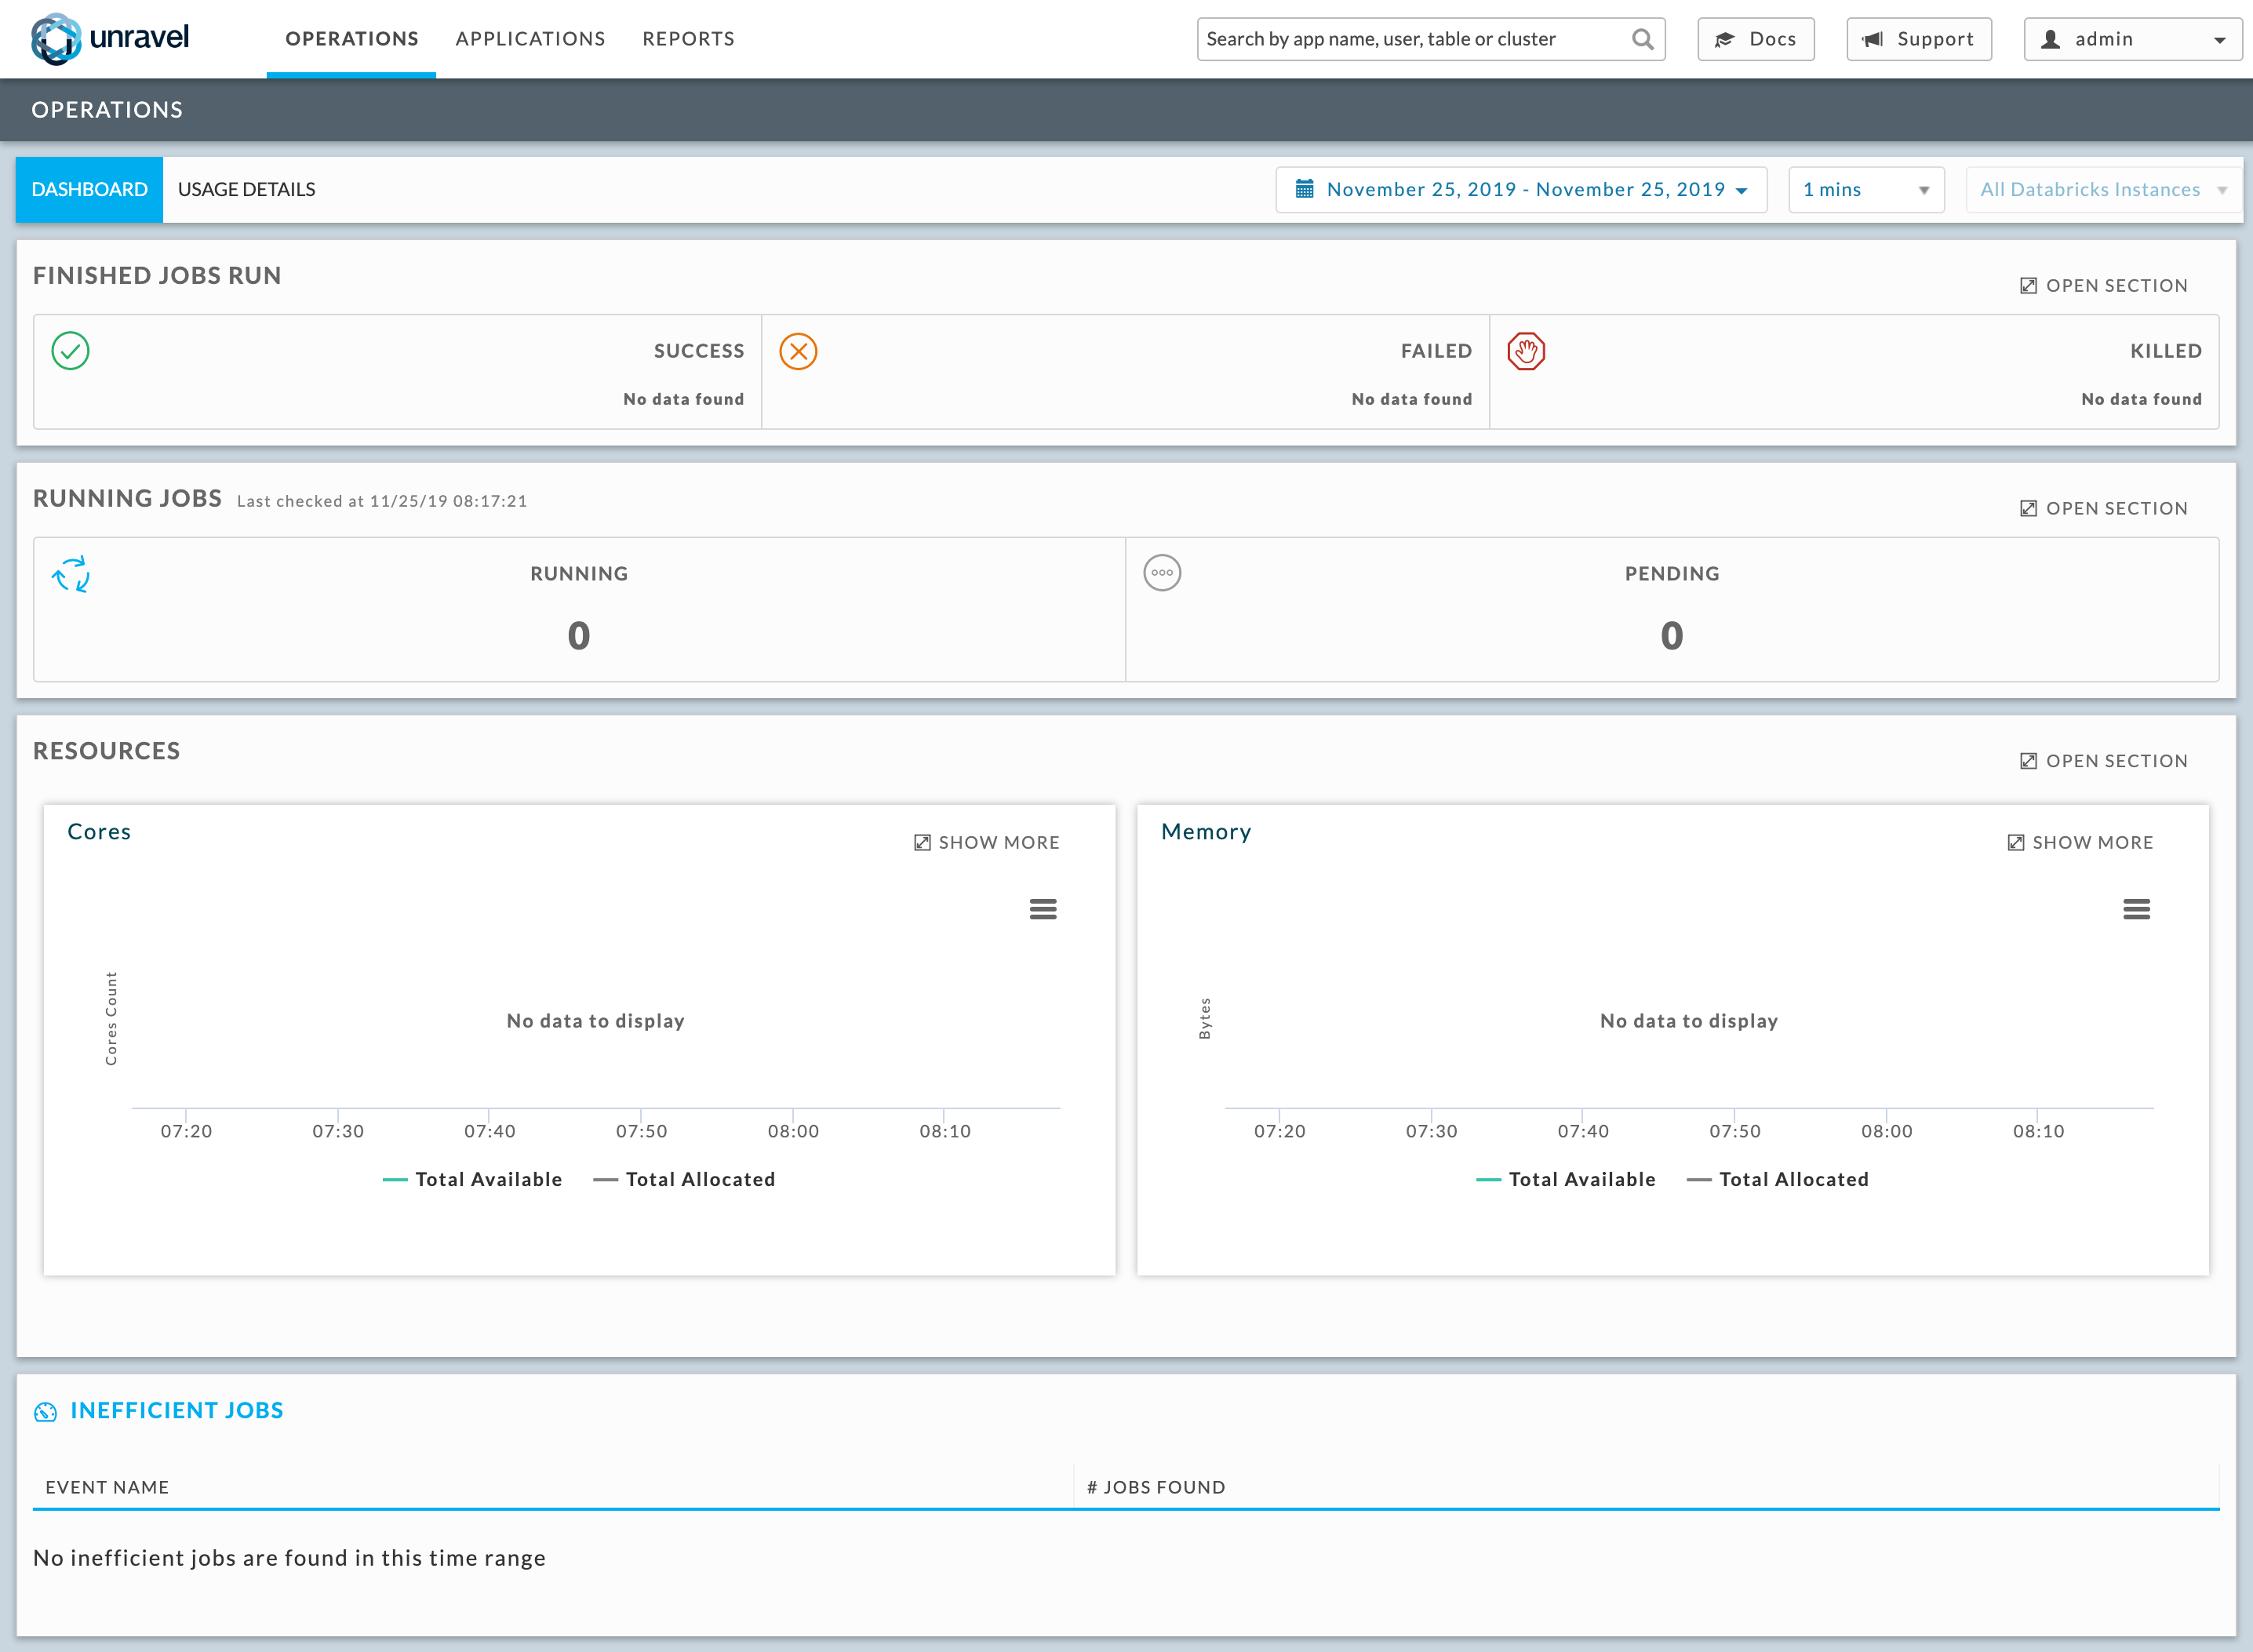
Step 2: Configure Unravel to monitor Azure Databricks workspaces
Install DBFS CLI.
sshto the Unravel VM and execute the following commands.yum install https://dl.fedoraproject.org/pub/epel/epel-release-latest-7.noarch.rpm sudo yum install python-pip sudo pip install databricks
Configure Unravel for Azure Databricks workspaces so Unravel can monitor your Automated (Job) clusters. You can configure multiple workspaces.
Navigate to Workspace > User Settings > Access Tokens and click Generate New Token. Leave the token lifespan as
unspecified, then the token lives indefinitely. Make note the token's value to use in the next step.Save the Unravel agent binaries, etc. in the Workspace and update the Unravel server’s configuration with yourworkspace details.
sshto the Unravel VM and run the following commands./usr/local/unravel/bin/databricks_setup.sh --add-workspace -i
Workspace id-nWorkspace name-tWorkspace token-s https://Workspace location.azuredatabricks.net -uUnravel VM Private IP address:4043
Restart Unravel.
service unravel_all.sh restart
Step 3: Configure Azure Databricks Automated (Job) clusters with Unravel
Unravel supports all Databricks task types that can be run via Automated (Job) clusters, specifically
spark-submit
Notebook
Jar
Python
You must configure Azure Databricks for each task type you want Unravel to monitor.
Important
You must complete step 1 and 2 for all task types. The remaining steps need to completed for the specific task types.
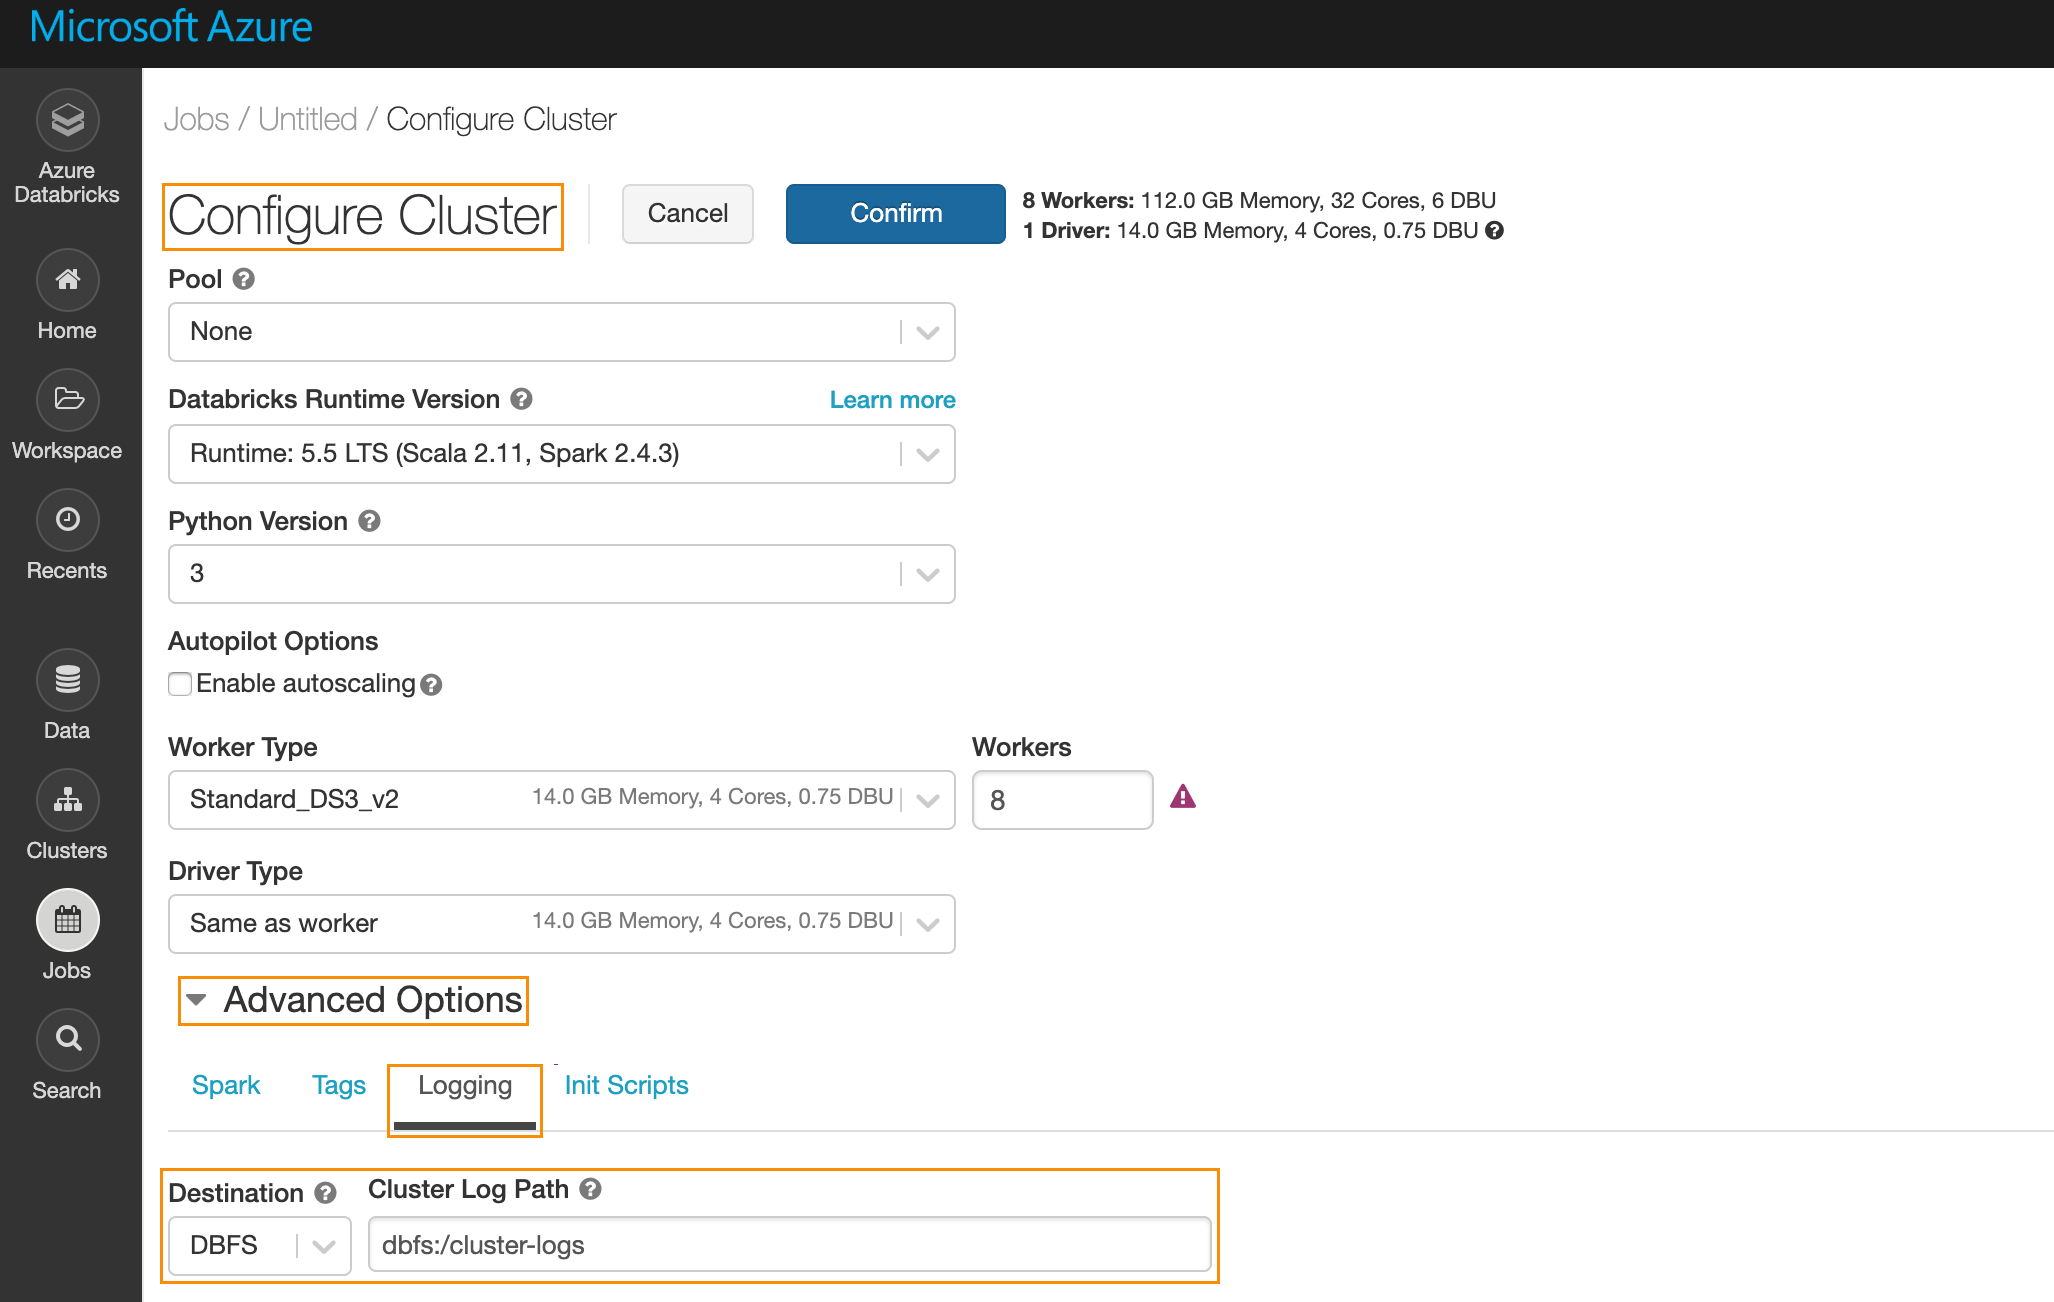
Specify the log path,
dbfs:/cluster-logs.UI
In the Azure portal navigate to Job > Configure Cluster. Under Advanced Options click Logging. Enter the following information.
Destination: Select
DBFS.CLuster Log Path: Enter
dbfs:/cluster-logs.
API
Using the
/api/2.0/jobs/createspecify the following in the request body.{ "new_cluster": { "cluster_log_conf": { "dbfs": { "destination": "dbfs:/cluster-logs" } } } }
Specify cluster init script.
UI
Under Advanced Options click Init Scripts enter the following information.
Type: Select
DBFS.Custer Log Path: Enter
dbfs:/databricks/unravel/unravel-db-sensor-archive/dbin/install-unravel.sh.
API
Using the
/api/2.0/jobs/createspecify the following in the request body.{ "new_cluster": { "init_script": [ { "dbfs": { "destination": ""dbfs:/databricks/unravel/unravel-db-sensor-archive/dbin/install-unravel.sh" } } ] } }
For Notebook and Jar task types add the following Spark Configuration:
UI
Under Advanced Options click Spark then Spark Config and enter the following:
spark.executor.extraJavaOptions -Dcom.unraveldata.client.rest.request.timeout.ms=1000 -Dcom.unraveldata.client.rest.conn.timeout.ms=1000 -javaagent:/dbfs/databricks/unravel/unravel-agent-pack-bin/btrace-agent.jar=config=executor,libs=spark-2.3
spark.driver.extraJavaOptions -Dcom.unraveldata.client.rest.request.timeout.ms=1000 -Dcom.unraveldata.client.rest.conn.timeout.ms=1000 -javaagent:/dbfs/databricks/unravel/unravel-agent-pack-bin/btrace-agent.jar=config=driver,script=StreamingProbe.btclass,libs=spark-2.3
spark.eventLog.enabled true
spark.eventLog.dir dbfs:/databricks/unravel/eventLogs/
spark.unravel.server.hostport Unravel VM Private IP Address:4043
spark.unravel.shutdown.delay.ms 300
API
Using
/api/2.0/jobs/createand specify the following in the request body.{ "new_cluster": { "spark_conf": { "spark.executor.extraJavaOptions": "-Dcom.unraveldata.client.rest.request.timeout.ms=1000 -Dcom.unraveldata.client.rest.conn.timeout.ms=1000 -javaagent:/dbfs/databricks/unravel/unravel-agent-pack-bin/btrace-agent.jar=config=executor,libs=spark-2.3", "spark.eventLog.enabled": "true", "spark.databricks.delta.preview.enabled": "true", "spark.unravel.server.hostport": "Unravel VM Private IP Address>:4043", "spark.driver.extraJavaOptions": "-Dcom.unraveldata.client.rest.request.timeout.ms=1000 -Dcom.unraveldata.client.rest.conn.timeout.ms=1000 -javaagent:/dbfs/databricks/unravel/unravel-agent-pack-bin/btrace-agent.jar=config=driver,script=StreamingProbe.btclass,libs=spark-2.3", "spark.eventLog.dir": "dbfs:/databricks/unravel/eventLogs/", "spark.unravel.shutdown.delay.ms": "300" }, } }
For spark-submit task types add the following Spark Configuration.
UI
Under Advanced Options click Spark then Spark Config Configure spark-submit. Add the following along with the rest of the task parameters:
"--conf", "spark.executor.extraJavaOptions=-Dcom.unraveldata.client.rest.ssl.enabled=true -Dcom.unraveldata.ssl.insecure=true -Dcom.unraveldata.client.rest.request.timeout.ms=1000 -Dcom.unraveldata.client.rest.conn.timeout.ms=1000 -javaagent:/dbfs/databricks/unravel/unravel-agent-pack-bin/btrace-agent.jar=config=executor,libs=spark-2.3", "--conf", "spark.eventLog.enabled=true", "--conf", "spark.unravel.server.hostport=
Unravel VM Private IP Address:4043", "--conf", "spark.driver.extraJavaOptions=-Dcom.unraveldata.client.rest.ssl.enabled=true -Dcom.unraveldata.ssl.insecure=true -Dcom.unraveldata.client.rest.request.timeout.ms=1000 -Dcom.unraveldata.client.rest.conn.timeout.ms=1000 -javaagent:/dbfs/databricks/unravel/unravel-agent-pack-bin/btrace-agent.jar=config=driver,libs=spark-2.3", "--conf", "spark.eventLog.dir=dbfs:/databricks/unravel/eventLogs/", "--conf", "spark.unravel.shutdown.delay.ms=300""--conf", "spark.executor.extraJavaOptions=-Dcom.unraveldata.client.rest.ssl.enabled=true -Dcom.unraveldata.ssl.insecure=true -Dcom.unraveldata.client.rest.request.timeout.ms=1000 -Dcom.unraveldata.client.rest.conn.timeout.ms=1000 -javaagent:/dbfs/databricks/unravel/unravel-agent-pack-bin/btrace-agent.jar=config=executor,libs=spark-2.3", "--conf", "spark.eventLog.enabled=true", "--conf", "spark.unravel.server.hostport=
Unravel VM Private IP Address:4043", "--conf", "spark.driver.extraJavaOptions=-Dcom.unraveldata.client.rest.ssl.enabled=true -Dcom.unraveldata.ssl.insecure=true -Dcom.unraveldata.client.rest.request.timeout.ms=1000 -Dcom.unraveldata.client.rest.conn.timeout.ms=1000 -javaagent:/dbfs/databricks/unravel/unravel-agent-pack-bin/btrace-agent.jar=config=driver,libs=spark-2.3", "--conf", "spark.eventLog.dir=dbfs:/databricks/unravel/eventLogs/", "--conf", "spark.unravel.shutdown.delay.ms=300"API
Using
/api/2.0/jobs/createand specify the following in the request body.{ "spark_submit_task": { "parameters": [ "--conf", "spark.executor.extraJavaOptions= -Dcom.unraveldata.client.rest.ssl.enabled=true -Dcom.unraveldata.ssl.insecure=true -Dcom.unraveldata.client.rest.request.timeout.ms=1000 -Dcom.unraveldata.client.rest.conn.timeout.ms=1000 -javaagent:/dbfs/databricks/unravel/unravel-agent-pack-bin/btrace-agent.jar=config=executor,libs=spark-2.3", "--conf", "spark.eventLog.enabled=true", "--conf", "spark.unravel.server.hostport=hostname or IP of the VM:4043", "--conf", "spark.driver.extraJavaOptions=-Dcom.unraveldata.client.rest.ssl.enabled=true -Dcom.unraveldata.ssl.insecure=true -Dcom.unraveldata.client.rest.request.timeout.ms=1000 -Dcom.unraveldata.client.rest.conn.timeout.ms=1000 -javaagent:/dbfs/databricks/unravel/unravel-agent-pack-bin/btrace-agent.jar=config=driver,libs=spark-2.3", "--conf", "spark.eventLog.dir=dbfs:/databricks/unravel/eventLogs/", "--conf", "spark.unravel.shutdown.delay.ms=300", ] } }
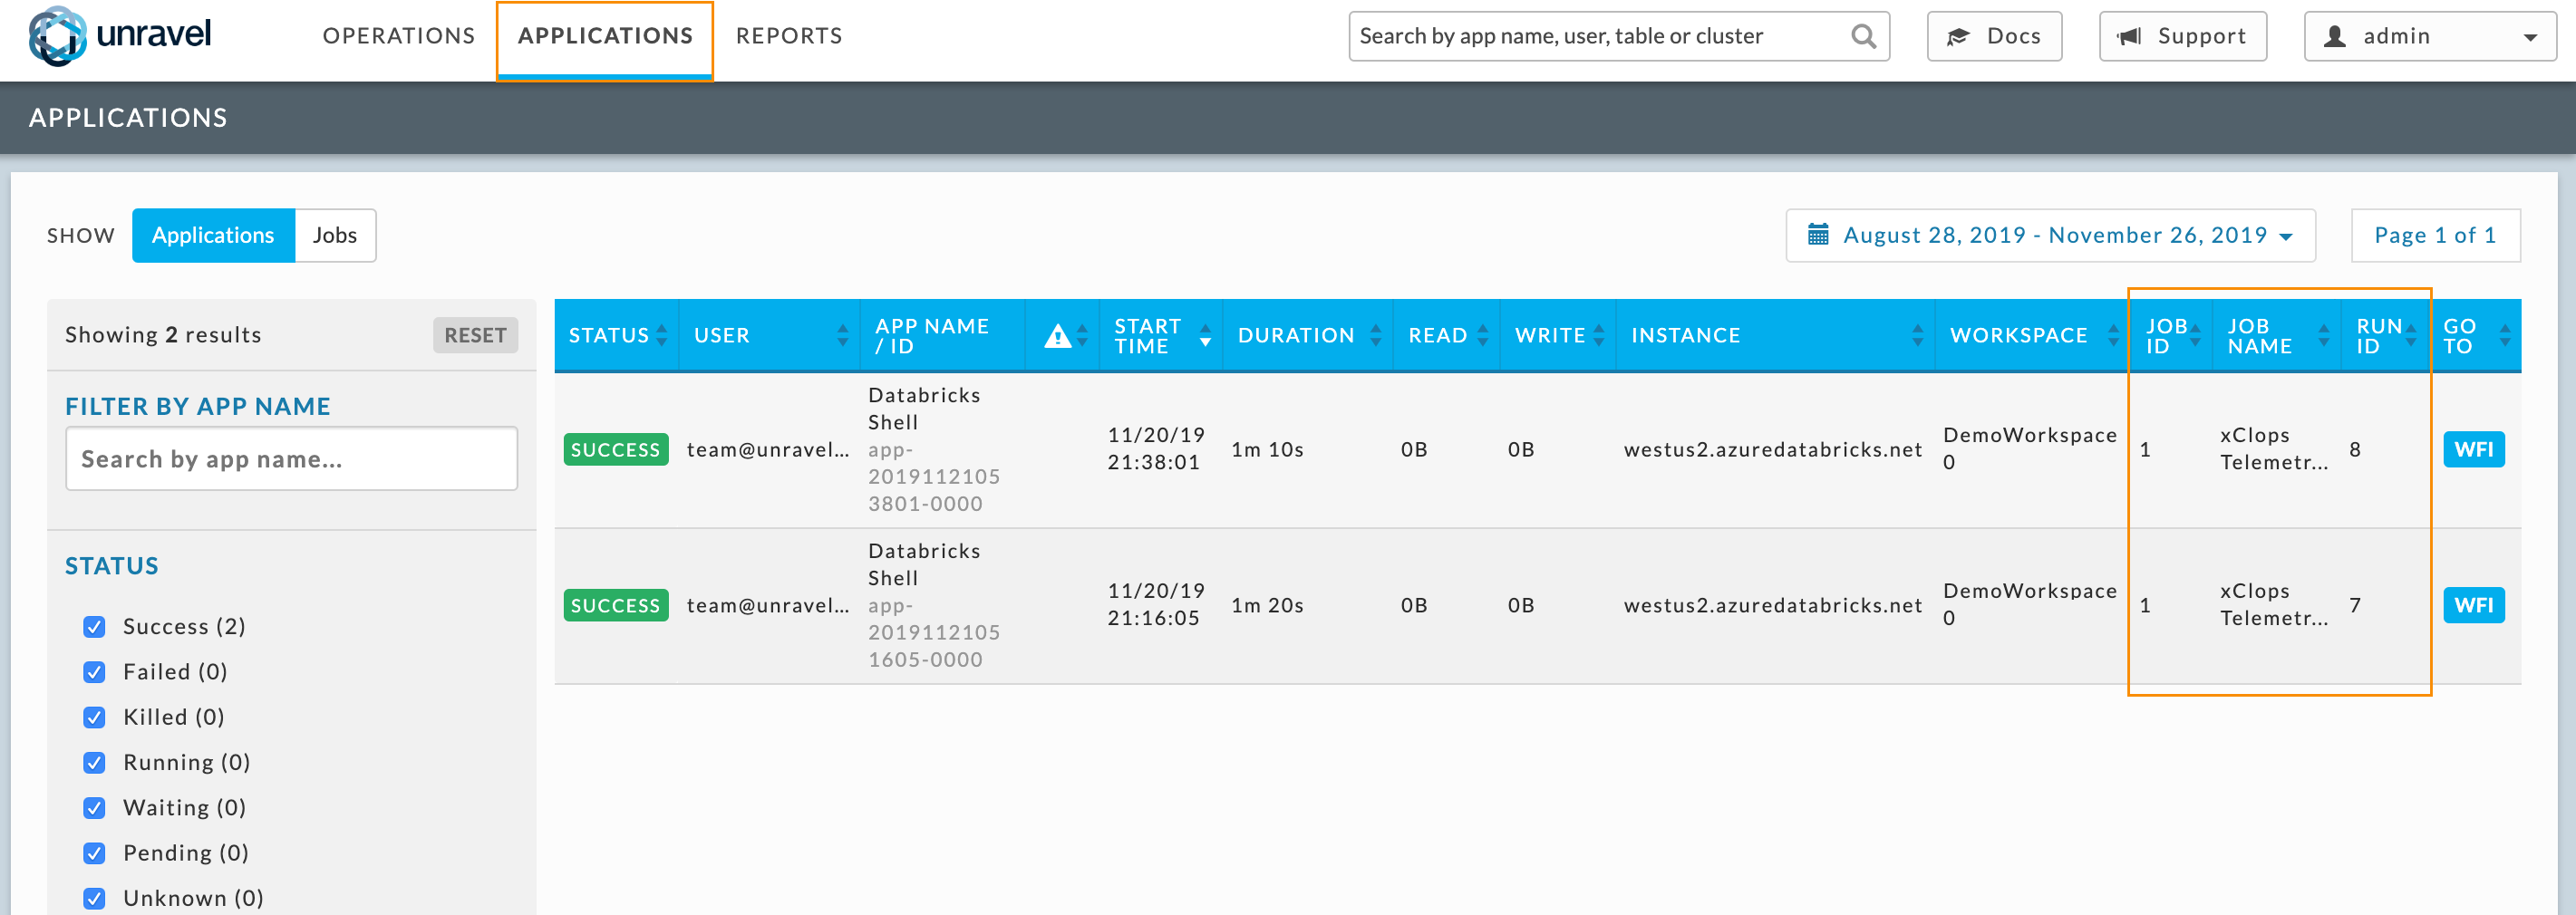
Step 4: To see the Unravel Server with your Automated (Job) clusters connected go the Unravel UI.
After you have configured a job with Unravel (Step 3 ), the corresponding job run is listed in the Unravel UI. Log into the Unravel server via a web browser. Enter either http:// hostname or IP of the VM:3000. Log in using the Admin username and password entered in the VM Parameters tab .
See the Unravel for Azure Databricks – User Guide to learn more about using Unravel for Azure Databricks.