AutoActions (Databricks)
The AutoActions automate the monitoring of your compute cluster by allowing you to define complex, actionable policies for different cluster metrics. You can set the AutoAction policy to generate alerts for Databricks clusters and the job runs that exceed the cost and duration threshold.
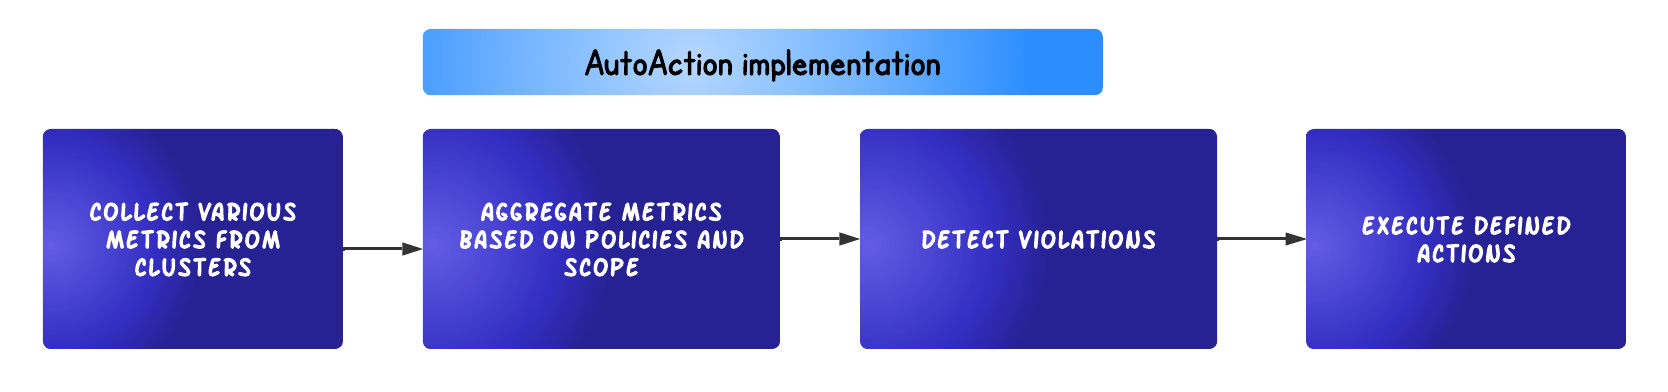
The Unravel server collects various metrics from clusters, which are aggregated based on the defined AutoAction policies and scope. Violations are detected based on the trigger conditions, and accordingly, set actions are executed.
Note
Alerts are triggered at runtime for both jobs and interactive clusters, which means that you can perform live monitoring on estimated cost not just when the job is finished but also when the job is in running status.
Each AutoAction policy consists of the following:
Trigger Conditions are the settings that determine when an AutoAction is violated, for example, jobs running for more than X hours or clusters costing more than $X.
Scope Define refinements to various scopes. For example, the app is owned by User X and on workspace Y.
Actions Define the automated actions when user-defined trigger conditions are met. For example, email User X when the trigger conditions are met.
Creating AutoActions
On the Unravel UI, click the AutoActions tab.
On the AutoActions page, in the upper-right corner, click
 .
.On the New AutoAction window, select any of the following templates:
Tip
Templates are policies that you define to trigger an alert.
Specify the following details:
Item
Description
Policy Name
Specify a policy name that reflects the purpose of the AutoAction policy.
Description
(Optional)
Describe the policy.
Active
Select the checkbox to activate the policy after you create a new AutoAction. It is not mandatory to activate a policy during creation.
Trigger Conditions
Specify when an alert should be triggered for the Databricks jobs trigger condition type.
Metrics
totalDuration: Total duration of a Databricks job.
cost: The cost incurred for a Databricks job.
Note
Select either AND or OR Join operator between the cost and duration metrics for complex trigger conditions.
OR: If selected, the policy is violated when any of the metric's conditions are met.AND: If selected, the policy is violated when both metric conditions are met.
Operator: Use the operators (>=, <=) to define the threshold level of the selected metrics compared to the value.
Value: Specify the threshold value in numeric. The default value of 300 seconds is considered if you leave the Value field empty.
Refine Scope
Click the down arrow
 and select a scope to trigger the AutoAction. You can refine the scope based on User, Workspace, and Time
For the Users and Workspaces option, you must specify if it affects All, Only, and Except. For example, if you choose User and select:
All, then, all the users are considered in the scope.
Only, then only that user is considered in the scope.
Except, then all the users except the specified user are considered in the scope.
For Only and Except options, you need to do the following based on the scope that you have selected.
User: Select a user from the list. Click Add User, if you want to add more users. You can also specify regular expressions (regex) to specify the scope. Ensure to select a scope and then only define the regex.
Workspace: Select a user from the list. Click Add Workspace, if you want to add more workspaces. You can also specify regular expressions (regex) to specify the scope. Ensure to select a scope and then only define the regex.
For the Time option, you must specify if it is always or daily. If you select the daily option, you must specify the timezone, start time, and end time during the day.
Actions
Click the down arrow
and select the action to be taken when the conditions defined in the AutoAction policy are met, and an AutoAction is triggered. You can choose from any or all of the following actions: Email
Enter the email ID of at least one recipient. Click Add Email to add more recipients.
Select the Include Owner checkbox to include the app's owner as a recipient of the email. The owner ID of an app can be a username (for example, John) or an email address (for example, john@acme.com).
Note
If the owner ID of an app is a username, then you must configure the base DNS for sending an email to the owner.
You can configure the base DNS using the com.unraveldata.report.user.email.domain property. For configuring email alerts and specifying email properties, see Email alerts
HTTP Post
Enter at least one URL. For example: http://localhost:8000/?notify=xyz@unraveldata.com&amp;notify_owners=false
Ensure to open the corresponding port.
You can add more URLs by clicking Add URL. You can also add a Slack webhook URL.
Post to Slack
Unravel provides integration with SlackApp, which lets you post information to one more Slack channel and user. Specify the following:
Webhook URL: The incoming webhook URL configured in Slack for the channel or user. You can post to multiple webhooks.
Token: The OAuth access token for the SlackApp.
See Slack's Incoming Webhooks for more information.
Click Create.
An AutoAction is successfully created and listed on the AutoActions page.
Regular Expressions (regex) (Databricks)
You can add regular expressions (regex) to AutoActions templates when you narrow the scope of User and Workspace with Only or Except. You must first select the scope (User or Workspace) and only specify the regular expressions in the Transform box. Ensure always to select a scope before you specify the regex.
Note
Keyword regex is mandatory. The regex keyword is similar to substitute s in regular expressions. The regular expression must be in the following format:
regex/{reg_exp_string}/{transform}/
Here:
{reg_exp_string}: Replace with a Java regular expression. For documentation of Java regular expression, see Oracle documentation.{transform}: Replace with a transform string, which typically contains a reference to a capturing group that can be referenced with $1. See Oracle documentation.
Example: regex/^.*(my_user).*/$1/
This example matches any string that contains the "my_user" string.
In the following example, regex is used to define the user scope.
{"enabled":true,
"admin":true,
"policy_name":"AutoAction2",
"policy_id":10,
"instance_id":"3955285931312492702",
"name_by_user":"Long Running Databricks Job with Include owner",
"description_by_user":"Long Running Databricks Job with include owner email",
"created_by":"admin",
"last_edited_by":"admin",
"created_at":1664884043240,
"updated_at":1664884043240,
"rules":[{"OR":[{"scope":"Databricks jobs",
"metric":"totalDuration",
"compare":">=","value":5000},{"scope":"Databricks jobs","metric":"cost",
"compare":">=","value":1}]}],
"actions":[],
"cluster_mode":0,
"cluster_list":[],
"cluster_transform":"",
"queue_mode":0,
"queue_list":[],
"queue_transform":"",
"user_mode":2,
"user_list":["vlad","sandip"],
"user_transform":"regex/^.*[.](.+)[.](.+)$/$2/",
"app_mode":1,
"app_list":[],
"app_transform":"",
"sustain_mode":0,
"sustain_time":0,
"time_mode":0}
Viewing AutoAction and its details
From the AutoActions page, you can add a new AutoAction and view a list of existing AutoActions.
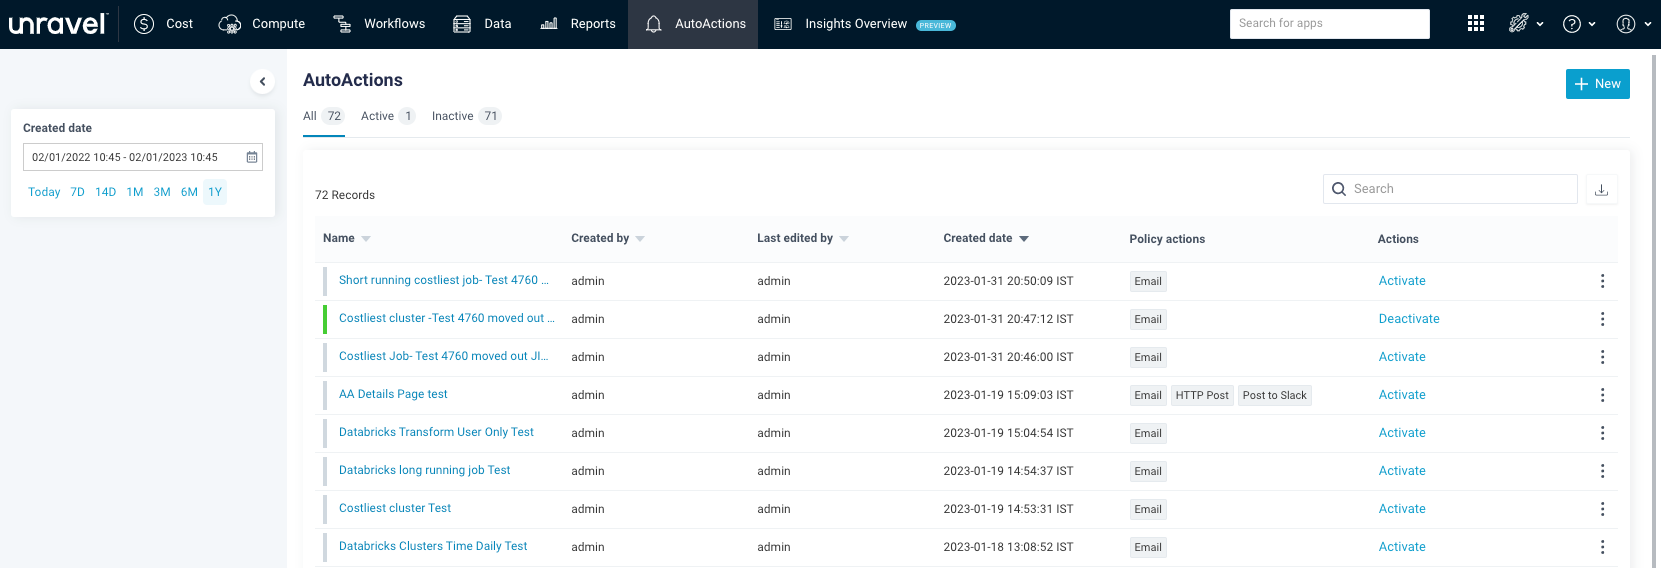
The AutoActions are listed in the following categories:
All: Lists all AutoActions (active and inactive).
Active: Lists all active AutoActions with a green
 bar adjacent to each AutoAction.
Inactive: List all inactive AutoActions with a grey
 bar adjacent to each AutoAction.
You can filter AutoActions based on Created Date. Select a date range to view the list of AutoActions. You can either specify a custom range or choose one of the date range options (Today, 7 days, 14 days, 1 month, 3 months, 6 months, 1 year)
The AutoActions page shows a table with the following columns:
Name: Lists the available AutoActions. Select the AutoAction name to view more details.
Created by: User who created an AutoAction
Last edited by: User who last modified the AutoAction
Created date: Latest timestamp and timezone when the AutoAction was created. The column is sorted by the latest created date and time.
Policy actions: Displays the name of the action to send an alert when the condition of the AutoAction policy is met. The actions are Email, HTTP Post, or Slack.
Actions: Click the corresponding Activate or Deactivate link to activate or deactivate an AutoAction.
You can perform the following tasks from the AutoActions page:
Icons | Action |
|---|---|
 | Create a new AutoAction. |
 | Search for a specific AutoAction using its name |
 | Download a list of AutoActions as a CSV file |
 | Click the toolbar next to each AutoAction name and perform the following actions:
|
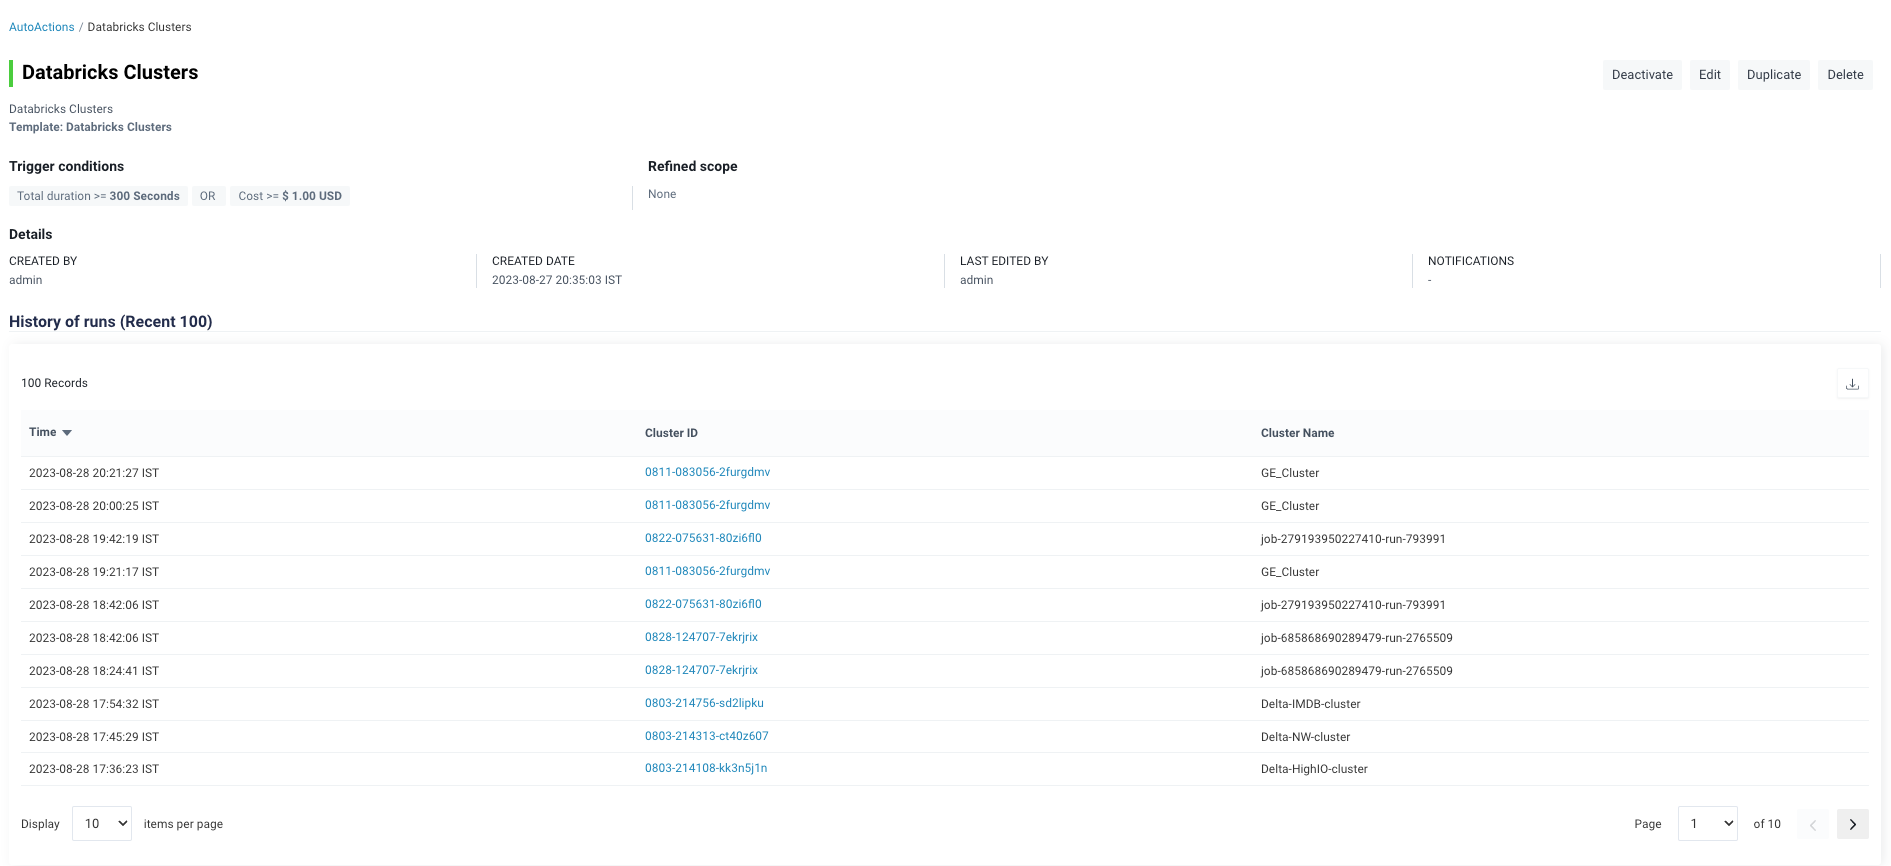
Click the name link of the AutoAction to view the history of runs and the details of the applications that violated the policy.