Microsoft Azure Databricks
Before installing Unravel in Azure Databricks, check and ensure that the Unravel installation requirements are completed and follow the below instructions to install and configure Unravel:
1. Create Unravel VM, create Databricks, and install DBFS CLI
Sign in to the Azure portal.
Select Virtual Machines > Add and enter the following information in the Basics tab:
Project Details
Subscription
Choose the applicable subscription.
Resource group
Create a new group or choose an existing one.
Instance Details
Virtual Machine Name:
The Unravel server name.
Region:
Select the Azure region.
Availability Options
Select
No infrastructure is redundancy required.Image
Select the appropriate image. Both
Centos-based 7.x+ andRed Hat Enterprise Linux 7.x+ are supported.Size
Click Change Size. In the modal select Memory-optimized image with at least
128 GB memoryandPremium Disk support, for example, E16s_v3 in East US 2)Administrator account
Authentication type
Select
passwordorSSH Key.Username and Password
Enter your VM login information.
Inbound Port Rules
Public inbound ports
Select Allow selected ports.
Selected Inbound ports
Select both
HTTPSandSSH.Click Next: Disks > and enter the following information in the Disks tab.
Disk Options
OS disk type: Select
Premium SSD.
Data Disk
Click Create and attach a new disk.
Caution
This disk is formatted so do not choose Attach an existing disk.
Enter a Name.
Select Source type
None (empty disk).Set Size to at least 512 GiB.
Account type: Select
premium SSD.
Click Next: Networking > and enter the following information:
Virtual network: Create new or choose an existing one.
Subnet: Create new or choose an existing one.
Public IP: Create new or choose an existing one.
Select Inbound ports: Select
HTTPSandSSH.
Click Review + create. Your deployment is now created.
Select Go to Resource > Networking > Inbound port rules > Add inbound port rule and include the following ports.
Rule Name
Destination
Destination IP Address
Destination Port Ranges
Unravel_3000
IP Addresses
NIC Private IP
3000
Unravel_4043
IP Addresses
NIC Private IP
4043
Click OK.
Select Create a resource > Azure Databricks > Create. Go directly to step#3 if you already have workspaces.
Select Workspace name, Subscription, Resource group, Location, and Pricing tier.
Review VNET Peering options to connect Databricks with Unravel VM.
2. Download Unravel
3. Deploy Unravel
4. Run setup
You can run the setup command to install Unravel. The setup command allows you to do the following:
Runs Precheck automatically to detect possible issues that prevent a successful installation. Suggestions are provided to resolve issues. Refer to Precheck filters for the expected value for each filter.
Let you run extra parameters to integrate the database of your choice.
The setup command allows you to use a managed database shipped with Unravel, or an external database. When run without any additional parameters, setup uses the Unravel managed PostgreSQL database. Otherwise, you can specify one of the following types of databases in the setup command:
MySQL (Unravel managed as well as external MySQL database)
MariaDB (Unravel managed as well as external MariaDB database)
PostgreSQL (External PostgreSQL)
Refer to Integrate database for details.
Let you specify a separate path for the data directory other than the default path.
The Unravel data and configurations are located in the
datadirectory. By default, the installer maintains the data directory under<Unravel installation directory>/data. You can also change the data directory's default location by running additional parameters with the setup command. To install Unravel with the setup command.Provides more setup options.
Notice
The Unravel user who owns the installation directory should run the setup command to install Unravel.
To install Unravel with the setup command, do the following:
After deploying the binaries, if you are the root user, switch to Unravel user.
su -
<unravel user>Run setup command:
Note
Refer to setup Options for all the additional parameters that can be run with the setup command
Refer to Integrate database topic and complete the pre-requisites before running the setup command with any other database other than Unravel managed PostgreSQL, which is shipped with the product. Extra parameters must be passed with the setup command when you use another database.
Tip
Optionally, if you want to provide a different data directory, you can pass an extra parameter (--data-directory) with the setup command as shown below:
<unravel_installation_directory>/unravel/versions/
<Unravel version>/setup --data-directory/the/data/directorySimilarly, you can configure separate directories for other unravel directories. Contact support for assistance.
PostgreSQL
Unravel managed PostgreSQL
<unravel_installation_directory>/unravel/versions/
<Unravel version>/setup --enable-databricksExternal PostgreSQL
<unravel_installation_directory>/unravel/versions/
<Unravel version>/setup --enable-databricks --external-database postgresql<HOST><PORT><SCHEMA><USERNAME><PASSWORD>/ ##TheHOST,PORT,SCHEMA,USERNAME,PASSWORDare optional fields and are prompted if missing. ##For example: /opt/unravel/versions/abcd.992/setup --enable-databricks --external-database postgresql xyz.unraveldata.com 5432 unravel_db_prod unravel unraveldata
MySQL
Unravel managed MySQL
<unravel_installation_directory>/unravel/versions/
<Unravel version>/setup --enable-databricks --extra /tmp/mysqlExternal MySQL
<unravel_installation_directory>/unravel/versions/
<Unravel version>/setup --enable-databricks --extra /tmp/<MySQL-directory> --external-database mysql<HOST><PORT><SCHEMA><USERNAME><PASSWORD>##TheHOST,PORT,SCHEMA,USERNAME,PASSWORDare optional fields and are prompted if missing.
MariaDB
Unravel managed MariaDB
<unravel_installation_directory>/unravel/versions/
<Unravel version>/setup --enable-databricks --extra /tmp/mariadbExternal MariaDB
<unravel_installation_directory>unravel/versions/
<Unravel version>/setup --enable-databricks --extra /tmp/<MariaDB-directory>--external-database mariadb<HOST><PORT><SCHEMA><USERNAME><PASSWORD>##TheHOST,PORT,SCHEMA,USERNAME,PASSWORDare optional fields and are prompted if missing.
Precheck is automatically run when you run the setup command. Refer to Precheck filters for expected value for each filter.
Start all the services.
<unravel_installation_directory>/unravel/manager start
Check the status of services.
<unravel_installation_directory>/unravel/manager report
The following service statuses are reported:
OK: Service is up and running.
Not Monitored: Service is not running. (Has stopped or has failed to start)
Initializing: Services are starting up.
Does not exist: The process unexpectedly disappeared. Restarts will be attempted 10 times.
You can also get the status and information for a specific service. Run the manager report command as follows:
<unravel_installation_directory>/unravel/manager report <service>
## For example: /opt/unravel/manager report auto_action
The Precheck output displays the issues that prevent a successful installation and also provides suggestions to resolve them. You must resolve each of the issues before proceeding. See Precheck filters.
After the prechecks are resolved, you must re-login or reload the shell to execute the setup command again.
Here is a sample of the Precheck run result:
/opt/unravel/versions/abcd.1004/setup
2021-04-05 15:51:30 Sending logs to: /tmp/unravel-setup-20210405-155130.log
2021-04-05 15:51:30 Running preinstallation check...
2021-04-05 15:51:31 Gathering information ................. Ok
2021-04-05 15:51:51 Running checks .................. Ok
--------------------------------------------------------------------------------
system
 Check limits        : PASSED
 Clock sync          : PASSED
 CPU requirement     : PASSED, Available cores: 8 cores
 Disk access         : PASSED, /opt/unravel/versions/develop.1004/healthcheck/healthcheck/plugins/system is writable
 Disk freespace      : PASSED, 229 GB of free disk space is available for precheck dir.
 Kerberos tools      : PASSED
 Memory requirement  : PASSED, Available memory: 79 GB
 Network ports       : PASSED
 OS libraries        : PASSED
 OS release          : PASSED, OS release version: centos 7.6
 OS settings         : PASSED
 SELinux             : PASSED
--------------------------------------------------------------------------------
Healthcheck report bundle: /tmp/healthcheck-20210405155130-xyz.unraveldata.com.tar.gz
2021-04-05 15:51:53 Prepare to install with: /opt/unravel/versions/abcd.1004/installer/installer/../installer/conf/presets/default.yaml
2021-04-05 15:51:57 Sending logs to: /opt/unravel/logs/setup.log
2021-04-05 15:51:57 Instantiating templates ................................................................................................................................................................................................................................ Ok
2021-04-05 15:52:05 Creating parcels .................................... Ok
2021-04-05 15:52:20 Installing sensors file ............................ Ok
2021-04-05 15:52:20 Installing pgsql connector ... Ok
2021-04-05 15:52:22 Starting service monitor ... Ok
2021-04-05 15:52:27 Request start for elasticsearch_1 .... Ok
2021-04-05 15:52:27 Waiting for elasticsearch_1 for 120 sec ......... Ok
2021-04-05 15:52:35 Request start for zookeeper .... Ok
2021-04-05 15:52:35 Request start for kafka .... Ok
2021-04-05 15:52:35 Waiting for kafka for 120 sec ...... Ok
2021-04-05 15:52:37 Waiting for kafka to be alive for 120 sec ..... Ok
2021-04-05 15:52:42 Initializing pgsql ... Ok
2021-04-05 15:52:46 Request start for pgsql .... Ok
2021-04-05 15:52:46 Waiting for pgsql for 120 sec ..... Ok
2021-04-05 15:52:47 Creating database schema ................. Ok
2021-04-05 15:52:50 Generating hashes .... Ok
2021-04-05 15:52:52 Loading elasticsearch templates ............ Ok
2021-04-05 15:52:55 Creating kafka topics .................... Ok
2021-04-05 15:53:36 Creating schema objects ....................................................................................................................................................................................................................................................................................................................................................................................................................................................................................................................................................................................................................................................................................................................................................................................................................................................................................................................................................................................................................................................................................................................................................................................................................................................................................................................................................................................................................................................................................................................................................................................................................................................................................................................................................................................................................................................................................................................................................................................................................................................... Ok
2021-04-05 15:54:03 Request stop ....................................................... Ok
2021-04-05 15:54:16 Done
[unravel@xyz ~]$
Note
In certain situations, you can skip the precheck using the setup --skip-precheck.
For example:
/opt/unravel/versions/<Unravel version>/setup --skip-precheckYou can also skip the checks that you know can fail. For example, if you want to skip the Check limits option and check_network_ports, run the setup command as follows:
setup --filter-precheck ~check_limits,~check_network_ports
Tip
Run --help with the setup command and any combination of the setup command for complete usage details.
<unravel_installation_directory>/unravel/versions/<Unravel version>/setup --help
5. Connect Databricks cluster to Unravel
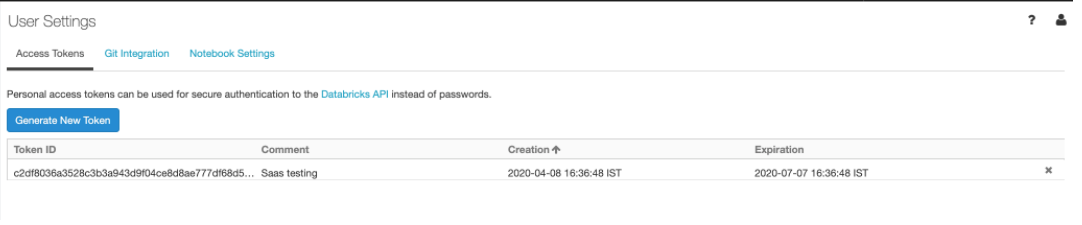
Create a Workspace token in Databricks.
Go to Workspace > Admin Console > Access Control and enable Personal Access Tokens. For more details, refer to Manage personal access tokens.
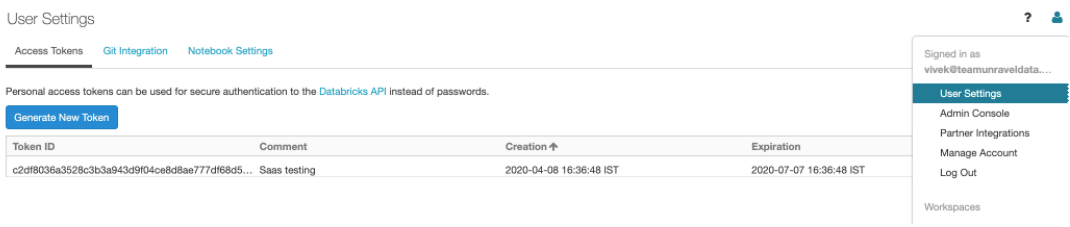
Go to Workspace > User Settings > Access Tokens and click Generate New Token. For more details, refer to Authentication using Databricks personal access tokens.
Register a new Databricks workspace or edit details of an existing Databricks workspace, using one of the following options.
Option 1: From Unravel UI
Go to the Unravel Instance UI and click Workspaces. The Workspaces Manager page is displayed.
Click Add Workspace and enter the following details.
Field
Description
Workspace Id
Databricks workspace ID.
Workspace Name
Databricks workspace name.
Instance (Region) URL
Regional URL where the Databricks workspace is deployed.
Tier
Select a subscription option: Standard or Premium.
Token
Personal access token to authenticate to and access Databricks REST APIs. Refer to Authentication using Databricks personal access tokens to create personal access tokens.
Note
After you click the Add button, it will take around 2-3 minutes to register the Databricks Workspace with Unravel.
Option 2: From command-line using manager command.
Stop Unravel
<Unravel installation directory>/unravel/manager stop
Switch to Unravel user.
Add the workspace details using the manager command as follows from the Unravel installation directory:
source
<path-to-python3-virtual environment-dir>/bin/activate <Unravel_installation_directory>/unravel/manager config databricks add --id <workspace-id> --name<workspace-name>--instance<workspace-instance>--access-token<workspace-token>--unravel-endpoint<unravel_server:port>##For example: /opt/unravel/manager config databricks add --id 0000000000000000 --name myworkspacename --instance https://adb-0000000000000000.16.azuredatabricks.net --access-token xxxx --unravel-endpoint 127.0.0.1:4043 --tier premiumApply the changes.
<Unravel installation directory>/unravel/manager config apply
Start Unravel
<Unravel installation directory>/unravel/manager start
Set the cluster configurations. On the Unravel Instance UI, click Manage > Workspaces > Cluster configuration to configure the Databricks cluster with Unravel. The following configurations must be updated for every cluster (Automated /Interactive) in your workspace.
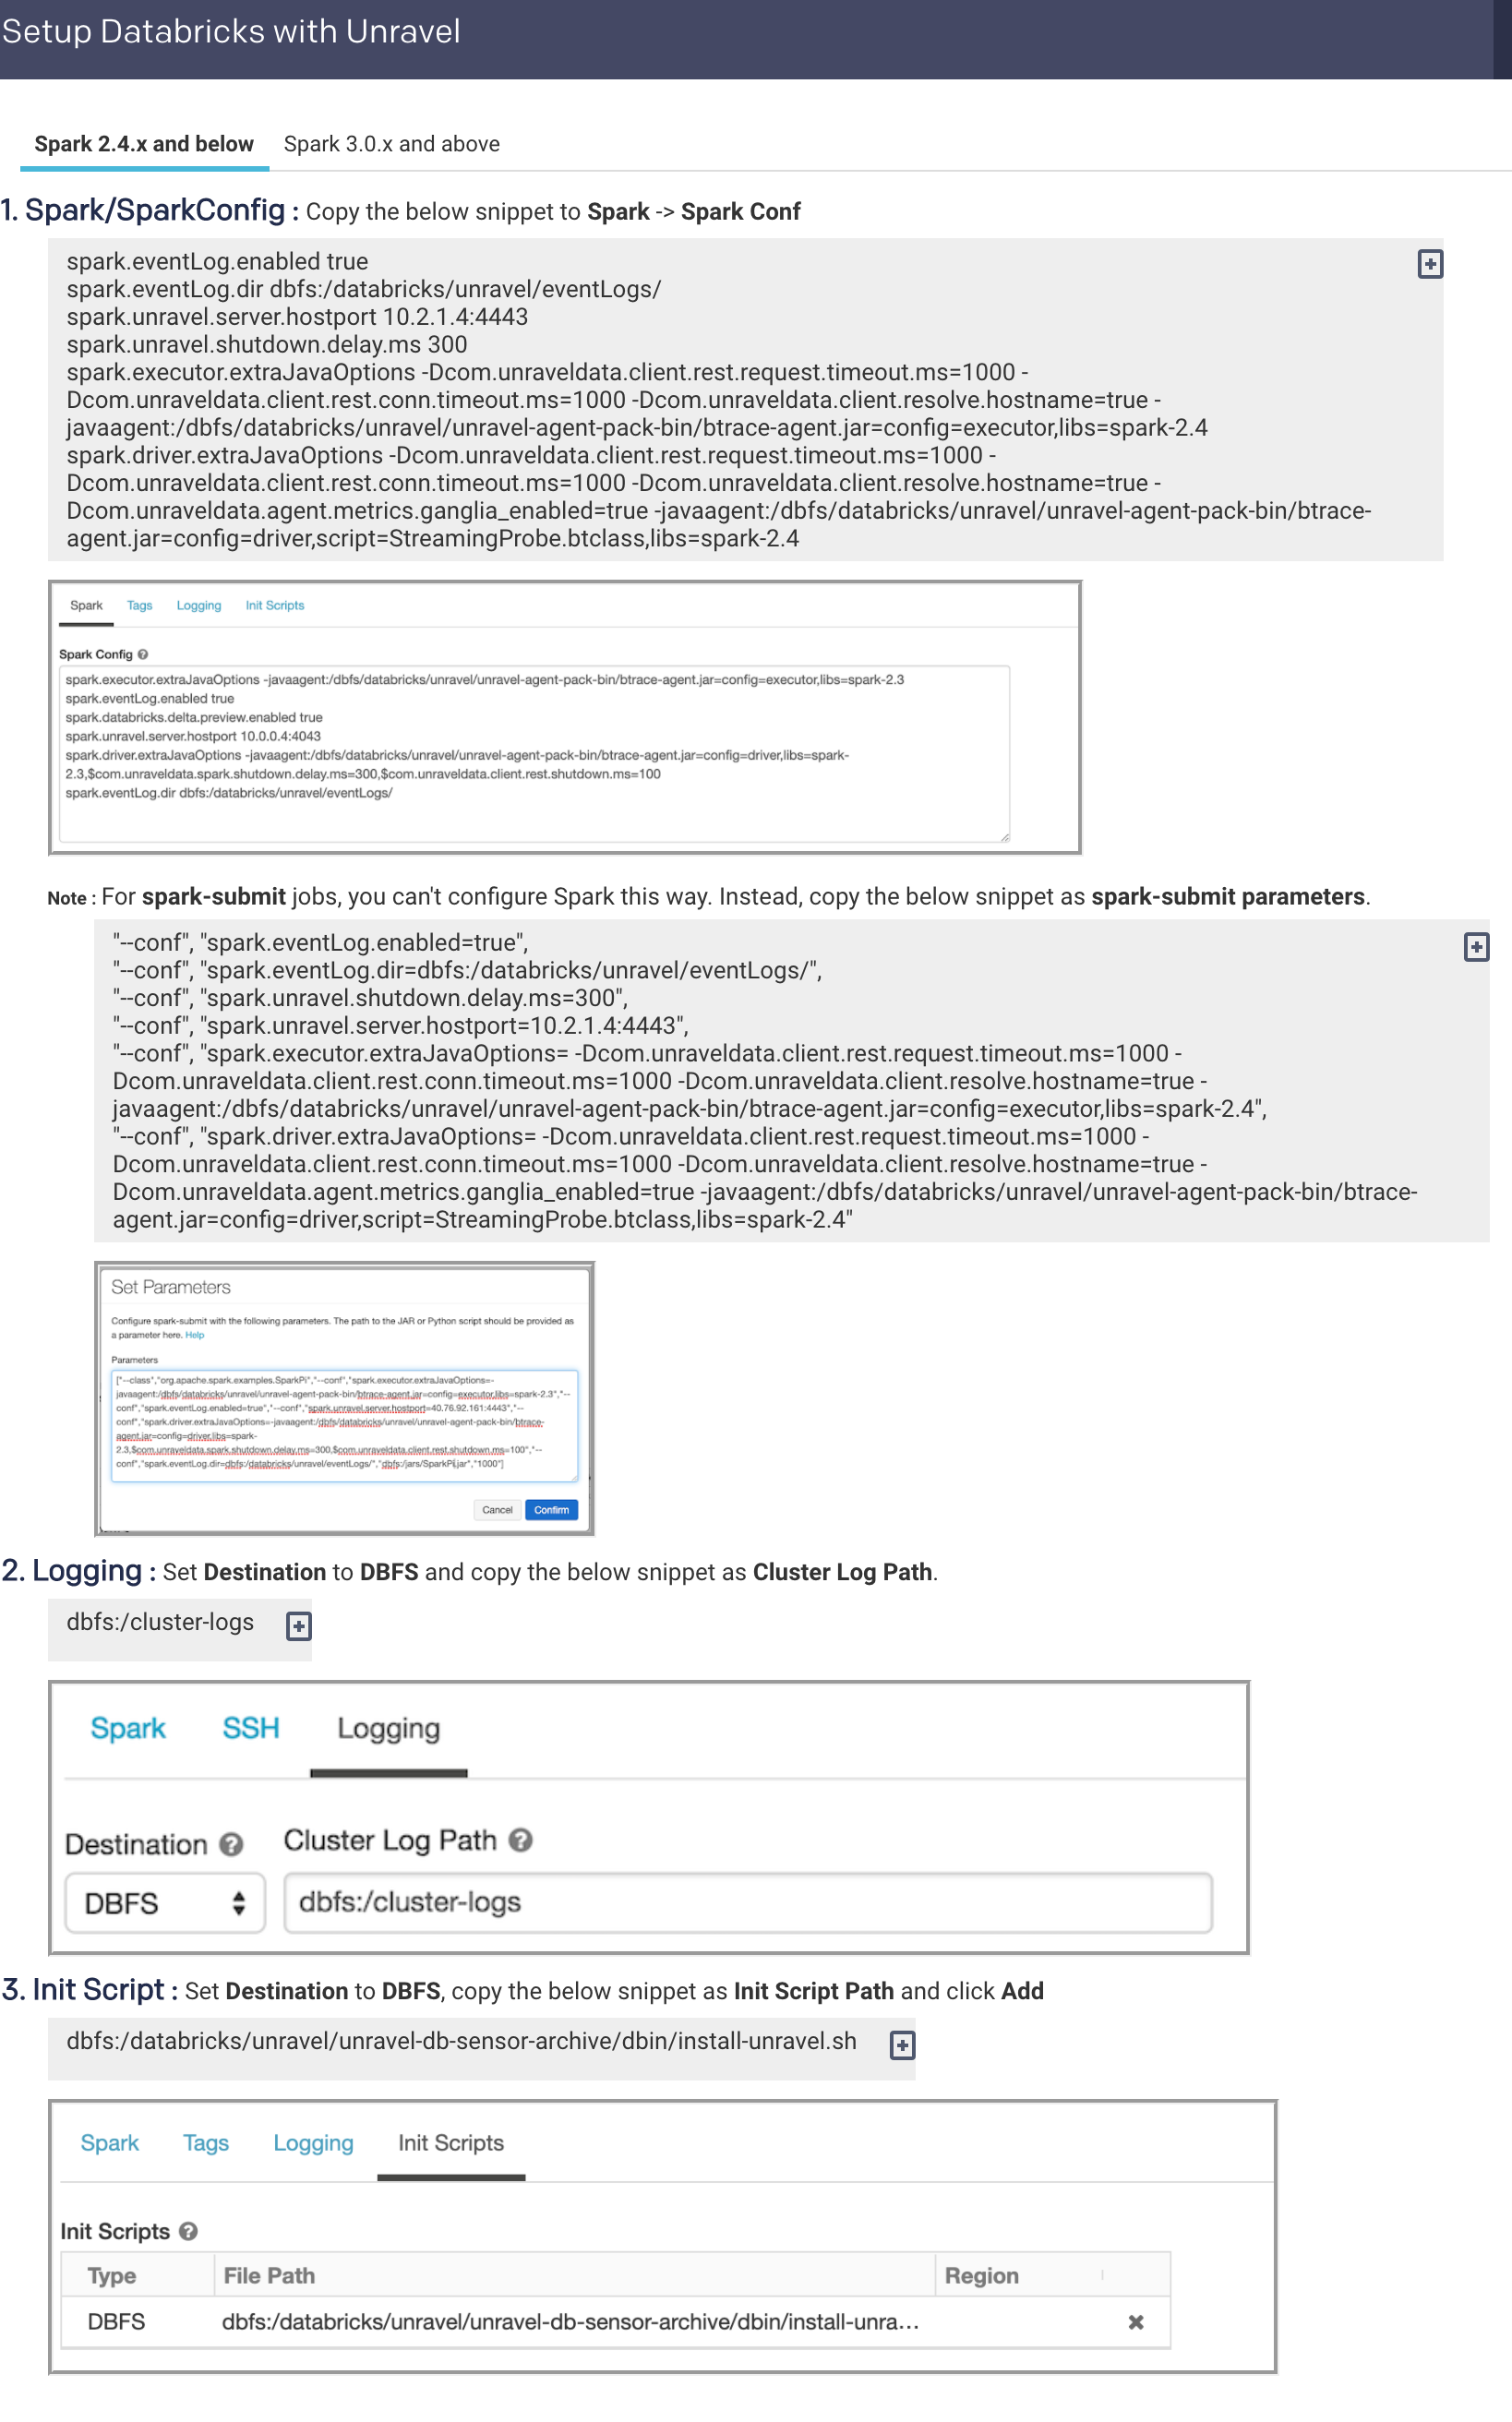
Configure the Workspace for Data page.
Set additional configurations if required.
Optionally, you can run healthcheck, at this point, to verify that all the configurations and services are running successfully.
<unravel_installation_directory>/unravel/manager healthcheck
Healthcheck is run automatically on an hourly basis in the backend. You can set the healthcheck intervals and email alerts to receive the healthcheck reports.