Multi-cluster installation (On-prem)
The Multi-cluster feature allows you to manage multiple clusters from a single Unravel installation. Unravel 4.7 supports managing one or more clusters of the same cluster type. Supported cluster types includes the following:
Cloudera Distribution of Apache Hadoop (CDH)
Cloudera Data Platform (CDP)
Hortonworks Data Platform (HDP)
Amazon Elastic MapReduce (EMR)
You can dynamically add or remove the clusters.
Note
Unravel multi-cluster support is available only for fresh installs. Unravel does not support multi-cluster management of combined on-prem and cloud clusters.
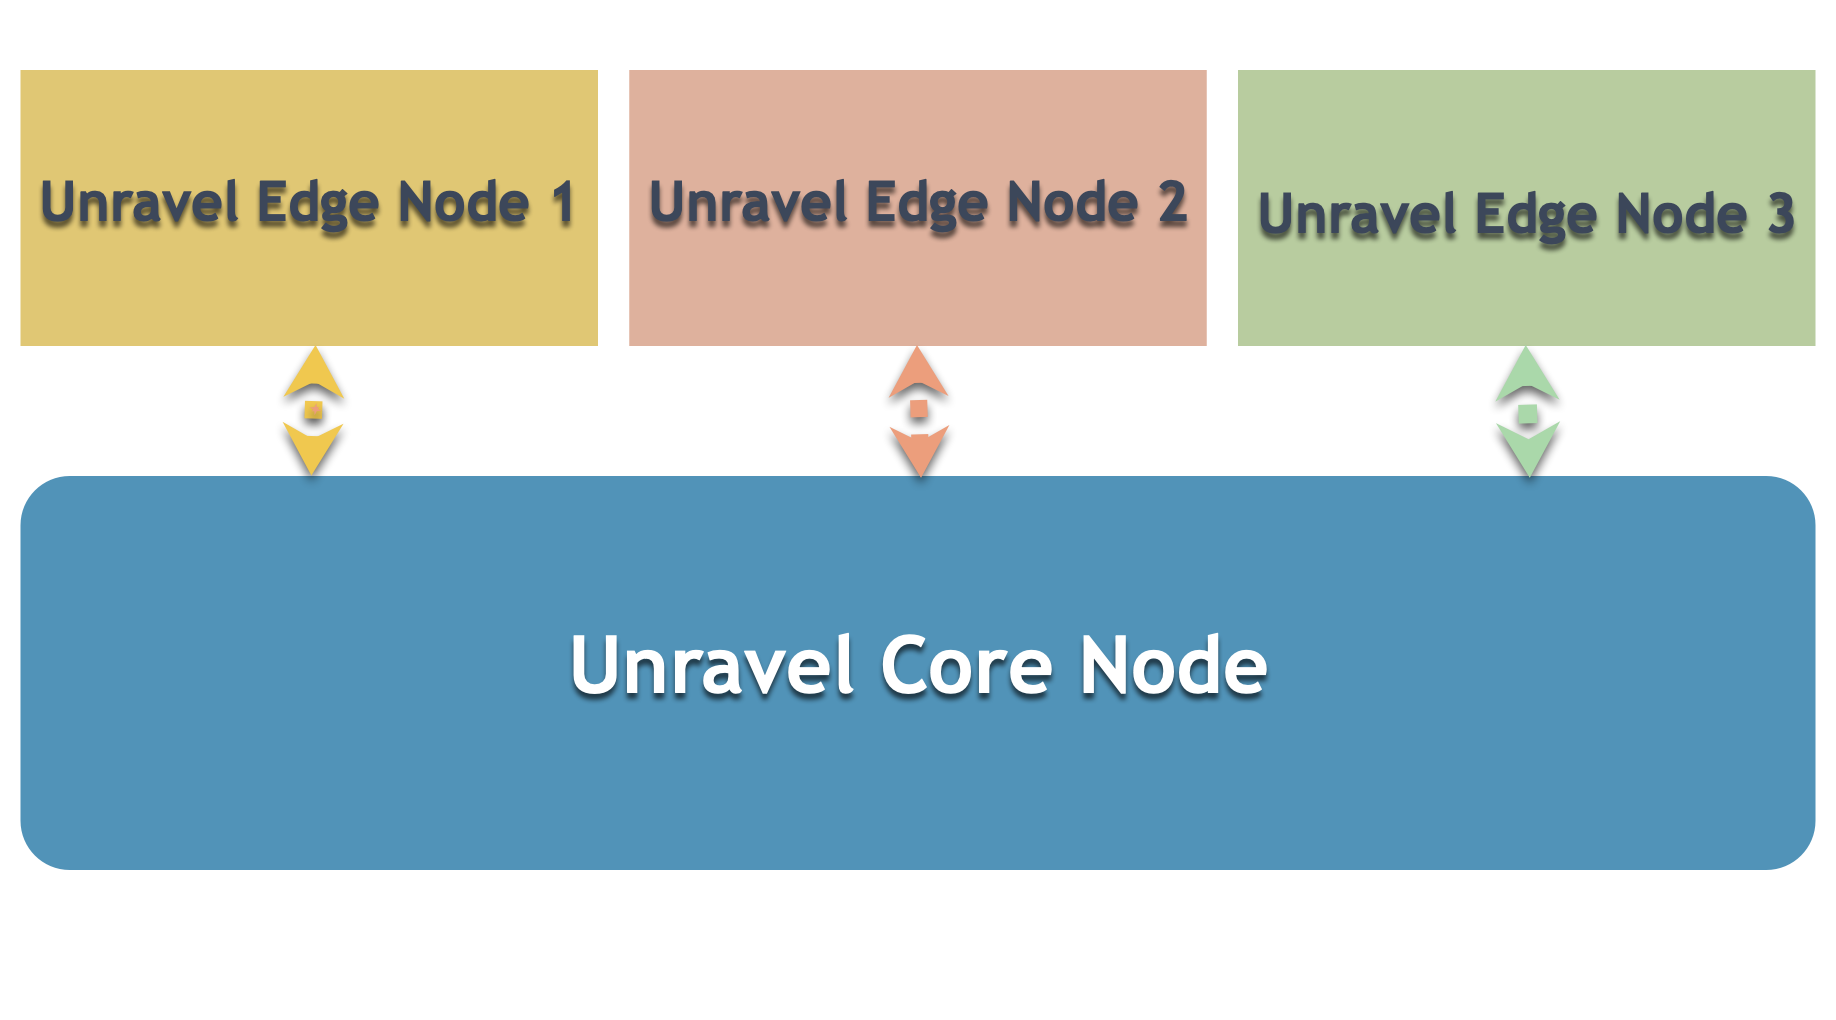
Multi-cluster deployment consists of installing Unravel on the core node and one or more edge nodes. The following image depicts the basic layout of multi-cluster deployment.
To know more about the multi-cluster architecture refer to the Multi-cluster deployment layout.
In a multi-cluster setup, Unravel should be installed on the core node as well as on the edge node. After Unravel is installed and configured on the edge node, you must configure the core node with the edge node settings.
To install and configure Unravel in a multi-cluster setup, do the following:
1. Install and set up Unravel on core node
Notice
In case you already have a single cluster installation of Unravel, you can skip the following instructions to set up Unravel on a core node and proceed to Step 2 (Install and set up Unravel on the edge node.)
1. Download Unravel
2. Deploy Unravel binaries
Unravel binaries are available as a tar file or RPM package. You can deploy the Unravel binaries in any directory on the server. However, the user who installs Unravel must have write permissions to the directory where the Unravel binaries are deployed.
After the Unravel binaries are deployed, the directory layout for both the Tar and RPM will be unravel/versions/<Directories and files>. The binaries are deployed to <Unravel_installation_directory> and Unravel will be available in <Unravel_installation_directory/unravel.
Option 1: Deploy Unravel from a tar file
The following steps to deploy Unravel from a tar file should be performed by a user, who will run Unravel.
Create an Installation directory.
mkdir
/path/to/installation/directory## For example: mkdir /opt/unravelNote
Some locations may require root access to create a directory. In such a case, after the directory is created, change the ownership to unravel user and continue with the installation procedure as the unravel user.
chown -R
username:groupname/path/to/installation/directory## For example:chown -R unravel:unravelgroup /opt/unravelExtract and copy the Unravel tar file to the installation directory, which was created in the first step. After you extract the contents of the tar file,
unraveldirectory is created within the installation directory.tar zxf unravel-
<version>tar.gz -C /path/to/installation/directory ## For example: tar zxf unravel-4.7.0.0.tar.gz -C /opt ## The unravel directory will be available within /opt
Option 2: Deploy Unravel from an RPM package
Important
The following steps, to deploy Unravel from an RPM package, should be performed by a root user. After the RPM package is deployed, the remaining installation procedures should be performed by the unravel user.
Create an installation directory.
mkdir /usr/local/unravel
Grant ownership of the directory to a user who will run Unravel. This user executes all the processes involved in Unravel installation.
chown -R
username:groupname/usr/local/unravel ## For example: chown -R unravel:unravelgroup /usr/local/unravelRun the following command:
rpm -i unravel-
<version>.rpm ## For example: rpm -i unravel-4.7.0.0.rpm ## The unravel directory will be available in /usr/localIn case you want to provide a different location, you can do so by using the --prefix command. For example:
mkdir /opt/unravel chown -R
username:groupname/opt/unravel rpm -i unravel-4.7.0.0.rpm --prefix /opt ## The unravel directory will be available in /optContinue with the installation procedures as unravel user.
3. Run setup
You can run the setup command to install Unravel. The setup command allows you to do the following:
Runs Precheck automatically to detect possible issues that prevent a successful installation. Suggestions are provided to resolve those issues. Check Precheck filters for expected value for each filter.
Let you run extra parameters to integrate the database of your choice.
The setup command allows you to use a managed database shipped with Unravel, or an external database. When run without any additional parameters, setup uses the Unravel managed PostgreSQL database. Otherwise, you can specify one of the following types of databases in the setup command:
MySQL (Unravel managed as well as external MySQL database)
MariaDB (Unravel managed as well as external MariaDB database)
PostgreSQL (Unravel managed as well as external PostgreSQL)
Refer to Integrate database for details.
Let you run extra parameters to specify a separate path for the data directory other than the default path.
The Unravel data and configurations are located in the
datadirectory. By default, the installer maintains the data directory under<Unravel installation directory>/data. You can also change the data directory's default location by running additional parameters with the setup command.Provides more setup options.
Notice
The Unravel user who owns the installation directory should run the setup command to install Unravel.
To install Unravel with the setup command, do the following:
After deploying the binaries, if you are the root user, switch to Unravel user.
su -
<unravel user>Run setup command:
Refer to Integrate database topic and complete the pre-requisites before running the setup command with any other database other than Unravel managed PostgreSQL, which is shipped with the product. Extra parameters must be passed with the setup command when you use another database.
Tip
Optionally, if you want to provide a different data directory, you can pass an extra parameter (--data-directory) with the setup command as shown below:
<unravel_installation_directory>/unravel/versions/
<Unravel version>/setup --data-directory/the/data/directorySimilarly, you can configure separate directories for other unravel directories. Contact support for assistance.
In case your core node is configured for Hadoop, you can run setup command without the additional parameters for --enable-core command.
PostgreSQL
Unravel managed PostgreSQL
##Core node with Hadoop configuration <Unravel installation directory>/unravel/versions/
<Unravel version>/setup ##Core node without Hadoop configuration <Unravel installation directory>/unravel/versions/<Unravel version>/setup --enable-coreExternal PostgreSQL
##Core node with Hadoop configuration <unravel_installation_directory>/versions/
<Unravel version>/setup --external-database postgresql<HOST><PORT><SCHEMA><USERNAME><PASSWORD>##Core node without Hadoop configuration <unravel_installation_directory>/versions/<Unravel version>/setup --enable-core --external-database postgresql<HOST><PORT><SCHEMA><USERNAME><PASSWORD>##TheHOST,PORT,SCHEMA,USERNAME,PASSWORDare optional fields and are prompted if missing. // For example: /opt/unravel/versions/develop.992/setup --enable-core --external-database postgresql xyz.unraveldata.com 5432 unravel_db_prod unravel unraveldata
MySQL
Unravel managed MySQL
##Core node with Hadoop configuration <unravel_installation_directory>/versions/
<Unravel version>/setup --extra /tmp/mysql ##Core node without Hadoop configuration <unravel_installation_directory>/versions/<Unravel version>/setup --enable-core --extra /tmp/mysqlExternal MySQL
##Core node with Hadoop configuration <unravel_installation_directory>/versions/
<Unravel version>/setup --extra /tmp/<mysql-directory> --external-database mysql<HOST><PORT><SCHEMA><USERNAME><PASSWORD>##Core node without Hadoop configuration <unravel_installation_directory>/versions/<Unravel version>/setup --enable-core --extra /tmp/<mysql-directory> --external-database mysql<HOST><PORT><SCHEMA><USERNAME><PASSWORD>##TheHOST,PORT,SCHEMA,USERNAME,PASSWORDare optional fields and are prompted if missing.
MariaDB
Unravel managed MariaDB
##Core node with Hadoop configuration <unravel_installation_directory>/versions/
<Unravel version>/setup --extra /tmp/mariadb ##Core node without Hadoop configuration <unravel_installation_directory>/versions/<Unravel version>/setup --enable-core --extra /tmp/mariadbExternal MariaDB
##Core node with Hadoop configuration <unravel_installation_directory>/versions/
<Unravel version>/setup --extra /tmp/<mariadb-directory>--external-database mariadb<HOST><PORT><SCHEMA><USERNAME><PASSWORD>##Core node without Hadoop configuration <unravel_installation_directory>/versions/<Unravel version>/setup --enable-core --extra /tmp/<mariadb-directory>--external-database mariadb<HOST><PORT><SCHEMA><USERNAME><PASSWORD>##TheHOST,PORT,SCHEMA,USERNAME,PASSWORDare optional fields and are prompted if missing.
Precheck is automatically run when you run the setup command. Check Precheck filters for expected value for each filter.
The Precheck output displays the issues that prevent a successful installation and also provides suggestions to resolve them. You must resolve each of the issues before proceeding. See Precheck filters.
After the prechecks are resolved, you must re-login or reload the shell to execute the setup command again. Following is a sample of the Precheck run result:
/opt/unravel/versions/develop.1011/setup --enable-core --extra /tmp/mysql
2021-04-06 16:30:19 Sending logs to: /tmp/unravel-setup-20210406-163019.log
2021-04-06 16:30:19 Running preinstallation check...
2021-04-06 16:30:21 Gathering information ................ Ok
2021-04-06 16:30:21 Running checks ............... Ok
--------------------------------------------------------------------------------
system
 Check limits        : PASSED
 Clock sync          : PASSED
 CPU requirement     : PASSED, Available cores: 8 cores
 Disk access         : PASSED, /opt/unravel/versions/develop.1011/healthcheck/healthcheck/plugins/system is writable
 Disk freespace      : PASSED, 213 GB of free disk space is available for precheck dir.
 Kerberos tools      : PASSED
 Memory requirement  : PASSED, Available memory: 95 GB
 Network ports       : PASSED
 OS libraries        : PASSED
 OS release          : PASSED, OS release version: centos 7.9
 OS settings         : PASSED
 SELinux             : PASSED
Healthcheck report bundle: /tmp/healthcheck-20210406163019-xyz.unraveldata.com.tar.gz
2021-04-06 16:30:21 Found package: /tmp/mysql/mysql-5.7.27-linux-glibc2.12-x86_64.tar.gz
2021-04-06 16:30:21 Found package: /tmp/mysql/mysql-connector-java-5.1.48.tar.gz
2021-04-06 16:30:21 Prepare to install with: /opt/unravel/versions/develop.1011/installer/installer/../installer/conf/presets/default.yaml
2021-04-06 16:30:25 Sending logs to: /opt/unravel/logs/setup.log
2021-04-06 16:30:25 Installing mysql server ............................................................................................................................................................................................................................................................................................................................................................................................ Ok
2021-04-06 16:30:42 Instantiating templates ......................................................................................................................................................................................................................... Ok
2021-04-06 16:30:47 Creating parcels .................................... Ok
2021-04-06 16:31:00 Installing sensors file ............................ Ok
2021-04-06 16:31:00 Installing pgsql connector ... Ok
2021-04-06 16:31:00 Installing mysql connector ... Ok
2021-04-06 16:31:02 Starting service monitor ... Ok
2021-04-06 16:31:07 Request start for elasticsearch_1 .... Ok
2021-04-06 16:31:07 Waiting for elasticsearch_1 for 120 sec ......... Ok
2021-04-06 16:31:14 Request start for zookeeper .... Ok
2021-04-06 16:31:14 Request start for kafka .... Ok
2021-04-06 16:31:14 Waiting for kafka for 120 sec ...... Ok
2021-04-06 16:31:16 Waiting for kafka to be alive for 120 sec ..... Ok
2021-04-06 16:31:20 Initializing mysql ... Ok
2021-04-06 16:31:27 Request start for mysql .... Ok
2021-04-06 16:31:27 Waiting for mysql for 120 sec ...... Ok
2021-04-06 16:31:29 Creating database schema ........ Ok
2021-04-06 16:31:31 Generating hashes .... Ok
2021-04-06 16:31:32 Loading elasticsearch templates ............ Ok
2021-04-06 16:31:35 Creating kafka topics .................... Ok
2021-04-06 16:32:10 Creating schema objects ................................................................................................................................................................................................................................................................................................................................................................................................................................................................................................................................................................................................................................................................................................................................................................................................................................................................................................................................................................................................................................................................................................................................................................................................................................................................................................................................................................................................................................................................................................................................................................................................................................................................................................................................................................................................................................................................................................................................................................................................................................................................................................................................................................................................................................................................................................................................................................................................................................................................................................................................................................................................................................................................................................................................................................................................................................................................................................................................................................................................................................................................................................................................................................................................................................................................................................................................................................................................................................................................................................................................................................................................................................................................................................................... Ok
2021-04-06 16:33:07 Request stop .................................................................... Ok
2021-04-06 16:33:26 Done
Note
In certain situations, you can skip the precheck using the setup --skip-precheck.
For example:
/opt/unravel/versions/<Unravel version>/setup --skip-precheck
You can also skip the checks that you know can fail. In the above example, if you want to skip the Check limits option, run the setup command as follows:
setup --filter-precheck ~check_limits
Tip
Run --help with the setup command and any combination of the setup command for complete usage details.
<unravel_installation_directory>/versions/<Unravel version>/setup --help
4. Add configurations
If you are using Kerberos authentication, set the principal path and keytab, enable Kerberos authentication, and apply the changes.
<Unravel installation directory>/unravel/manager config kerberos set --keytab
</path/to/keytab file>--principal<server@example.com><Unravel installation directory>/unravel/manager config kerberos enable <unravel_installation_directory>/manager config applyRun the following steps from the manager tool to add certificates to the Truststore:
Download the certificates to a directory. For example: wget http://xyz.unraveldata.com/unravel_certs/unravel_wildcard.pem
Provide permissions to the user, who installs unravel, to access the certificates folder.
chown -R
username:groupname/path/to/certificates/directoryUpload the certificates using any of the following options:
## Option 1 <unravel_installation_directory>/unravel/manager config tls trust add
</path/to/the/certificate/filesor ## Option 2 <unravel_installation_directory>/unravel/manager config tls trust add --pem</path/to/the/certificate/files><unravel_installation_directory>/unravel/manager config tls trust add --jks</path/to/the/certificate/files><unravel_installation_directory>/unravel/manager config tls trust add --pkcs12</path/to/the/certificate/files>Enable the Truststore.
<unravel_installation_directory>/unravel/manager config tls trust
<enable|disable><unravel_installation_directory>/unravel/manager config applyVerify the connection.
<unravel_installation_directory>/unravel/manager verify connect <Cluster Manager-host> <Cluster Manager-port>
For example: /opt/unravel/manager verify connect xyz.unraveldata.com 7180
-- Running: verify connect xyz.unraveldata.com 7180
 - Resolved IP: 111.17.4.123
 - Reverse lookup: ('xyz.unraveldata.com', [], ['111.17.4.123'])
 - Connection:   OK
 - TLS:      No
-- OK
Start all the services.
<unravel_installation_directory>/unravel/manager start
Check the status of services.
<unravel_installation_directory>/unravel/manager report
The following service statuses are reported:
OK: Service is up and running
Not Monitored: Service is not running. (Has stopped or has failed to start)
Initializing: Services are starting up.
Does not exist: The process unexpectedly disappeared. Restarts will be attempted 10 times.
You can also get the status and information for a specific service. Run the manager report command as follows:
<unravel_installation_directory>/unravel/manager report <service>
## For example: /opt/unravel/manager report auto_action
Optionally, you can run healthcheck, at this point, to verify that all the configurations and services are running successfully.
<unravel_installation_directory>/unravel/manager healthcheck
Healthcheck is run automatically on an hourly basis in the backend. You can set your email to receive the healthcheck reports. Refer to Healthcheck for more details.
2. Install and set up Unravel on the edge node
1. Download Unravel
Unravel binaries are shipped as a tar file as well as an RPM package. You can deploy the Unravel binaries in any directory on the server. However, the user who installs Unravel must have write permissions to the directory where Unravel binaries are deployed.
After the Unravel binaries are deployed, the directory layout for both the Tar and RPM will be unravel/versions/<Directories and files>. The binaries are deployed to <Unravel_installation_directory> and Unravel will be available in <Unravel_installation_directory/unravel.
Deploy Unravel from a tar file
The following steps, to deploy Unravel from a tar file, should be performed by a user, who will run Unravel.
Create an Installation directory.
mkdir
/path/to/installation/directory## For example: mkdir /opt/unravelNote
Some locations may require root access to create a directory. In such a case, after the directory is created, change the ownership to unravel user and continue with the installation procedure as the unravel user.
chown -R
username:groupname/path/to/installation/directory## For example:chown -R unravel:unravelgroup /opt/unravelExtract and copy the Unravel tar file to the installation directory, which was created in the first step. After you extract the contents of the tar file,
unraveldirectory is created within the installation directory.tar zxf unravel-
<version>tar.gz -C /path/to/installation/directory ## For example: tar zxf unravel-4.7.0.0.tar.gz -C /opt ## The unravel directory will be available within /opt
Deploy Unravel from an RPM package
The following steps to deploy Unravel from an RPM package should be performed by a root user. After the RPM package is deployed, the remaining installation procedures should be performed by the unravel user.
Create an installation directory.
mkdir /usr/local/unravel
Grant ownership of the directory to a user who will run Unravel. This user executes all the processes involved in Unravel installation.
chown -R
username:groupname/usr/local/unravel ## For example: chown -R unravel:unravelgroup /usr/local/unravelRun the following command:
rpm -i unravel-
<version>.rpm ## For example: rpm -i unravel-4.7.0.0.rpm ## The unravel directory will be available in /usr/localIn case you want to provide a different location, you can do so by using the --prefix command. For example:
mkdir /opt/unravel chown -R
username:groupname/opt/unravel rpm -i unravel-4.7.0.0.rpm --prefix /opt ## The unravel directory will be available in /optContinue with the installation procedures as unravel user.
Notice
Perform the following steps on each of the edge nodes in the cluster.
After deploying the binaries, if you are the root user, switch to Unravel user.
su -
<unravel user>Run setup as follows:
<installation_directory>/versions/4.7.x.x/setup --cluster-access<Unravel-host>##<Unravel-host>: specify the FQDN or the logical hostname of Unravel core node./opt/unravel/versions/develop.1002/setup --cluster-access xyz.unraveldata.com 2021-04-05 12:36:08 Sending logs to: /tmp/unravel-setup-20210405-123608.log 2021-04-05 12:36:08 Running preinstallation check... 2021-04-05 12:36:11 Gathering information ................. Ok 2021-04-05 12:36:35 Running checks .................. Ok -------------------------------------------------------------------------------- system Check limits : PASSED Clock sync : PASSED CPU requirement : PASSED, Available cores: 8 cores Disk access : PASSED, /opt/unravel/versions/develop.1002/healthcheck/healthcheck/plugins/system is writable Disk freespace : PASSED, 228 GB of free disk space is available for precheck dir. Kerberos tools : PASSED Memory requirement : PASSED, Available memory: 95 GB Network ports : PASSED OS libraries : PASSED OS release : PASSED, OS release version: centos 7.6 OS settings : PASSED SELinux : PASSED -------------------------------------------------------------------------------- hadoop Clients : PASSED - Found hadoop - Found hdfs - Found yarn - Found hive - Found beeline Distribution : PASSED, found CDP 7.1.3 RM HA Enabled/Disabled : PASSED, Disabled Healthcheck report bundle: /tmp/healthcheck-20210405123609-wnode58.unraveldata.com.tar.gz 2021-04-05 12:36:37 Prepare to install with: /opt/unravel/versions/develop.1002/installer/installer/../installer/conf/presets/cluster-access.yaml 2021-04-05 12:36:42 Sending logs to: /opt/unravel/logs/setup.log 2021-04-05 12:36:42 Instantiating templates ................................ Ok 2021-04-05 12:36:53 Starting service monitor ... Ok 2021-04-05 12:36:57 Generating hashes .... Ok 2021-04-05 12:37:00 Request stop ..... Ok 2021-04-05 12:37:02 DoneRun autoconfig and apply changes.
<unravel_installation_directory>/manager config auto
<unravel_installation_directory>/manager config apply
When prompted, you can provide the following:
Cluster manager URL
Username
Password
If you are using Kerberos authentication, set the principal path and keytab, enable Kerberos authentication, and apply the changes.
<Unravel installation directory>/unravel/manager config kerberos set --keytab
</path/to/keytab file>--principal<server@example.com><Unravel installation directory>/unravel/manager config kerberos enable <unravel_installation_directory>/manager config applyStart all the services.
<unravel_installation_directory>/unravel/manager start
Check the status of services.
<unravel_installation_directory>/unravel/manager report
The following service statuses are reported:
OK: Service is up and running
Not Monitored: Service is not running. (Has stopped or has failed to start)
Initializing: Services are starting up.
Does not exist: The process unexpectedly disappeared. Restarts will be attempted 10 times.
You can also get the status and information for a specific service or for all services. Run the manager report command as follows:
<unravel_installation_directory>/unravel/manager report <service>
## For example:/opt/unravel/manager report healthcheck
Optionally, you can run healthcheck to verify that all the configurations and services are running successfully.
<unravel_installation_directory>/unravel/manager healthcheck
Healthcheck is run automatically, on an hourly basis, in the backend. You can set your email to receive the healthcheck reports.
3. Configure core node with edge node settings
Log in to the core node as an Unravel user.
Important
Ensure to repeat the following steps (2-8) for each of the edge nodes, which must be configured with a core node.
Add each of the edge nodes, involved with Unravel monitoring, to the core node.
<unravel_installation_directory>/unravel/manager config edge add
<EDGE_KEY><CLUSTER_ACCESS_ID>//For example: /opt/unravel/manager config edge add edge-a 123-123-123-123Important
EDGE_KEY is any label that you must provide to identify the edge node.
CLUSTER_ACCESS_ID can be obtained by running manager support show cluster_access_id on the edge node.
Run auto-configuration.
<unravel_installation_directory>/unravel/manager config edge auto
<EDGE_KEY>--url<CM hostname>//For example: /opt/unravel/manager config edge auto edge-a --url xyz.unraveldata.comWhen prompted, you can provide the following:
Cluster manager URL
Username
Password
Note
You must set the Hive metastore password manually to connect to the Hive metastore.
<Unravel installation directory>/unravel/manager config edge hive metastore password
<EDGE_KEY><CLUSTER_KEY><SERVICE_KEY><password>Also, refer to Encrypting/Decrypting passwords.
Run the manager config edge show command to get the
<EDGE_KEY><CLUSTER_KEY><HIVE_KEY>details.<EDGE_KEY>is the label used to identify the edge node.<CLUSTER_KEY>is the name of the cluster where you set the Hive configurations.<SERVICE_KEY>is the definition of the Hive service.
Provide the credentials to access the cluster manager, when prompted.
Apply changes.
<unravel_installation_directory>/manager config apply
You may be prompted to stop Unravel. Run manager stop to stop Unravel.
Start all the services.
<unravel_installation_directory>/unravel/manager start
Check the status of services.
<unravel_installation_directory>/unravel/manager report
Check the list of services, which are enabled for the edge node after running the auto-configurations.
<unravel_installation_directory>/unravel/manager config edge show
-- Running: config edge show
------------ | ---------------------------------------- | ------------
    EDGE KEY | - edge-a                                 | Enabled
             |     Cluster manager:                     | Enabled
             |     Clusters:                            |
 CLUSTER KEY |       - Cluster_Name                     | Enabled
             |           HBASE:                         |
 SERVICE KEY |             - hbase                      | Enabled
             |           HDFS:                          |
 SERVICE KEY |             - hdfs                       | Enabled
             |           HIVE:                          |
 SERVICE KEY |             - hive                       | Enabled
 SERVICE KEY |             - hive2                      | Enabled
             |           IMPALA:                        |
 SERVICE KEY |             - impala                     | Enabled
 SERVICE KEY |             - impala2                    | Enabled
             |           KAFKA:                         |
 SERVICE KEY |             - kafka                      | Enabled
 SERVICE KEY |             - kafka2                     | Enabled
             |           SPARK_ON_YARN:                 |
 SERVICE KEY |             - spark_on_yarn              | Enabled
             |           YARN:                          |
 SERVICE KEY |             - yarn                       | Enabled
             |           ZOOKEEPER:                     |
 SERVICE KEY |             - zookeeper                  | Enabled
------------ | ---------------------------------------- | ------------
-- OK
You can disable any of the services. For example, you want to disable the Hbase services:
<unravel_installation_directory>/unravel/manager config edge hbase disable
<EDGE_KEY><HADOOP CLUSTER NAME><SERVICE NAME>For example: /opt/unravel/manager config edge hbase disable local-node XYZWP26E hbaseRun healthcheck to verify that all the configurations and services are running successfully.
<unravel_installation_directory>/manager healthcheck
Healthcheck is run automatically, on an hourly basis, in the backend. You can set your email to receive the healthcheck reports.
This section provides information about enabling additional instrumentation for CDH and CDP platforms.
Enable additional instrumentation for CDH
This topic explains how to enable additional instrumentation on your gateway/edge/client nodes that are used to submit jobs to your big data platform. Additional instrumentation can include:
Sensor jars packaged in a parcel on Unravel server.
Hive queries in Hadoop that are pushed to Unravel Server by the Hive Hook sensor, a JAR file.
Spark job performance metrics that are pushed to Unravel Server by the Spark sensor, a JAR file.
Copying Hive hook and Btrace jars to HDFS shared library path.
Impala queries that are pulled from the Cloudera Manager or from the Impala daemon
1. Download, distribute, and activate Unravel sensor
Sensor JARs are packaged in a parcel on Unravel server. Run the following steps from the Cloudera Manager to download, distribute, and activate this parcel.
Note
Ensure that Unravel is up and running before you perform the following steps.
In Cloudera Manager, click
 . The Parcel page is displayed.
On the Parcel page, click Configuration or Parcel Repositories & Network settings. The Parcel Configurations dialog box is displayed.
Go to the Remote Parcel Repository URLs section, click + and enter the Unravel host along with the exact directory name for your CDH version.
http://
<unravel-host>:<port>/parcels/<cdh <major.minor version>/ // For example: http://xyznode46.unraveldata.com:3000/parcels/cdh6.3/<unravel-host>is the hostname or LAN IP address of Unravel. In a multi-cluster scenario, this would be the host where thelog_receiverdaemon is running.<port>is the Unravel UI port. The default is 3000. In case you have customized the default port, you can add that port number.<cdh-version>is your version of CDH. For example,cdh5.16orcdh6.3.You can go to
http://directory (For example: http://xyznode46.unraveldata.com:3000/parcels) and copy the exact directory name of your CDH version (CDH<major.minor>).<unravel-host>:<port>/parcels/
Note
If you're using Active Directory Kerberos,
unravel-hostmust be a fully qualified domain name or IP address.Tip
If you are running more than one version of CDH (for example, you have multiple clusters), you can add more than one parcel entry for
unravel-host.Click Save Changes.
In the Cloudera Manager, click Check for new parcels, find the
UNRAVEL_SENSORparcel that you want to distribute, and click the corresponding Download button.In the Cloudera Manager, from Location > Parcel Name, find the
UNRAVEL_SENSORparcel that you want to distribute and click the corresponding Download button.After the parcel is downloaded, click the corresponding Distribute button. This will distribute the parcel to all the hosts.
After the parcel is distributed, click the corresponding Activate button. The status column will now display Distributed, Activated.
Note
If you have an old sensor parcel from Unravel, you must deactivate it now.
2. Put the Hive Hook JAR in AUX_CLASSPATH
In Cloudera Manager, select the target cluster from the drop-down, click Hive >Configuration, and search for
hive-env.In Gateway Client Environment Advanced Configuration Snippet (Safety Valve) for
hive-env.sh, click View as text and enter the following exactly as shown, with no substitutions:AUX_CLASSPATH=${AUX_CLASSPATH}:/opt/cloudera/parcels/UNRAVEL_SENSOR/lib/java/unravel_hive_hook.jarIf Sentry is enabled, grant privileges on the JAR files to the Sentry roles that run Hive queries.
Sentry commands may also be needed to enable access to the Hive Hook JAR file. Grant privileges on the JAR files to the roles that run hive queries. Log in to Beeline as user
hiveand use the HiveSQL GRANTstatement to do so.For example (substitute
roleas appropriate),GRANT ALL ON URI 'file:///opt/cloudera/parcels/UNRAVEL_SENSOR/lib/java/unravel_hive_hook.jar' TO ROLE
<role>
3. Oozie: Copy Hive Hook and BTrace JARs to HDFS shared library path
In Cloudera Manager, select the target cluster from the drop-down, click Oozie >Configuration and check the path shown in ShareLib Root Directory.
From a terminal application on the Unravel node (edge node in case of multi-cluster.), pick up the ShareLib Root Directory directory path with the latest timestamp.
hdfs dfs -ls
<path to ShareLib directory>// For example: hdfs dfs -ls /user/oozie/share/lib/Important
The jars must be copied to the
libdirectory (with the latest timestamp), which is shown inShareLib Root Directory.Copy the Hive Hook JAR
/opt/cloudera/parcels/UNRAVEL_SENSOR/lib/java/unravel_hive_hook.jarand the Btrace JAR,/opt/cloudera/parcels/UNRAVEL_SENSOR/lib/java/btrace-agent.jarto the specified path in ShareLib Root Directory.hdfs dfs -copyFromLocal /opt/cloudera/parcels/UNRAVEL_SENSOR/lib/java/unravel_hive_hook.jar /user/oozie/share/lib/
<latest timestamp lib directory>/ //For example: hdfs dfs -copyFromLocal /opt/cloudera/parcels/UNRAVEL_SENSOR/lib/java/unravel_hive_hook.jar /user/oozie/share/lib/lib_20210326035616/hdfs dfs -copyFromLocal /opt/cloudera/parcels/UNRAVEL_SENSOR/lib/java/btrace-agent.jar /user/oozie/share/lib/
<latest timestamp lib directory>/ //For example: hdfs dfs -copyFromLocal /opt/cloudera/parcels/UNRAVEL_SENSOR/lib/java/btrace-agent.jar /user/oozie/share/lib/lib_20210326035616/From a terminal application, copy the Hive Hook JAR
/opt/cloudera/parcels/UNRAVEL_SENSOR/lib/java/unravel_hive_hook.jarand the Btrace JAR,/opt/cloudera/parcels/UNRAVEL_SENSOR/lib/java/btrace-agent.jarto the specified path in ShareLib Root Directory.For example, if the path specified in ShareLib Root Directory. is
/user/oozie, run the following commands to copy the JAR files.Caution
Jobs controlled by Oozie 2.3+ fail if you do not copy the Hive Hook and BTrace JARs to the HDFS shared library path.
4. Set Hive Hook configuration
On the Cloudera Manager, click Hive service and then click the Configuration tab.
Search for
hive-site.xml, which will lead to the Hive Client Advanced Configuration Snippet for hive-site.xml section.Specify the hive hook configurations. You have the option to either use the XML text field or Editor to specify the hive hook configuration.
Option 1: XML text field
Click View as XML to open the XML text field and copy-paste the following.
<property> <name>com.unraveldata.host</name> <value>
<UNRAVEL HOST NAME></value> <description>Unravel hive-hook processing host</description> </property> <property> <name>com.unraveldata.hive.hook.tcp</name> <value>true</value> </property> <property> <name>com.unraveldata.hive.hdfs.dir</name> <value>/user/unravel/HOOK_RESULT_DIR</value> <description>destination for hive-hook, Unravel log processing</description> </property> <property> <name>hive.exec.driver.run.hooks</name> <value>com.unraveldata.dataflow.hive.hook.UnravelHiveHook</value> <description>for Unravel, from unraveldata.com</description> </property> <property> <name>hive.exec.pre.hooks</name> <value>com.unraveldata.dataflow.hive.hook.UnravelHiveHook</value> <description>for Unravel, from unraveldata.com</description> </property> <property> <name>hive.exec.post.hooks</name> <value>com.unraveldata.dataflow.hive.hook.UnravelHiveHook</value> <description>for Unravel, from unraveldata.com</description> </property> <property> <name>hive.exec.failure.hooks</name> <value>com.unraveldata.dataflow.hive.hook.UnravelHiveHook</value> <description>for Unravel, from unraveldata.com</description> </property>Ensure to replace
UNRAVEL HOST NAMEwith the Unravel hostname. Replace TheUnravel Host Namewith the hostname of the edge node in case of a multi-cluster deployment.Option 2: Editor:
Click + and enter the property, value, and description (optional).
Property
Value
Description
com.unraveldata.host
Replace with Unravel hostname or with the hostname of the edge node in case of a multi-cluster deployment.
Unravel hive-hook processing host
com.unraveldata.hive.hook.tcp
true
Hive hook tcp protocol.
com.unraveldata.hive.hdfs.dir
/user/unravel/HOOK_RESULT_DIR
Destination directory for hive-hook, Unravel log processing.
hive.exec.driver.run.hooks
com.unraveldata.dataflow.hive.hook.UnravelHiveHook
Hive hook
hive.exec.pre.hooks
com.unraveldata.dataflow.hive.hook.UnravelHiveHook
Hive hook
hive.exec.post.hooks
com.unraveldata.dataflow.hive.hook.UnravelHiveHook
Hive hook
hive.exec.failure.hooks
com.unraveldata.dataflow.hive.hook.UnravelHiveHook
Hive hook
Similarly, ensure to add the same hive hook configurations in HiveServer2 Advanced Configuration Snippet for hive-site.xml.
Optionally, add a comment in Reason for change and then click Save Changes.
From the Cloudera Manager page, click the Stale configurations icon (
 ) to deploy the configuration and restart the Hive services.
Check Unravel UI to see if all Hive queries are running.
If queries are running fine and appearing in Unravel UI, then you have successfully added the hive hooks configurations.
If queries are failing with a
class not founderror or permission problems:Undo the
hive-site.xmlchanges in Cloudera Manager.Deploy the hive client configuration.
Restart the Hive service.
Follow the steps in Troubleshooting.
5. Configure Spark properties in spark-defaults.conf
In Cloudera Manager, select the target cluster and then click Spark.
Select Configuration.
Search for
spark-defaults.In Spark Client Advanced Configuration Snippet (Safety Valve) for spark-conf/spark-defaults.conf, enter the following text, replacing placeholders with your particular values:
spark.unravel.server.hostport=
unravel-host:<port>spark.driver.extraJavaOptions=-javaagent:/opt/cloudera/parcels/UNRAVEL_SENSOR/lib/java/btrace-agent.jar=config=driver,libs=spark-versionspark.executor.extraJavaOptions=-javaagent:/opt/cloudera/parcels/UNRAVEL_SENSOR/lib/java/btrace-agent.jar=config=executor,libs=spark-versionspark.eventLog.enabled=true<unravel-host>: Specify the Unravel hostname. In the case of multi-cluster deployment use the FQDN or logical hostname of the edge node forunravel-host.<Port>: 4043 is the default port. If you have customized the ports, you can specify that port number here.<spark-version>: Forspark-version, use a Spark version that is compatible with this version of Unravel. You can check the Spark version with the spark-submit --version command and specify the same version.
Click Save changes.
Click (
) or use the Actions pull-down menu to deploy the client configuration. Your spark-shell will ensure new JVM containers are created with the necessary extraJavaOptions for the Spark drivers and executors.Check Unravel UI to see if all Spark jobs are running.
If jobs are running and appearing in Unravel UI, you have deployed the Spark jar successfully.
If queries are failing with a
class not founderror or permission problems:Undo the
spark-defaults.confchanges in Cloudera Manager.Deploy the client configuration.
Investigate and fix the issue.
Follow the steps in Troubleshooting.
Note
If you have YARN-client mode applications, the default Spark configuration is not sufficient, because the driver JVM starts before the configuration set through the SparkConf is applied. For more information, see Apache Spark Configuration. In this case, configure the Unravel Sensor for Spark to profile specific Spark applications only (in other words, per-application profiling rather than cluster-wide profiling).
6. Optional: Configure YARN-MapReduce JVM sensor cluster-wide
In Cloudera Manager, go to YARN service.
Select the Configuration tab.
Search for Application Master Java Opts Base and concatenate the following XML block properties snippet (ensure to start with a space and add below).
Note
Make sure that "-" is a minus sign. You need to modify the value of
unravel-hostwith your Unravel Server IP address or a fully qualified DNS. For multi-host Unravel installation, use the IP address of Host2.-javaagent:/opt/cloudera/parcels/UNRAVEL_SENSOR/lib/java/btrace-agent.jar=libs=mr -Dunravel.server.hostport=
unravel-host:4043Search for MapReduce Client Advanced Configuration Snippet (Safety Valve) for
mapred-site.xmlin the middle of the page.Enter the following XML four-block properties snippet to Gateway Default Group. (Click View as XML.)
<property> <name>mapreduce.task.profile</name> <value>true</value> </property> <property> <name>mapreduce.task.profile.maps</name> <value>0-5</value> </property> <property> <name>mapreduce.task.profile.reduces</name> <value>0-5</value> </property> <property> <name>mapreduce.task.profile.params</name> <value>-javaagent:/opt/cloudera/parcels/UNRAVEL_SENSOR/lib/java/btrace-agent.jar=libs=mr -Dunravel.server.hostport=
<unravel-host>:4043</value></property>Note
Replace
unravel-hostto Unravel hostname. In case of multi-cluster, add the hostname of the edge node.Save the changes.
Deploy the client configuration by using the Actions pull-down menu.
Cloudera Manager will specify a restart which is not necessary to effect these changes. (Click Restart Stale Services if that is visible. However, you can also perform this later when you have a planned maintenance.)
Tip
The restart is important for the MR sensor to be picked up by queries submitted via Hiveserver2.
Use the Unravel UI to monitor the situation. When you view the MapReduce APM page for any completed MRjob you should see mappers and reducers in the Resource Usage tab.
7. Retrieve Impala data from Cloudera Manager
Impala properties are automatically configured. Refer to Impala properties for the list of properties that are automatically configured. If it is not set already by auto-configuration, set the properties as follows:
<Unravel installation directory>/manager config properties set <PROPERTY> <VALUE>
For example,
<Unravel installation directory>/manager config properties set com.unraveldata.data.source cm <Unravel installation directory>/manager config properties set com.unraveldata.cloudera.manager.url http://my-cm-url<Unravel installation directory>/manager config properties set com.unraveldata.cloudera.manager.usernamemycmname<Unravel installation directory>/manager config properties set com.unraveldata.cloudera.manager.passwordmycmpassword
For multi-cluster, use the following format and set these on the edge node:
<Unravel installation directory>/manager config properties set com.unraveldata.data.source cm <Unravel installation directory>/manager config properties set com.unraveldata.cloudera.manager.url http://my-cm-url<Unravel installation directory>/manager config properties set com.unraveldata.cloudera.manager.usernamemycmname<Unravel installation directory>/manager config properties set com.unraveldata.cloudera.manager.passwordmycmpassword
Note
By default, the Impala sensor task is enabled. To disable it, you can edit the following property as follows:
<Unravel installation directory>/manager config properties set com.unraveldata.sensor.tasks.disabled iw
Optionally, you can change the Impala lookback window. By default, when Unravel Server starts, it retrieves the last 5 minutes of Impala queries. To change this, do the following:
Change the value for com.unraveldata.cloudera.manager.impala.look.back.minutes property.
<Unravel installation directory>/manager config properties set com.unraveldata.cloudera.manager.impala.look.back.minutes -<period>
For example: <Unravel installation directory>/manager config properties set com.unraveldata.cloudera.manager.impala.look.back.minutes -7
Note
Include a minus sign in front of the new value.
8. Add more configurations
For quick initial installation, you can use the hdfs principal and its keytab. However, for production use you may want to create an alternate principal that has restricted access to specific areas and use its corresponding keytab. This topic explains how to do this.
You can name the alternate principal whatever you prefer; these steps name it unravel. Its name doesn't need to be the same as the local username.
The steps apply only to CDH and have been tested using Cloudera Manager with the recommended Sentry configuration.
Check the HDFS default umask.
For access via ACL, the group part of the HDFS default umask needs to have read and execute access. This allows Unravel to see subdirectories and read files. The default umask setting on HDFS for both CDH and HDP is
022. The middle digit controls the group mask, and ACLs are masked using this default group mode.You can check the HDFS umask setting from either Cloudera Manager or in
hdfs-site.xml:In Cloudera Manager, check the value of dfs.umaskmode and make sure the middle digit is
2or0.In
hdfs-site.xmlfile search for fs.permissions.umask-mode and make sure the middle digit is2or0.
Enable ACL inheritance.
In Cloudera Manager's HDFS configuration, search for
namenode advanced configuration snippet, and set its dfs.namenode.posix.acl.inheritance.enabled property totrueinhdfs-site.xml. This is a workaround for an issue where HDFS was not compliant with the Posix standard for ACL inheritance. For details, see Apache JIRA HDFS-6962. Cloudera backported the fix for this issue into CDH5.8.4, CDH5.9.1, and later, setting dfs.namenode.posix.acl.inheritance.enabled tofalsein Hadoop 2.x andtruein Hadoop 3.x.Restart the cluster to effect the change of dfs.namenode.posix.acl.inheritance.enabled to
true.Change the ACLs of the target HDFS directories.
Run the following commands as global
hdfsto change the ACLs of the following HDFS directories. Run these in the order presented.Set the ACL for future directories.
Note
Be sure to set the permissions at the
/user/historylevel. Files are first written to anintermediate_donefolder under/user/historyand then moved to/user/history/done.hadoop fs -setfacl -R -m default:user:unravel:r-x /user/spark/applicationHistory hadoop fs -setfacl -R -m default:user:unravel:r-x /user/history hadoop fs -setfacl -R -m default:user:unravel:r-x /tmp/logs hadoop fs -setfacl -R -m default:user:unravel:r-x /user/hive/warehouse
If you have Spark2 installed, set the ACL of the Spark2 application history folder:
hadoop fs -setfacl -R -m default:user:unravel:r-x /user/spark/spark2ApplicationHistory
Set ACL for existing directories.
hadoop fs -setfacl -R -m user:unravel:r-x /user/spark/applicationHistory
hadoop fs -setfacl -R -m user:unravel:r-x /user/history
hadoop fs -setfacl -R -m user:unravel:r-x /tmp/logs
hadoop fs -setfacl -R -m user:unravel:r-x /user/hive/warehouse
If you have Spark2 installed, set the ACL of the Spark2 application history folder:
hadoop fs -setfacl -R -m user:unravel:r-x /user/spark/spark2ApplicationHistory
Verify the ACL of the target HDFS directories.
hdfs dfs -getfacl /user/spark/applicationHistory
hdfs dfs -getfacl /user/spark/spark2ApplicationHistory
hdfs dfs -getfacl /user/history
hdfs dfs -getfacl /tmp/logs
hdfs dfs -getfacl /user/hive/warehouse
On the Unravel Server, verify HDFS permission on folders as the target user (
unravel,hdfs,mapr, or custom) with a valid kerberos ticket corresponding to the keytab principal.sudo -u unravel kdestroy sudo -u unravel kinit -kt
keytab-fileprincipalsudo -u unravel hadoop fs -ls /user/history sudo -u unravel hadoop fs -ls /tmp/logs sudo -u unravel hadoop fs -ls /user/hive/warehouseFind and verify the keytab:
klist -kt
keytab-fileWarning
If you're using KMS and HDFS encryption and the
hdfsprincipal, you might need to adjustkms-acls.xmlpermissions in Cloudera Manager for DECRYPT_EEK if access is denied. In particular, the "done" directory might not allow decryption of logs by thehdfsprincipal.If you're using "JNI" based groups for HDFS (a setting in Cloudera Manager), you need to add this line to
/usr/local/unravel/etc/unravel.ext.sh:export LD_LIBRARY_PATH=/opt/cloudera/parcels/CDH/lib/hadoop/lib/native
If Kerberos is enabled, set the new values for
keytab-fileandprincipal:<Unravel installation directory>/manager config kerberos set --keytab /etc/security/keytabs/unravel.service.keytab --principal unravel/server@example.com <Unravel installation directory>/manager config kerberos enable
Important
Whenever you change Kerberos tokens or principal, restart all services,
<installation directory>/manager restart.
References
For more information on creating permanent functions, see Cloudera documentation.
Enable additional instrumentation for CDP
This topic explains how to enable additional instrumentation on your gateway/edge/client nodes that are used to submit jobs to your big data platform. Additional instrumentation can include:
Hive queries in Hadoop that are pushed to Unravel Server by the Hive Hook sensor, a JAR file.
Spark job performance metrics that are pushed to Unravel Server by the Spark sensor, a JAR file.
Impala queries that are pulled from Cloudera Manager or the Impala daemon.
Sensor JARs packaged in a parcel on Unravel Server.
Tez Dag information is pushed to Unravel server by the Tez sensor, a JAR file.
1. Download, distribute, and activate Unravel sensor
Sensor JARs are packaged in a parcel on Unravel server. Run the following steps from the Cloudera Manager to download, distribute, and activate this parcel.
Note
Ensure that Unravel is up and running before you perform the following steps.
In Cloudera Manager, click
. The Parcel page is displayed.On the Parcel page, click Configuration or Parcel Repositories & Network settings. The Parcel Configurations dialog box is displayed.
Go to the Remote Parcel Repository URLs section, click + and enter the Unravel host along with the exact directory name for your CDH version.
http://
<unravel-host>:<port>/parcels/<cdh <major:minor version>/For example: http://xyz.unraveldata.com:3000/parcels/cdh 7.1
<unravel-host>is the hostname or LAN IP address of Unravel. In a multi-cluster scenario, this would be the host where thelog_receiverdaemon is running.<port>is the Unravel UI port. The default is 3000. In case you have customized the default port, you can add that port number.<cdh-version>is your version of CDP. For example,cdh7.1.You can go to
http://directory (For example: http://xyznode46.unraveldata.com:3000/parcels) and copy the exact directory name of your CDH version (CDH<major.minor>).<unravel-host>:<port>/parcels/
Note
If you're using Active Directory Kerberos,
unravel-hostmust be a fully qualified domain name or IP address.Tip
If you're running more than one version of CDP (for example, you have multiple clusters), you can add more than one parcel entry for
unravel-host.Click Save Changes.
In the Cloudera Manager, click Check for new parcels find the
UNRAVEL_SENSORparcel that you want to distribute, and click the corresponding Download button.After the parcel is downloaded, click the corresponding Distribute button. This will distribute the parcel to all the hosts.
After the parcel is distributed, click the corresponding Activate button. The status column will now display Distributed, Activated.
Note
If you have an old sensor parcel from Unravel, you must deactivate it now.
2. Put the Hive Hook JAR in AUX_CLASSPATH
In Cloudera Manager, select the target cluster from the drop-down, click Hive >Configuration, and search for
hive-env.In Gateway Client Environment Advanced Configuration Snippet (Safety Valve) for
hive-env.shenter the following exactly as shown, with no substitutions:AUX_CLASSPATH=${AUX_CLASSPATH}:/opt/cloudera/parcels/UNRAVEL_SENSOR/lib/java/unravel_hive_hook.jarEnsure that the Unravel hive hook JAR has the read/execute access for the user running the hive server.
3. Oozie: Copy Hive Hook and BTrace JARs to HDFS shared library path
In Cloudera Manager, select the target cluster from the drop-down, click Oozie >Configuration and check the path shown in ShareLib Root Directory.
From a terminal application on the Unravel node (edge node in case of multi-cluster.), pick up the ShareLib Root Directory directory path with the latest timestamp.
hdfs dfs -ls
<path to ShareLib directory>// For example: hdfs dfs -ls /user/oozie/share/lib/Important
The jars must be copied to the
libdirectory (with the latest timestamp), which is shown inShareLib Root Directory.Copy the Hive Hook JAR
/opt/cloudera/parcels/UNRAVEL_SENSOR/lib/java/unravel_hive_hook.jarand the Btrace JAR,/opt/cloudera/parcels/UNRAVEL_SENSOR/lib/java/btrace-agent.jarto the specified path in ShareLib Root Directory.hdfs dfs -copyFromLocal /opt/cloudera/parcels/UNRAVEL_SENSOR/lib/java/unravel_hive_hook.jar /user/oozie/share/lib/
<latest timestamp lib directory>/ //For example: hdfs dfs -copyFromLocal /opt/cloudera/parcels/UNRAVEL_SENSOR/lib/java/unravel_hive_hook.jar /user/oozie/share/lib/lib_20210326035616/hdfs dfs -copyFromLocal /opt/cloudera/parcels/UNRAVEL_SENSOR/lib/java/btrace-agent.jar /user/oozie/share/lib/
<latest timestamp lib directory>/ //For example: hdfs dfs -copyFromLocal /opt/cloudera/parcels/UNRAVEL_SENSOR/lib/java/btrace-agent.jar /user/oozie/share/lib/lib_20210326035616/From a terminal application, copy the Hive Hook JAR
/opt/cloudera/parcels/UNRAVEL_SENSOR/lib/java/unravel_hive_hook.jarand the Btrace JAR,/opt/cloudera/parcels/UNRAVEL_SENSOR/lib/java/btrace-agent.jarto the specified path in ShareLib Root Directory.For example, if the path specified in ShareLib Root Directory. is
/user/oozie, run the following commands to copy the JAR files.Caution
Jobs controlled by Oozie 2.3+ fail if you do not copy the Hive Hook and BTrace JARs to the HDFS shared library path.
4. Deploy the BTrace JAR for Tez service
On the Cloudera Manager, go to Tez > configuration and search the following properties:
tez.am.launch.cmd-opts
tez.task.launch.cmd-opts
Append the following to tez.am.launch.cmd-opts and tez.task.launch.cmd-opts properties:
-javaagent:/opt/cloudera/parcels/UNRAVEL_SENSOR/lib/java/btrace-agent.jar=libs=mr,config=tez -Dunravel.server.hostport=
<unravel_host>:4043Note
For
unravel-host, specify the FQDN or the logical hostname of Unravel or of the edge node in case of multi-cluster.Click the Stale configurations icon (
) to deploy the client configuration and restart the Tez services.
5. Set Hive Hook configuration
On the Cloudera Manager, click Hive service and then click the Configuration tab.
Search for
hive-site.xml, which will lead to the Hive Client Advanced Configuration Snippet for hive-site.xml section.Specify the hive hook configurations. You have the option to either use the XML text field or Editor to specify the hive hook configuration.
Option 1: XML text field
Click View as XML to open the XML text field and copy-paste the following.
<property> <name>com.unraveldata.host</name> <value>
<UNRAVEL HOST NAME></value> <description>Unravel hive-hook processing host</description> </property> <property> <name>com.unraveldata.hive.hook.tcp</name> <value>true</value> </property> <property> <name>com.unraveldata.hive.hdfs.dir</name> <value>/user/unravel/HOOK_RESULT_DIR</value> <description>destination for hive-hook, Unravel log processing</description> </property> <property> <name>hive.exec.driver.run.hooks</name> <value>com.unraveldata.dataflow.hive.hook.UnravelHiveHook</value> <description>for Unravel, from unraveldata.com</description> </property> <property> <name>hive.exec.pre.hooks</name> <value>com.unraveldata.dataflow.hive.hook.UnravelHiveHook</value> <description>for Unravel, from unraveldata.com</description> </property> <property> <name>hive.exec.post.hooks</name> <value>com.unraveldata.dataflow.hive.hook.UnravelHiveHook</value> <description>for Unravel, from unraveldata.com</description> </property> <property> <name>hive.exec.failure.hooks</name> <value>com.unraveldata.dataflow.hive.hook.UnravelHiveHook</value> <description>for Unravel, from unraveldata.com</description> </property>Ensure to replace
UNRAVEL HOST NAMEwith the Unravel hostname. Replace TheUnravel Host Namewith the hostname of the edge node in case of a multi-cluster deployment.Option 2: Editor:
Click + and enter the property, value, and description (optional).
Property
Value
Description
com.unraveldata.host
Replace with Unravel hostname or with the hostname of the edge node in case of a multi-cluster deployment.
Unravel hive-hook processing host
com.unraveldata.hive.hook.tcp
true
Hive hook tcp protocol.
com.unraveldata.hive.hdfs.dir
/user/unravel/HOOK_RESULT_DIR
Destination directory for hive-hook, Unravel log processing.
hive.exec.driver.run.hooks
com.unraveldata.dataflow.hive.hook.UnravelHiveHook
Hive hook
hive.exec.pre.hooks
com.unraveldata.dataflow.hive.hook.UnravelHiveHook
Hive hook
hive.exec.post.hooks
com.unraveldata.dataflow.hive.hook.UnravelHiveHook
Hive hook
hive.exec.failure.hooks
com.unraveldata.dataflow.hive.hook.UnravelHiveHook
Hive hook
Similarly, ensure to add the same hive hook configurations in HiveServer2 Advanced Configuration Snippet for hive-site.xml.
Optionally, add a comment in Reason for change and then click Save Changes.
From the Cloudera Manager page, Click the Stale configurations icon (
) to deploy the configuration and restart the Hive services.Check Unravel UI to see if all Hive queries are running.
If queries are running fine and appearing in Unravel UI, then you have successfully added the hive hooks configurations.
If queries are failing with a
class not founderror or permission problems:Undo the
hive-site.xmlchanges in Cloudera Manager.Deploy the hive client configuration.
Restart the Hive service.
Follow the steps in Troubleshooting.
6. Configure Spark properties in spark-defaults.conf
In Cloudera Manager, select the target cluster and then click Spark.
Select Configuration.
Search for
spark-defaults.In Spark Client Advanced Configuration Snippet (Safety Valve) for spark-conf/spark-defaults.conf, enter the following text, replacing placeholders with your particular values:
spark.unravel.server.hostport=
unravel-host:portspark.driver.extraJavaOptions=-javaagent:/opt/cloudera/parcels/UNRAVEL_SENSOR/lib/java/btrace-agent.jar=config=driver,libs=spark-versionspark.executor.extraJavaOptions=-javaagent:/opt/cloudera/parcels/UNRAVEL_SENSOR/lib/java/btrace-agent.jar=config=executor,libs=spark-versionspark.eventLog.enabled=true<unravel-host>: Specify the Unravel hostname. In the case of multi-cluster deployment use the FQDN or logical hostname of the edge node forunravel-host.<Port>: 4043 is the default port. If you have customized the ports, you can specify that port number here.<spark-version>: Forspark-version, use a Spark version that is compatible with this version of Unravel. You can check the Spark version with the spark-submit --version command and specify the same version.
Click Save changes.
Click the Stale configurations icon (
) to deploy the client configuration and restart the Spark services. Your spark-shell will ensure new JVM containers are created with the necessary extraJavaOptions for the Spark drivers and executors.Check Unravel UI to see if all Spark jobs are running.
If jobs are running and appearing in Unravel UI, you have deployed the Spark jar successfully.
If queries are failing with a
class not founderror or permission problems:Undo the
spark-defaults.confchanges in Cloudera Manager.Deploy the client configuration.
Investigate and fix the issue.
Follow the steps in Troubleshooting.
Note
If you have YARN-client mode applications, the default Spark configuration is not sufficient, because the driver JVM starts before the configuration set through the SparkConf is applied. For more information, see Apache Spark Configuration. In this case, configure the Unravel Sensor for Spark to profile specific Spark applications only (in other words, per-application profiling rather than cluster-wide profiling).
7. Retrieve Impala data from Cloudera Manager
Impala properties are automatically configured. Refer to Impala properties for the list of properties that are automatically configured. If it is not set already by auto-configuration, set the properties as follows:
<Unravel installation directory>/manager config properties set <PROPERTY> <VALUE>
For example,
<Unravel installation directory>/manager config properties set com.unraveldata.data.source cm <Unravel installation directory>/manager config properties set com.unraveldata.cloudera.manager.url http://my-cm-url<Unravel installation directory>/manager config properties set com.unraveldata.cloudera.manager.usernamemycmname<Unravel installation directory>/manager config properties set com.unraveldata.cloudera.manager.passwordmycmpassword
For multi-cluster, use the following format and set these on the edge node:
<Unravel installation directory>/manager config properties set com.unraveldata.data.source cm <Unravel installation directory>/manager config properties set com.unraveldata.cloudera.manager.url http://my-cm-url<Unravel installation directory>/manager config properties set com.unraveldata.cloudera.manager.usernamemycmname<Unravel installation directory>/manager config properties set com.unraveldata.cloudera.manager.passwordmycmpassword
Note
By default, the Impala sensor task is enabled. To disable it, you can edit the following property as follows:
<Unravel installation directory>/manager config properties set com.unraveldata.sensor.tasks.disabled iw
Optionally, you can change the Impala lookback window. By default, when Unravel Server starts, it retrieves the last 5 minutes of Impala queries. To change this, do the following:
Change the value for com.unraveldata.cloudera.manager.impala.look.back.minutes property.
<Unravel installation directory>/manager config properties set com.unraveldata.cloudera.manager.impala.look.back.minutes -<period>
For example: <Unravel installation directory>/manager config properties set com.unraveldata.cloudera.manager.impala.look.back.minutes -7
Note
Include a minus sign in front of the new value.
8. Add more configurations
References
For more information on creating permanent functions, see Cloudera documentation.