Amazon Athena (preview only)
Amazon Athena is a serverless query service that enables you to interact with data directly in place on AWS S3 using ANSI standard SQL. You pay only for the queries you run, based on how much data the queries scan. Failed queries cost $0. For cancelled or killed queries, you're charged only for the data that was scanned before the queries were cancelled. For more information on Athena pricing, see Amazon's Athena pricing. Since you’re charged per scan per query, you can use Unravel to show you the cost per Athena query.
Note
This feature is in beta/preview mode. Currently, Unravel UI doesn't display insights and recommendations on Athena queries.
Preview features are in beta and are subject to change. The design and code are less mature than official GA features. They are provided as-is with no warranties. Preview features are not subject to the support SLA of official GA features. We do not recommend you deploy Preview features in a production environment.
This feature is available only in releases that include updates to Unravel's Amazon EMR support, such as 4.5.0.5. See Unravel's Amazon EMR compatibility matrix for more information.
Use cases
Amazon Athena is well suited to structured data such as logs.
You send Unravel information about your Athena queries through an AWS Lambda function which monitors your AWS CloudTrail trail for Athena events.
Follow these steps to connect your Athena queries to Unravel through an AWS Lambda function. These steps assume you already have Athena queries set up. In summary, we'll walk you through how to:
Create a trail in AWS CloudTrail for management read/write events.
Create a new AWS role to allow AWS Lambda functions to call AWS services on your behalf.
Create an AWS Lambda function that sends data to Unravel whenever your trail has a new entry.
View Athena queries in Unravel UI.
For help with Amazon's Athena, documentation for more help
1. Create a trail in AWS CloudTrail
You can capture Athena activity by creating a specific CloudTrail trail for management read/write events, and specifying a new or existing S3 bucket to store the trail.
Note
Your AWS account must have the following permissions for these steps:
AWSCloudTrailReadOnlyAccess
CloudtrailFullAccess
Log into your AWS console at https://console.aws.amazon.com.
In the AWS console, select CloudTrail.
On the CloudTrail page, click Trails | Create trail.
In the Trail name field, type
UnravelIn the Apply trail to all regions section, select Yes.
In the Management events section, next to Read/Write events, select All.
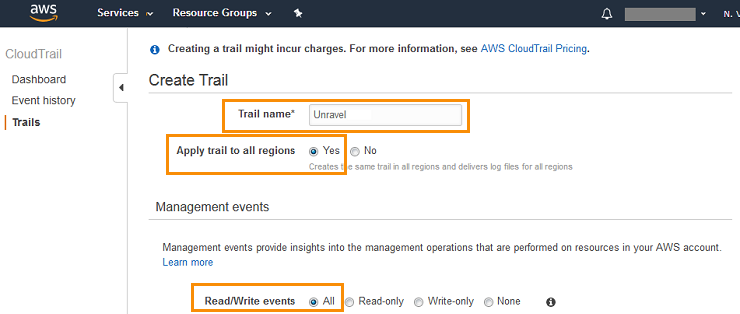
In the Data events section, don’t make any changes. This trail doesn’t need to log any data events.
In the Storage location section, specify where you want AWS to store your new trail.
You can create a new S3 bucket or use an existing S3 bucket. If you create a new bucket:
Set the S3 bucket name to
unravel-cloudtrailExpand the Advanced section.
Leave the Log file prefix field blank.
For Encrypt log files with SSE-KMS, select No.
For Enable log file validation, select Yes.
For Send SNS notification for every log file delivery, select No.
Click Create.
Configure CloudWatch permissions on unravel-cloudtrail:
Click your newly created trail, unravel-cloudtrail, and scroll down to CloudWatch Logs.
Click Configure.

In the New or existing log group field, type
CloudTrail/UnravelLogGroup
Click Continue.
On the next page, expand View Details, and specify the following:
IAM Role: Create a new IAM Role.
Role Name:
unravel-cloudtrail-roleClick Allow.
The configuration summary for this trail appears, and in the upper right corner the logging status is displayed.
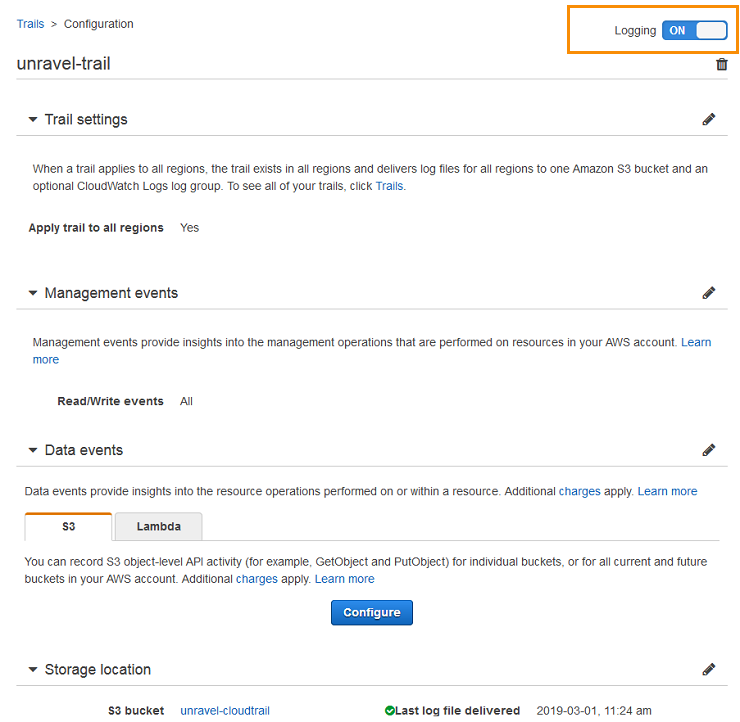
2. Create a role for Unravel's AWS Lambda function
Unravel provides an AWS Lambda function to forward your CloudTrail trail to Unravel. To connect Unravel’s AWS Lambda function with your trail, you first need to create an AWS role for Unravel’s Lambda function to use, if you don’t have one already.
For more information on AWS Lambda, see Using AWS Lambda with AWS CloudTrail.
Log into your AWS console at https://console.aws.amazon.com.
In the AWS console, select IAM.
On the IAM page, click Roles.
Click Create role.
In the Select type of trusted entity, choose AWS service.
In the Choose the service that will use this role section, select Lambda.
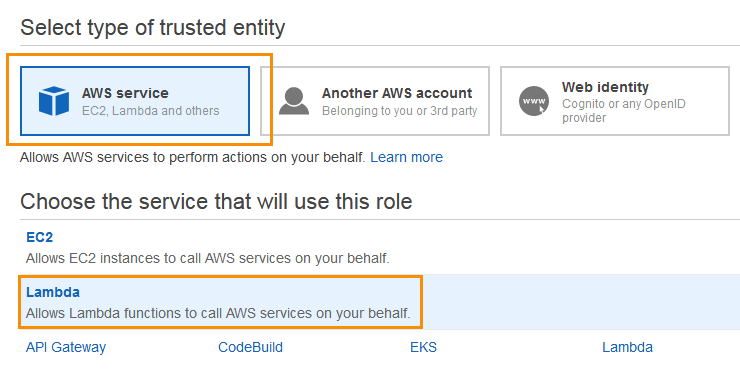
Click Next: Permissions.
On the Attach permissions policies page, type each of the following policies into the search box and select the checkbox next to it:
AmazonS3ReadOnlyAccess
AWSLambdaVPCAccessExecutionRole
Click Next: Tags.
(Optional) If you want to add tags to this role, add them here.
Click Next: Review.
On the Review page, set Role name to
unravel-athena-lambda-role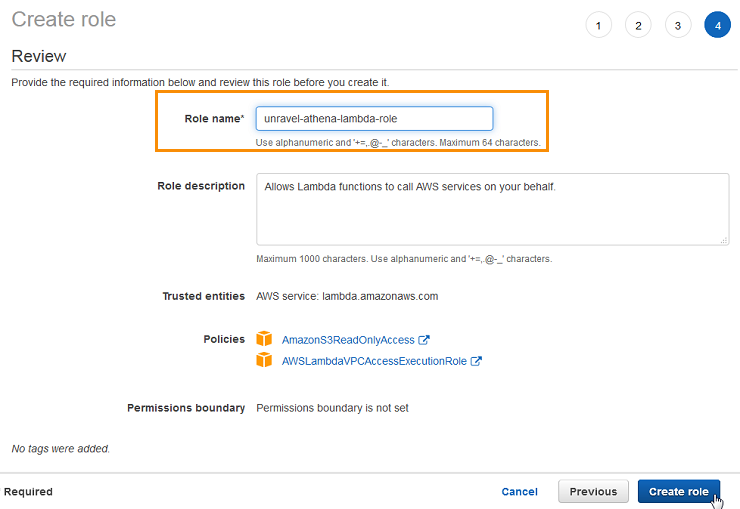
Click Create role.
The AWS console displays a message indicating that it created the role.

Select the role in the list of roles.
On the role summary page, select the Trust relationships tab to verify which trusted entities that can assume this role.

3. Create Unravel's AWS Lambda function
This section explains how to create an AWS Lambda function that sends data to Unravel whenever your trail has a new entry.
Note
Your AWS account must have the following permission for these steps:
AWSLambdaFullAccess
Define basic settings for the Lambda function
Log into your AWS console at https://console.aws.amazon.com
In the AWS console, select Lambda.
On the Lambda page, click Create function.
On the Create function page, enter the following:
Function name:
UnravelAthenaLambdaRuntime: Python 2.7
Execution role: Use an existing role
Existing role: unravel-athena-lambda-role
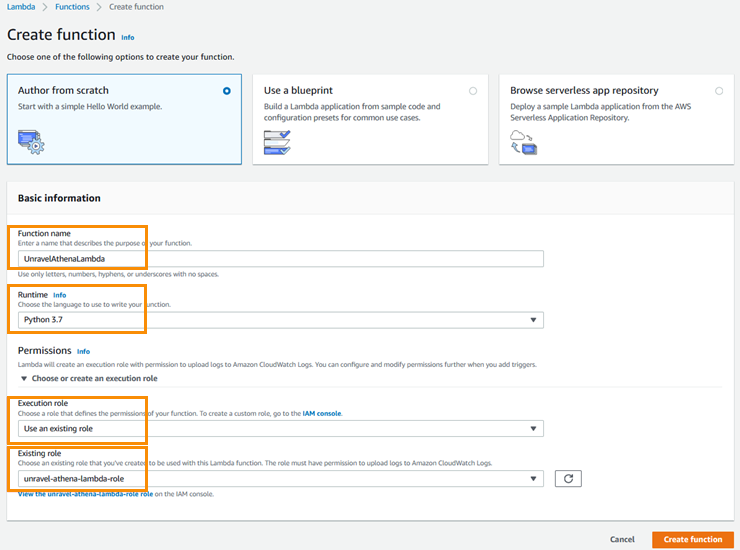
Click Create function.
AWS displays a banner indicating success, and displays your new Lambda function’s page.
Add a trigger to the Lambda function
From the list of triggers on the left, select S3.

In the Configure triggers section, enter the following:
Bucket:
unravel-cloudtrailEvent type: All object create events
Select the Enable trigger checkbox.
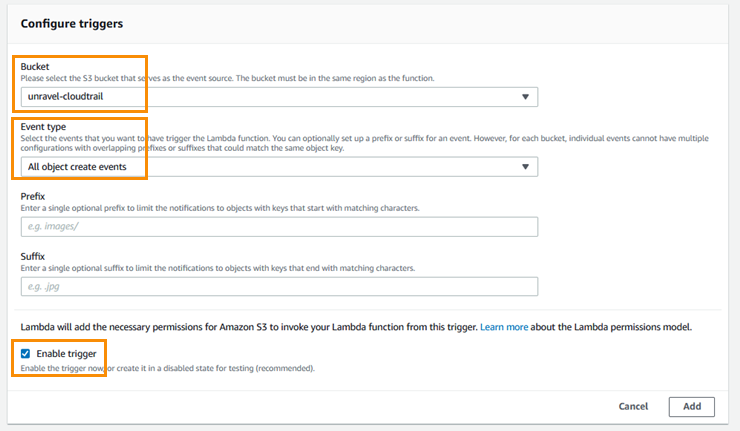
Click Add.
AWS shows the new S3 trigger at the bottom of the page.

At the top of the page, click Save.

Add code to Unravel’s AWS Lambda function
Select the new Lambda function:
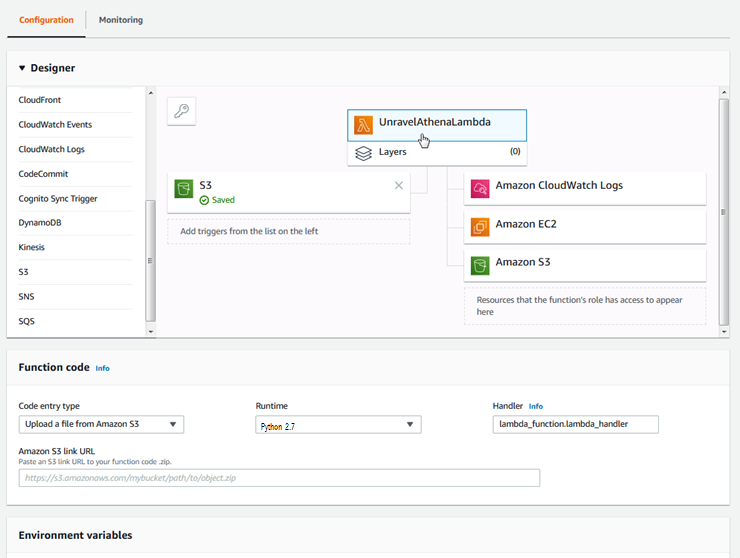
AWS displays configurable settings for this function.
In the Function code section, enter the following:
Code entry type: Upload a file Amazon S3
Amazon S3 link URL:
s3://unraveldatarepo/share/lambda/UnravelAthenaLambda.zipRuntime: Python 2.7
In the Environment variables section, enter the following key-value pair:
Key:
unravel_lr_urlValue:
http://private-IP-of-Unravel-Node:Port/logs/athena/j-default/athena/athenaWhere:
private-IP-of-Unravel-Nodeis the private IP address of your Unravel Server, andPortis 4043 unless 4043 is already in use (in which case, contact ).
In the Execution role section, enter the following:
Select Use an existing role.
Existing role: unravel-athena-lambda-role
In the Network section, specify your virtual private cloud (VPC) information:
Note
Don’t select No VPC.
Select your VPC.
Select at least two subnets from the pull-down list (hold CTRL to select multiple subnets).
Select your private security group (SG).
Review the inbound and outbound rules.
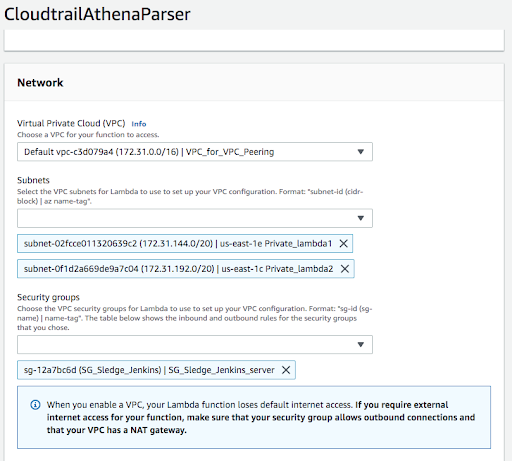
At the top of the page, click Test.
At the top of the page, click Save.
AWS displays a banner indicating success.
4. View Athena queries in Unravel UI
In Unravel UI, look at Athena | Apps.