Hortonworks Data Platform (HDP)
Check the installation requirements for HDP and follow the below instructions to download, install, and set up Unravel for the HDP platform.
1. Download Unravel
Important
Before you download, Unravel for your platform, ensure to get the username and password from Unravel Support.
Download the Unravel v4.7 package (RPM or Tar) using any of the following links:
You can refer to Download section to determine any specific Unravel version that you want to download.
2. Deploy Unravel binaries
Unravel binaries are shipped as a tar file as well as an RPM package. You can deploy the Unravel binaries in any directory on the server. However, the user who installs Unravel must have write permissions to the directory where Unravel binaries are deployed.
Deploy Unravel from a tar file
To deploy Unravel binaries from a tar file, do the following:
Create an Installation directory and grant ownership of the directory to the user who installs Unravel. This user executes all the processes involved in Unravel installation.
mkdir
/path/to/installation/directorychown -Rusername:groupname/path/to/installation/directoryFor example:
mkdir /opt/unravel
chown -R unravel:unravelgroup /opt/unravel
Extract the Unravel tar file to the installation directory, which was created as part of the prerequisite.
tar zxf unravel-<version>tar.gz -C /path/to/installation/directory
For example:
tar zxf unravel-<version>tar.gz -C /opt/unravel
Deploy Unravel from an RPM package
To install Unravel from an RPM package, do the following:
Create a directory and grant ownership of the directory to a user who will run Unravel.
mkdir
/path/to/installation/directorychown -Rusername:groupname/path/to/installation/directoryFor example:
mkdir /opt/unravel
chown -R unravel:unravelgroup /opt/unravel
Run the following command as a root user:
rpm -i unravel-<version>.rpm --prefix
/path/to/installation/directoryFor example:
rpm -i unravel-<version>.rpm --prefix
/opt/unravelThis deploys the binaries to the specified directory.
3. Run setup
After deploying the Unravel binaries, run the setup command from the installation directory.
<Unravel installation directory>/versions/<unravel version>/setup
For example:
/opt/unravel/versions/4.7.0.0/setup
When you run the setup command for the first time, you can pass additional parameters if you are integrating an external database or changing the default data directory:
Integrate database
If the setup command is run without additional parameters, the Unravel managed PostgreSQL database is used, which is shipped with the installer. However, if you want to use Unravel managed MySQL, MariaDB, or an external database, you can pass additional parameters with the setup command.
Example:
<unravel_installation_directory>/versions/<build>/setup --extra /tmp/mysql
<unravel_installation_directory>/versions/<build>/setup --extra /tmp/<MySQL-directory> --external-database
TYPEHOST PORT SCHEMA USERNAME PASSWORD/Note
Refer to Integrate database for all the requirements and details to integrate another database.
Change Unravel directories
All the Unravel configurations are located in the
datadirectory. By default, the installer maintains the data directory under<Unravel installation directory>/data. However, if you want to provide a different directory for data, you can run the setup command as follows:<unravel_installation_directory>/versions/<build>/setup --data-directory
/the/data/directorySimilarly, you can configure separate directories for all the Unravel directories such as
run,tmp,services, and so on by providing a configuration file.
Precheck is automatically run when you run the setup command. The precheck output displays the issues that prevent a successful installation and also provides suggestions to resolve them. You must resolve each of the issues before proceeding. <Can add link to the list of errors/issues reference>
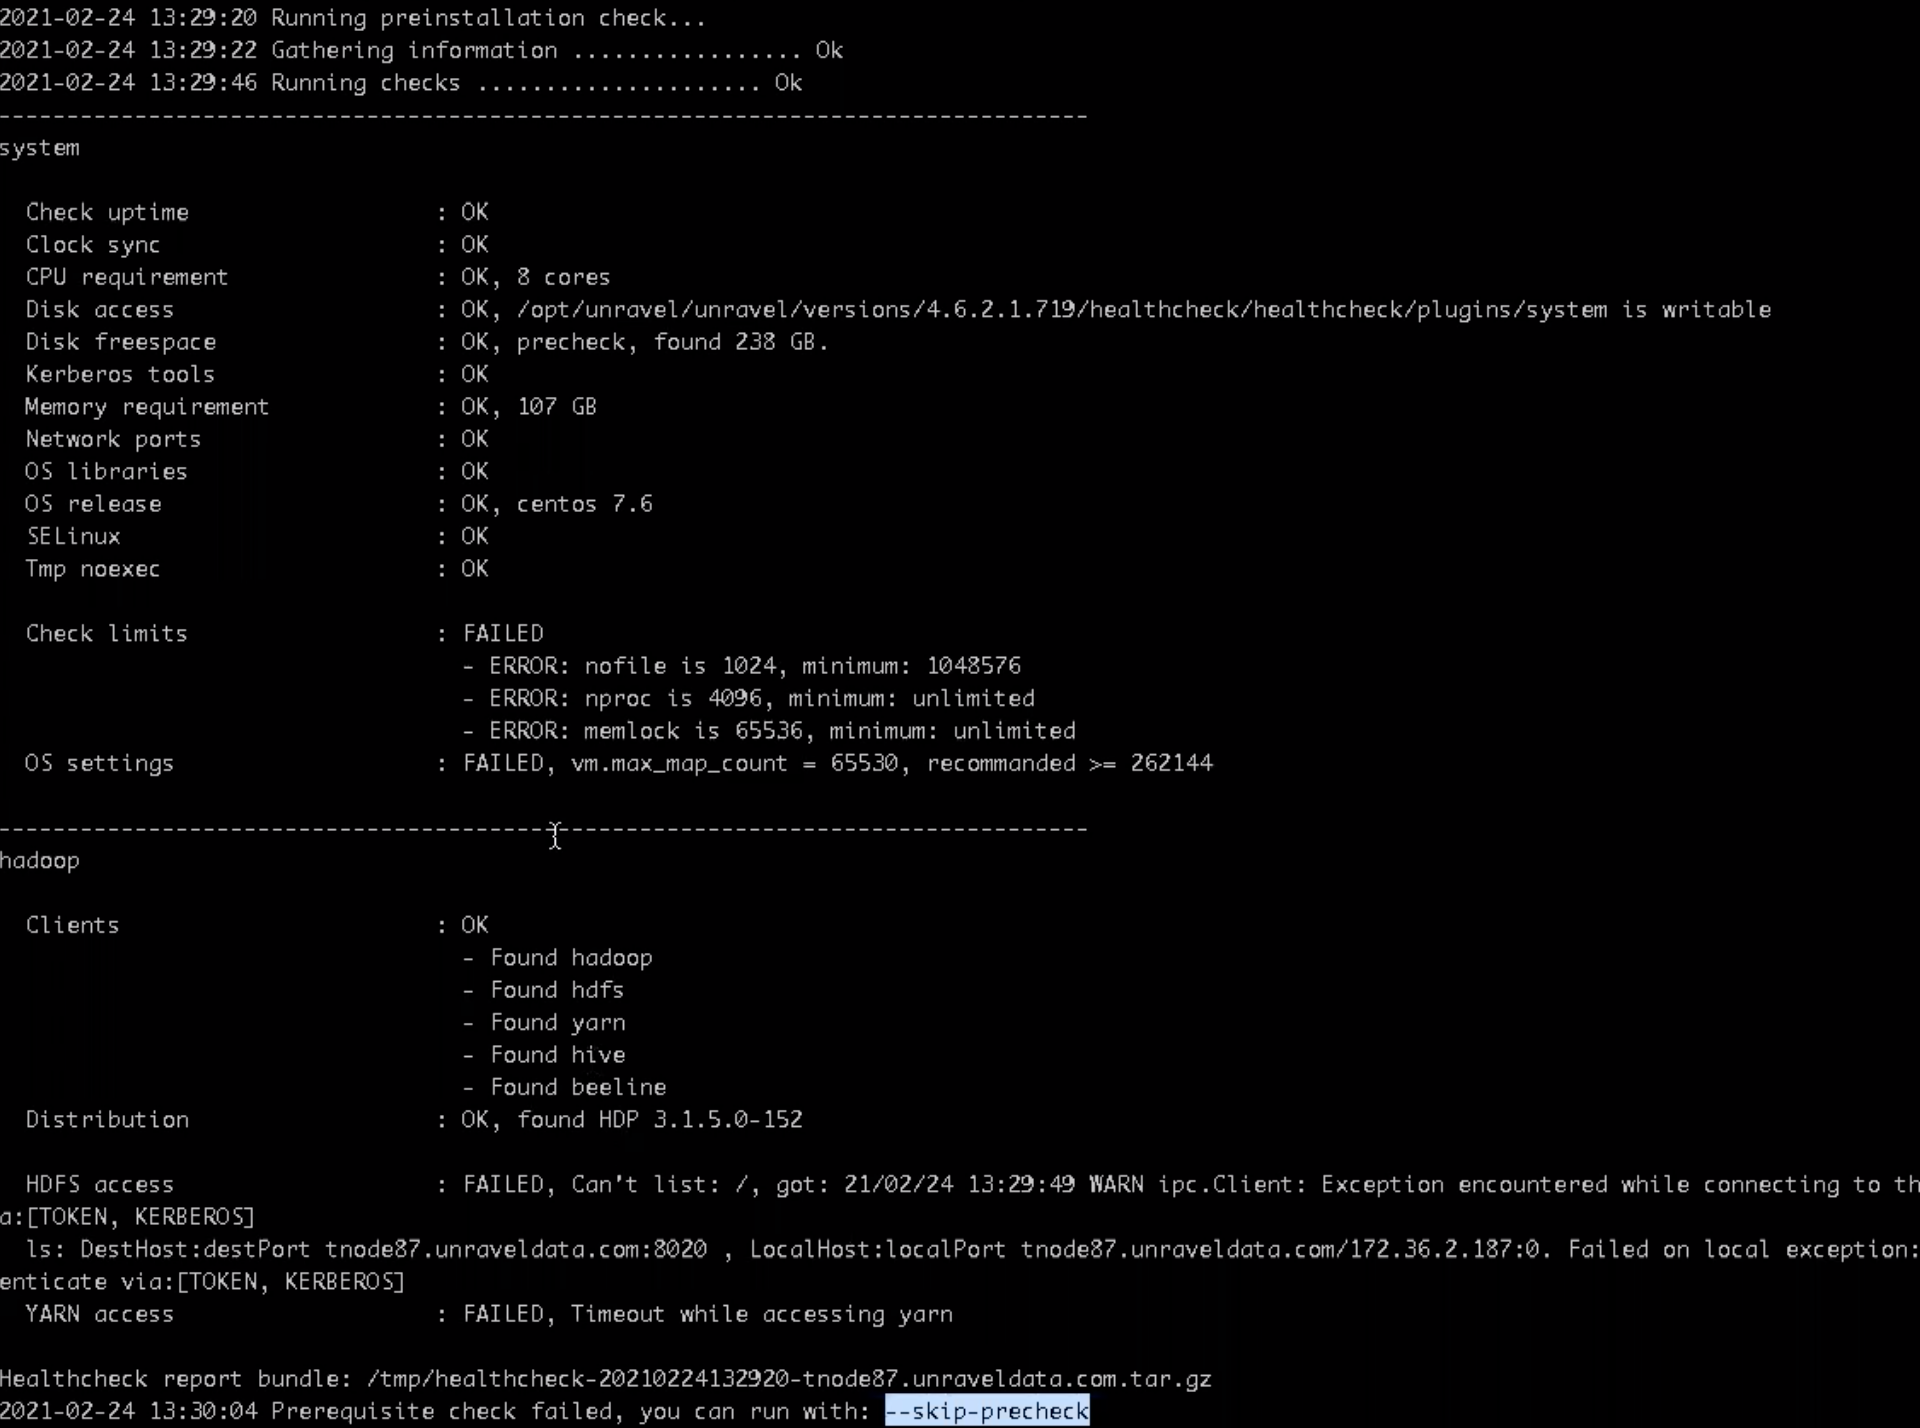
Note
In certain situations, you can skip the precheck using the setup --skip-precheck.
For example:
/opt/unravel/versions/<Unravel version>/setup --cluster-access=abc1011.p2g.net.eu.xyz --skip-precheck
You can also skip the checks that you know can fail. For example, if you want to skip memory and Hadoop checks, run the setup command as follows:
setup --filter-precheck ~hadoop,~mem_minimum
Run --help with the setup command and any combination of the setup command for complete usage details.
<unravel_installation_directory>/versions/<Unravel version>/setup --help
<unravel_installation_directory>/manager/manager config auto --help
4. Add configurations
Run manager config auto command to automatically pull in all the Hadoop configurations. You will be prompted to provide the location and credentials for Cloudera Manager or Ambari UI.
<unravel_installation_directory>/manager config auto
If you are using Kerberos authentication, set the principal path and keytab and then enable Kerberos authentication.
<Unravel installation directory>/manager config kerberos set --keytab /etc/security/keytabs/unravel.service.keytab --principal unravel/server@example.com

<Unravel installation directory>/manager config kerberos enable
Run the following steps from the manager tool to add certificates to the Truststore:
Autodetect file format based on the extension:
<unravel_installation_directory>/manager config tls trust add
 <certificates>
Force the uploading of certificate (pem/jks/pkcs) files:
manager config tls trust add --pem
<certificates>manager config tls trust add --jks<certificates>manager config tls trust add --pkcs12<certificates>Enable the Truststore
manager config tls trust
<enable|disable>
You can set additional Unravel configurations either at this point or later after you start all Unravel services.
Start all the services and check the status.
<unravel_installation_directory>/manager start watch
Optionally, you can run healthcheck to verify that all the configurations and services are running successfully.
<unravel_installation_directory>/manager run healthcheck
Healthcheck is run automatically, in the backend, in intervals. You can set your email to receive the healthcheck reports.
This topic explains how to configure Unravel to retrieve additional data from Hive, Tez, Spark, and Oozie, such as Hive queries, application timelines, Spark jobs, YARN resource management data, and logs. You can do this by generating Unravel's JARs and distributing them to every node that runs queries in the cluster. Later, after the JARs are distributed to the nodes, you can integrate Hive, Tez, and Spark data with Unravel.
Hive configurations
Import the hive hook sensor jar into the classpath
On the Ambari UI, click Hive > Configs > Advanced > Advanced hive-env. In the hive-env template, towards the end of line, add:
export AUX_CLASSPATH=${AUX_CLASSPATH}:<path to unravel hive hook sensor jar>/unravel-hive-1.2.0-hook.jarFor example:
export AUX_CLASSPATH=${AUX_CLASSPATH}:/usr/local/unravel-jars/unravel-hive-1.2.0-hook.jar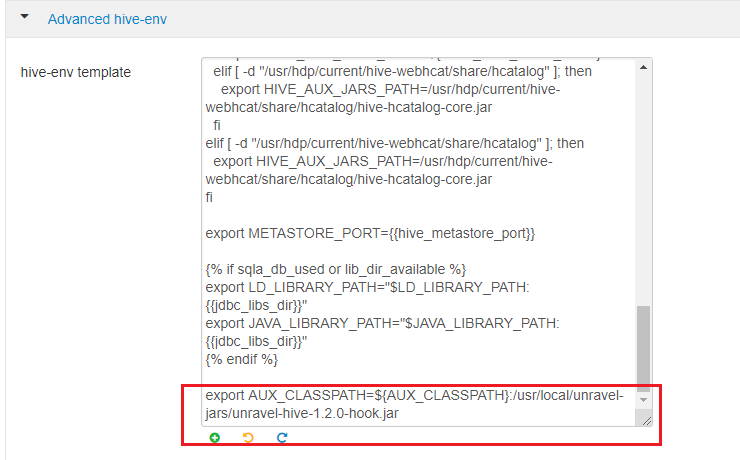
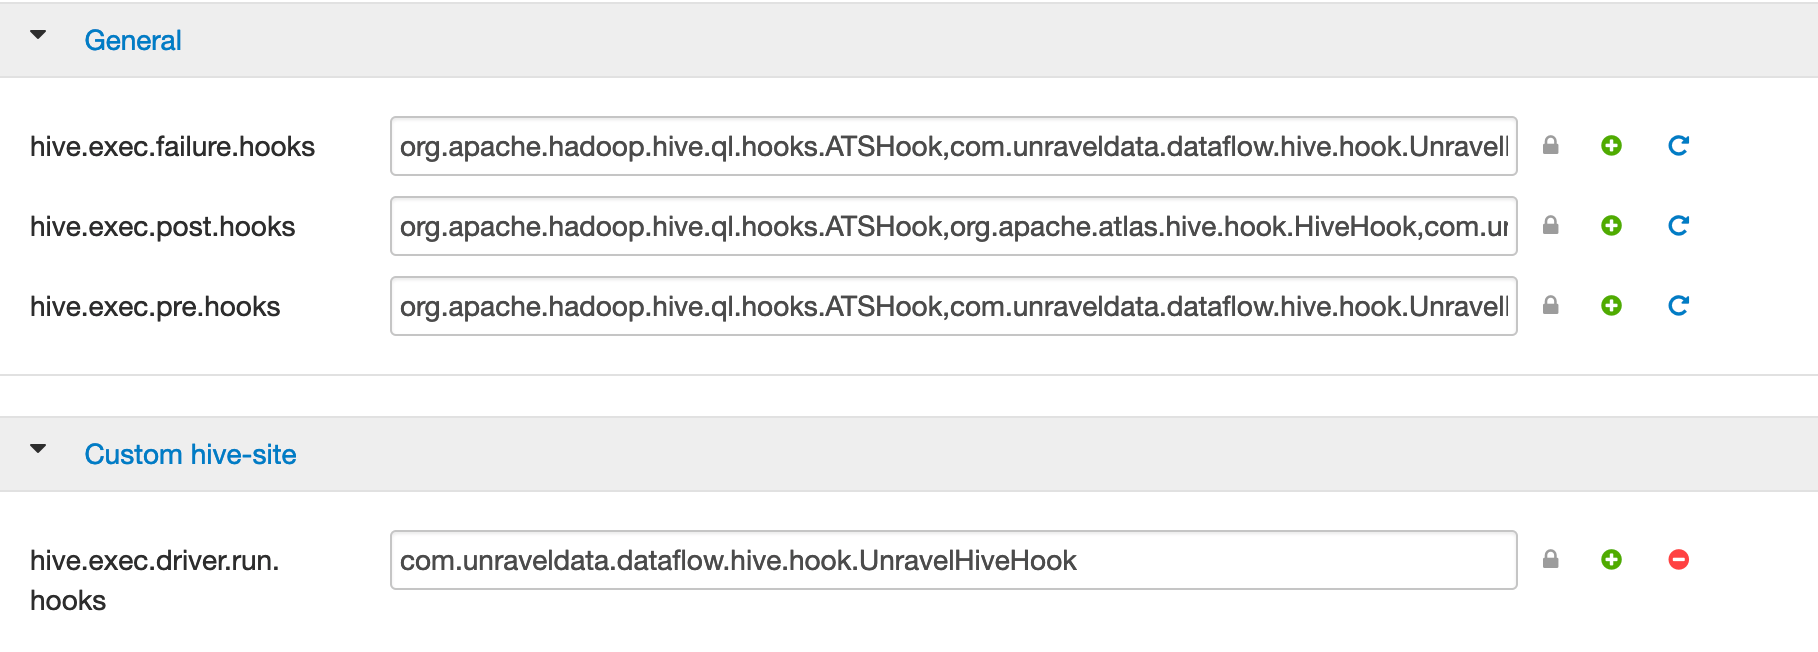
Configure hive hook
On the Ambari UI, click Hive > Configs > Advanced. In the General section, search for the following hive hooks:
hive.exec.failure.hooks hive.exec.post.hooks hive.exec.pre.hooks hive.exec.run.hooks Copy the
,com.unraveldata.dataflow.hive.hook.UnravelHiveHook,property against each of the hooks.Important
Be sure to append with no space before or after the comma, for example, property=existingValue,newValue
For example:
hive.exec.failure.hooks=
existing-value,com.unraveldata.dataflow.hive.hook.UnravelHiveHook hive.exec.post.hooks=existing-value,com.unraveldata.dataflow.hive.hook.UnravelHiveHook hive.exec.pre.hooks=existing-value,com.unraveldata.dataflow.hive.hook.UnravelHiveHook hive.exec.run.hooks=existing-value,com.unraveldata.dataflow.hive.hook.UnravelHiveHookIn case you do not find these hive hooks, go to the Custom hive-site section, click Add Property and add these as key and value per line in the Properties text box.
For example:
hive.exec.pre.hooks=com.unraveldata.dataflow.hive.hook.UnravelHiveHook
Similarly, ensure to set com.unraveldata.host: to
unravel-gateway-internal-IP-hostnamefrom the Custom hive-site section.Optional: Hive LLAP if it is enabled
Tip
Edit
hive-site.xmlmanually, not through Ambari Web UI.Copy the settings in Custom hive-interactive-site and paste them into
/etc/hive/conf/hive-site.xml.Copy the settings in Advanced hive-interactive-env and paste them into
/etc/hive/conf/hive-site.xml.
Configure HDFS
Click HDFS > Configs > Advanced > Advanced hadoop-env. In the hadoop-env template, look for export HADOOP_CLASSPATH and append Unravel's JAR path as shown.
export HADOOP_CLASSPATH=${HADOOP_CLASSPATH}:<Unravel sensor installation directory>/unravel-hive-1.2.0-hook.jar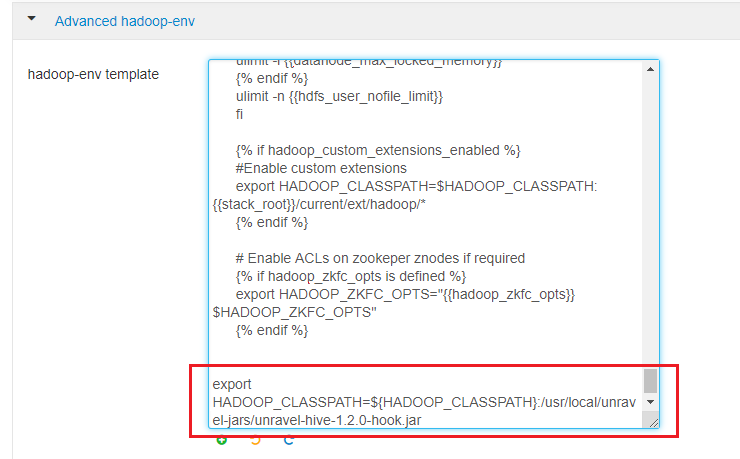
Configure the BTrace agent for Tez
From the Ambari UI, go to Tez > config > Advanced and in the General section, append the Java options below to tez.am.launch.cmd-opts and tez.task.launch.cmd-opts:
-javaagent:
<Unravel sensor installation directory>/jars/btrace-agent.jar=libs=mr,config=tez -Dunravel.server.hostport=<unravel-host>:4043Tip
In a Kerberos environment, you need to modify tez.am.view-acls property with the "run as" user or *.
Configure the Application Timeline Server (ATS)
Note
From Unravel v4.6.1.6, this step is not mandatory.
In
yarn-site.xml:yarn.timeline-service.enabled=true yarn.timeline-service.entity-group-fs-store.group-id-plugin-classes=org.apache.tez.dag.history.logging.ats.TimelineCachePluginImpl yarn.timeline-service.version=1.5 or yarn.timeline-service.versions=1.5f,2.0f
If yarn.acl.enable is
true, addunravelto yarn.admin.acl.In
hive-env.sh, add:Use ATS Logging: true
In
tez-site.xml, add:tez.dag.history.logging.enabled=true tez.am.history.logging.enabled=true tez.history.logging.service.class=org.apache.tez.dag.history.logging.ats.ATSV15HistoryLoggingService tez.am.view-acls=
unravel-"run-as"-user or *Note
From HDP version 3.1.0 onwards, this Tez configuration must be done manually.
Configure Spark-on-Yarn
Tip
For
unravel-host, use Unravel Server's fully qualified domain name (FQDN) or IP address.Add the location of the Spark JARs.
Click Spark > Configs > Custom spark-defaults > Add Property and use
 Bulk property add mode, or edit
 spark-defaults.confas follows:Tip
If your cluster has only one Spark 1.X version,
spark-defaults.confis in/usr/hdp/current/spark-client/conf.If your cluster is running Spark 2.X,
spark-defaults.confis in/usr/hdp/current/spark2-client/conf.
This example uses default locations for Spark JARs. Your environment may vary.
spark.unravel.server.hostport=
unravel-host:4043 spark.driver.extraJavaOptions=-javaagent:/usr/local/unravel-jars/btrace-agent.jar=config=driver,libs=<spark-version>spark.executor.extraJavaOptions=-javaagent:/usr/local/unravel-jars/btrace-agent.jar=config=executor,libs=<spark-version>spark.eventLog.enabled=trueFor example:
spark.unravel.server.hostport=xyznode.unraveldata.com:4043
spark.driver.extraJavaOptions=-javaagent:/usr/local/unravel-jars/btrace-agent.jar=config=driver,libs=spark-2.3
spark.executor.extraJavaOptions=-javaagent:/usr/local/unravel-jars/btrace-agent.jar=config=executor,libs=spark-2.3
spark.eventLog.enabled=true
Note
If you have multiple Spark services in the same cluster, you must set the Spark default configuration on each of them.
Configure Oozie
Define the following properties in <Unravel installation directory>/data/conf/unravel.properties. If you do not find the properties add them.
Tez.
Set these if the Application Timeline Server (ATS) requires authentication.
Run
<Unravel installation directory>/install_bin/hive_test_simple.shon the HDP cluster or on any cloud environment wherehive.execution.engine=tez.Log into Unravel server and go to the Applications page. Check for Tez jobs.
Unravel UI may take a few seconds to load Tez data.
Learn how to set Unravel configurations and add more configurations .