Install Unravel on GCP Dataproc
Before installing Unravel on Google Dataproc, check and ensure that the Unravel installation requirements are completed and follow the instructions to install and configure Unravel:
Create and configure the GCE instance
On your GCP console, go to the GCEs dashboard and click Create Instance.
Select the following options based on Unravel's instance requirements:
Base OS
Instance type and size
GCE instance's Firewall Rules
Ports
Networking
The GCE instance must be in the same network as the target Dataproc clusters, which the Unravel compute node is monitoring.
Firewall rules or policies
Create a Cloud storage ReadAccess only IAM role and assign it to Unravel GCE to read the archive logs on the Cloud storage bucket configured for the Dataproc cluster.
Create TCP and UDP connections from the Dataproc master node to Unravel Compute node.
Create a firewall rule that allows port 3000 and port 4043 from Dataproc cluster nodes' IP addresses, and put the member of the Firewall Rules used on the Dataproc cluster in this rule.
Sample inbound rule Type
Protocol
Port range
Source
All traffic
All
All
For example, 10.10.0.0/16
SSH
TCP
22
0.0.0.0/0 or trusted public IP for SSH access
Custom TCP Rule
TCP
3000
Custom TCP Rule
TCP
4043
Sample outbound rule Type
Protocol
Port range
Source
All traffic
All
All
0.0.0.0/0
Note
The GCE instance should have all TCP access to the Dataproc cluster (server/parent or worker) nodes. You can grant access by adding firewall rules of the Dataproc server/parent and worker with all TCP and all port ranges.
If it isn't possible to allow the Unravel VM access to all traffic to the Dataproc cluster, you must minimally allow it to access cluster nodes' TCP ports 9870, 9866, and 9867.
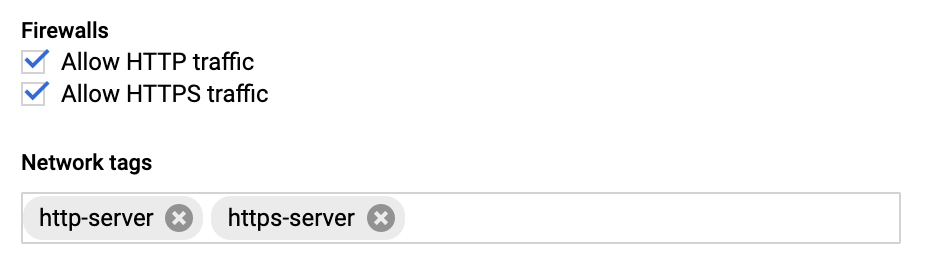
While creating the GCE instance, add the Firewall properties, Enable the HTTP and HTTPS traffic Go to Network tab, and add Network tags. (This is the firewall rule that is already created.)
Configure the GCE instance
Disable
selinux.sudo setenforce Permissive
Edit
/etc/selinux/configto make sure the setting persists after reboot and make sureSELINUX=permissive.sudo vi /etc/selinux/config
Install
libaio.x86_64,lzop.x86_64, andntp.x86_64.sudo yum install -y libaio.x86_64 sudo yum install -y lzop.x86_64 sudo yum install -y ntp.x86_64
Start ntpd and check the system time.
sudo service ntpd start
sudo ntpq -p
Create a new user named
hadoop.sudo useradd hadoop
Download Unravel
Deploy Unravel binaries
Install Unravel on GCE
You can install Unravel either with Interactive Precheck or manually without Interactive Precheck.
Note
Unravel recommends installation with Interactive Precheck.
Install Unravel with Interactive Precheck on GCE
Install Unravel manually
You can run the setup command to install Unravel. The setup command does the following:
Runs Precheck automatically to detect possible issues that prevent a successful installation. Suggestions are provided to resolve issues. Refer to Precheck filters for the expected value for each filter.
Let you run extra parameters to integrate the database of your choice.
The setup command allows you to use a managed database shipped with Unravel or an external database. When run without any additional parameters, the setup uses the Unravel managed PostgreSQL database. Otherwise, you can specify one of the following types of databases in the setup command:
MySQL (Unravel managed as well as external MySQL database)
MariaDB (Unravel managed)
PostgreSQL (Unravel managed)
Refer to Integrate database for details.
Let you specify a separate path for the data directory other than the default path.
The Unravel data and configurations are located in the
datadirectory. By default, the installer maintains the data directory under<Unravel installation directory>/data. You can also change the data directory's default location by running additional parameters with the setup command.Provides more setup options.
Notice
The Unravel user who owns the installation directory should run the setup command to install Unravel.
To install Unravel with the setup command, do the following:
After deploying the binaries, if you are the root user, switch to Unravel user.
su -
<unravel user>Run setup command:
Note
Refer to setup Options for all the additional parameters that can be run with the setup command
Refer to Integrate database topic and complete the pre-requisites before running the setup command with any other database other than Unravel managed PostgreSQL, which is shipped with the product. Extra parameters must be passed with the setup command when you use another database.
Tip
Optionally, if you want to provide a different data directory, you can pass an extra parameter (--data-directory) with the setup command as shown below:
<unravel_installation_directory>/unravel/versions/
<Unravel version>/setup --data-directory/the/data/directorySimilarly, you can configure separate directories for other unravel directories. Contact support for assistance.
PostgreSQL
Unravel managed PostgreSQL
<unravel_installation_directory>/unravel/versions/
<Unravel version>/setup --enable-dataprocExternal PostgreSQL
<unravel_installation_directory>/unravel/versions/
<Unravel version>/setup --enable-dataproc --external-database postgresql<HOST><PORT><SCHEMA><USERNAME><PASSWORD>##TheHOST,PORT,SCHEMA,USERNAME,PASSWORDare optional fields and are prompted if missing. ##For example: /opt/unravel/versions/abcd.992/setup --enable-dataproc --external-database postgresql xyz.unraveldata.com 5432 unravel_db_prod unravel unraveldataNote
If you have configured the secure connection from Unravel GCP to the external PostgreSQL database with Cloud SQL Auth proxy, then run the command using the local host as follows:
<unravel_installation_directory>/unravel/versions/
<Unravel version>/setup --enable-dataproc --external-database postgreSQL 127.0.0.1 5432<SCHEMA><USERNAME><PASSWORD>##TheSCHEMA,USERNAME,PASSWORDare optional fields and are prompted if missing.
MySQL
Unravel managed MySQL
<unravel_installation_directory>/unravel/versions/
<Unravel version>/setup --enable-dataproc --extra /tmp/mysqlExternal MySQL
<unravel_installation_directory>/unravel/versions/
<Unravel version>/setup --enable-dataproc --extra /tmp/<MySQL-directory> --external-database mysql<HOST><PORT><SCHEMA><USERNAME><PASSWORD>##TheHOST,PORT,SCHEMA,USERNAME,PASSWORDare optional fields and are prompted if missing.Note
If you have configured the secure connection from Unravel GCP to the external MySQL database with Cloud SQL Auth proxy, then run the command using the local host as follows:
<unravel_installation_directory>/unravel/versions/
<Unravel version>/setup --enable-dataproc --extra /tmp/<MySQL-directory> --external-database mysql 127.0.0.1 3306<SCHEMA><USERNAME><PASSWORD>##TheSCHEMA,USERNAME,PASSWORDare optional fields and are prompted if missing.
MariaDB
Unravel managed MariaDB
<unravel_installation_directory>/unravel/versions/
<Unravel version>/setup --enable-dataproc --extra /tmp/mariadbExternal MariaDB
<unravel_installation_directory>unravel/versions/
<Unravel version>/setup --enable-dataproc --extra /tmp/<MariaDB-directory>--external-database mariadb<HOST><PORT><SCHEMA><USERNAME><PASSWORD>##TheHOST,PORT,SCHEMA,USERNAME,PASSWORDare optional fields and are prompted if missing.
Precheck is automatically run when you run the setup command. Refer to Precheck filters for the expected value for each filter.
Set the following property:
<unravel_installation_directory>/unravel/manager config properties set com.unraveldata.process.event.log false
Set the license file name.
<Unravel installation directory>/unravel/manager config license set
<license filename>This command takes a filename as input and performs the following actions:
Reads the license file
The license YAML file contains product licensing information, license validity and expiration date, and the licensed number of clusters and nodes.
Verifies whether it is a valid license
Adds the com.unraveldata.license.file property to the
unravel.propertiesfile located at<unravel installation directory>/data/conf
Note
If you do not provide the license filename, the
manager config license setcommand prompts for the license information. You can copy the content of the license file.Sample content of the license file:
##### BEGIN UNRAVEL LICENSE
Licensee     : ACME Disintegrating Pistol Manufacturing
Valid from    :  2022-12-16 00:00:00 UTC
Expire after  :  2023-10-16 23:59:00 UTC
License type : Enterprise
Licensed number of nodes : 1000000
Signature    : c2Uvb2JqLnRhcmdldC92OF9pbml0aWFsaXplcnMvZ2VuL3RvcnF1ZS
Revision     : 1
##### END UNRAVEL LICENSE #####
Apply the changes
<unravel_installation_directory>/unravel/manager config apply --restart
Check the status of services.
<unravel_installation_directory>/unravel/manager report
The following service statuses are reported:
OK: Service is up and running.
Not Monitored: Service is not running. (Has stopped or has failed to start)
Initializing: Services are starting up.
Does not exist: The process unexpectedly disappeared. Restarts will be attempted 10 times.
You can also get the status and information for a specific service. Run the manager report command as follows:
<unravel_installation_directory>/unravel/manager report <service>
## For example: /opt/unravel/manager report auto_action
The Precheck output displays the issues that prevent a successful installation and provides suggestions to resolve them. You must resolve each of the issues before proceeding. See Precheck filters.
After the prechecks are resolved, you must re-login or reload the shell to execute the setup command again.
Here is a sample of the Precheck run result:
/opt/unravel/versions/abcd.1004/setup
2021-04-05 15:51:30 Sending logs to: /tmp/unravel-setup-20210405-155130.log
2021-04-05 15:51:30 Running preinstallation check...
2021-04-05 15:51:31 Gathering information ................. Ok
2021-04-05 15:51:51 Running checks .................. Ok
--------------------------------------------------------------------------------
system
 Check limits        : PASSED
 Clock sync          : PASSED
 CPU requirement     : PASSED, Available cores: 8 cores
 Disk access         : PASSED, /opt/unravel/versions/develop.1004/healthcheck/healthcheck/plugins/system is writable
 Disk freespace      : PASSED, 229 GB of free disk space is available for precheck dir.
 Kerberos tools      : PASSED
 Memory requirement  : PASSED, Available memory: 79 GB
 Network ports       : PASSED
 OS libraries        : PASSED
 OS release          : PASSED, OS release version: centos 7.6
 OS settings         : PASSED
 SELinux             : PASSED
--------------------------------------------------------------------------------
Healthcheck report bundle: /tmp/healthcheck-20210405155130-xyz.unraveldata.com.tar.gz
2021-04-05 15:51:53 Prepare to install with: /opt/unravel/versions/abcd.1004/installer/installer/../installer/conf/presets/default.yaml
2021-04-05 15:51:57 Sending logs to: /opt/unravel/logs/setup.log
2021-04-05 15:51:57 Instantiating templates ................................................................................................................................................................................................................................ Ok
2021-04-05 15:52:05 Creating parcels .................................... Ok
2021-04-05 15:52:20 Installing sensors file ............................ Ok
2021-04-05 15:52:20 Installing pgsql connector ... Ok
2021-04-05 15:52:22 Starting service monitor ... Ok
2021-04-05 15:52:27 Request start for elasticsearch_1 .... Ok
2021-04-05 15:52:27 Waiting for elasticsearch_1 for 120 sec ......... Ok
2021-04-05 15:52:35 Request start for zookeeper .... Ok
2021-04-05 15:52:35 Request start for kafka .... Ok
2021-04-05 15:52:35 Waiting for kafka for 120 sec ...... Ok
2021-04-05 15:52:37 Waiting for kafka to be alive for 120 sec ..... Ok
2021-04-05 15:52:42 Initializing pgsql ... Ok
2021-04-05 15:52:46 Request start for pgsql .... Ok
2021-04-05 15:52:46 Waiting for pgsql for 120 sec ..... Ok
2021-04-05 15:52:47 Creating database schema ................. Ok
2021-04-05 15:52:50 Generating hashes .... Ok
2021-04-05 15:52:52 Loading elasticsearch templates ............ Ok
2021-04-05 15:52:55 Creating kafka topics .................... Ok
2021-04-05 15:53:36 Creating schema objects ....................................................................................................................................................................................................................................................................................................................................................................................................................................................................................................................................................................................................................................................................................................................................................................................................................................................................................................................................................................................................................................................................................................................................................................................................................................................................................................................................................................................................................................................................................................................................................................................................................................................................................................................................................................................................................................................................................................................................................................................................................................................... Ok
2021-04-05 15:54:03 Request stop ....................................................... Ok
2021-04-05 15:54:16 Done
[unravel@xyz ~]$
Note
In certain situations, you can skip the precheck using the setup --skip-precheck command
For example:
/opt/unravel/versions/<Unravel version>/setup --skip-precheck
You can also skip the checks that you know can fail. For example, if you want to skip the Check limits option and the Disk freespace option, pick the command within the parenthesis corresponding to these failed options and run the setup command as follows:
setup --filter-precheck ~check_limits,~check_freespace
Tip
Run --help with the setup command and any combination of the setup command for complete usage details.
<unravel_installation_directory>/unravel/versions/<Unravel version>/setup --help
Connecting Unravel Server to a new Dataproc cluster
This section explains how to set up and configure your Dataproc cluster, so Unravel can begin monitoring jobs running on the cluster.
Assumptions
The GCE instance for Unravel Server has been created.
Unravel services are running.
The Unravel GCE instance and Dataproc clusters allow all outbound traffic.
The nodes in the Dataproc cluster allow all traffic from the Unravel GCE. This implies either one of the following configurations:
The DataProc cluster is on a different VPC, and you've configured VPC peering, route table creation, and updated your Firewall policy.
The DataProc cluster is on a different VPC, and you've configured VPC peering, route table creation, and updated your Firewall policy.
Network ACL on VPC allows all traffic.
Connect to a new DataProc cluster
Perform the following steps to run Initialization actions, unravel_dataproc_init.py, on all nodes in the cluster. The bootstrap script makes the following changes:
On the server/parent node:
On Hive clusters, it updates
/etc/hive/conf/hive-site.xml.On Spark clusters, it updates
/etc/spark/conf/spark-defaults.conf.It updates
/etc/hadoop/conf/mapred-site.xml.It updates
/etc/hadoop/conf/yarn-site.xml.If Tez is installed, it updates
/etc/tez/conf/tez-site.xml.It installs and starts the
unravel_esdaemon in/usr/local/unravel_es.It installs the Spark and MapReduce sensors in
/usr/local/unravel-agent.It installs the Hive Hook sensor in
/usr/lib/hive/lib/.
On all other nodes:
It installs the Spark and MapReduce sensors in
/usr/local/unravel-agent.It installs Hive sensors in
/usr/lib/hive/lib.
Be sure to substitute your specific bucket location for my-bucket.
Download Unravel's bootstrap script,
unravel_dataproc_init.pyusingcurlorgsutil.curlcurl https://storage.cloud.google.com/unraveldata.com/unravel_dataproc_init.py -o /tmp/unravel_dataproc_bootstrap.py
gsutilgsutil cp gs://unraveldata.com/unravel_dataproc_init.py /tmp/unravel_dataproc_init.py
Upload the bootstrap script to a Google Cloud Storage Bucket.
Permissions needed
You need the write access to the Cloud Storage bucket that you want to upload the init actions script to. In addition, the GCP account you use to create the Dataproc cluster must have read access to the init action script to execute its directives.
Use
gsutilto upload the init action script to the default Dataproc logging bucket.gsutil cp unravel_dataproc_init.py gs://
my-bucket/unravel_dataproc_init.pyIn the GCP console, select the Dataproc services and click Create cluster.
In the Create Dataproc cluster window, click CREATE for the Cluster on Compute Engine option.
In the Set up cluster section, enter the cluster name and select Standard or Single Node cluster type.
In the Versioning section, ensure that the 2.0 (Debian 10, Hadoop 3.2, Spark 3.1) standard dataproc image is selected.
You can skip the Configure nodes section.
In the Customize cluster section, perform the following actions:
Section
Option
Network configuration
Specify the Network Options such as the VPC and subnet.
Important
Ensure that the Dataproc cluster and the Unravel server are created on the same VPC and subnet. For more information, see prerequisites.
Initialization actions
Click ADD INITIALIZATION ACTION and select the
<my-bucket>/unravel_dataproc_init.pyunraveldata.com/unravel_dataproc_init.pyCustom cluster metadata
Add the Unravel server details in the following fields:
Key:
unravel-serverValue:
<your-unravel-server-public-IP-address>Example:
unravel-gke-ns-udedev.unraveldata.comCaution
If the Unravel server name is not configured, the cluster is not integrated with the virtual machine (Unravel node).
If you want to enable MapReduce sensor and configuration, you can specify the following values:
Key:
allValue:
true
unravel-server key value now supports optional protocol and port if Unravel UI is TLS enabled.
both
<unravel-server-public-IP-address>or https://<yunravel-server-public-IP-address>:3000 are supported.For example: test-dataproc.unraveldata.com or https://test-dataproc.unraveldata.com:3000 or 10.10.10.1 or 10.10.10.1:3000
New optional key and value for Unravel API server (LR server) TLS
key: lr-tls value: true
key: lr-port value: 4443
Skip the Manage security section.
Click CREATE.
A new Dataproc cluster is created.
Sanity check
After you connect the Unravel GCE to your Dataproc cluster, run some jobs on the Dataproc cluster and monitor the information displayed in Unravel UI (http://unravel_VM_node_public_IP:3000).