Small files
Note
These reports are available only for Cloudera Distribution of Apache Hadoop (CDH) and Cloudera Data Platform (CDP) platforms and require HDFS administrator privileges. If you can't grant HDFS administrator privileges to the user unravel, refer to configuring FSimage.
A single mapper accesses each small file. Therefore, a large number of small files can lead to a large number of mappers. Mappers are costly to run and drive up your app's costs. This report helps you identify users who create/use an excessive amount of small files.
You can use this information to take corrective action, such as:
Combine multiple files into large files.
Notify, limit, or block users who create or use an excessive amount.
Taking actions:
Corrects and prevents future performance degradation.
Lowers your costs to run apps.
The tab opens, displaying the last successfully generated report, if any. It is sorted in descending order of the total number of small files in the directory. The report's parameters are listed above the table headings. You can search the table by path list; any path matching or containing the search string is displayed.
All reports, whether scheduled or ad hoc, are archived. Successful reports can be viewed or downloaded from the Report Archives tab.
Configuring the Small files report
Stop Unravel
<Unravel installation directory>/unravel/manager stop
Set the Small files report properties as follows:
<Unravel installation directory>/unravel/manager config properties set
<property><value>For example: /opt/unravel-install/unravel/manager config properties set com.unraveldata.ngui.sfhivetable.schedule.interval 2dRefer to Small files and Small files and Files reports for the complete list of properties that can be configured for the Small files report.
Apply the changes.
<Unravel installation directory>/unravel/manager config apply
Start Unravel
<Unravel installation directory>/unravel/manager start
Generating Small Files report
Click the
 button to generate a new report. The parameters are:
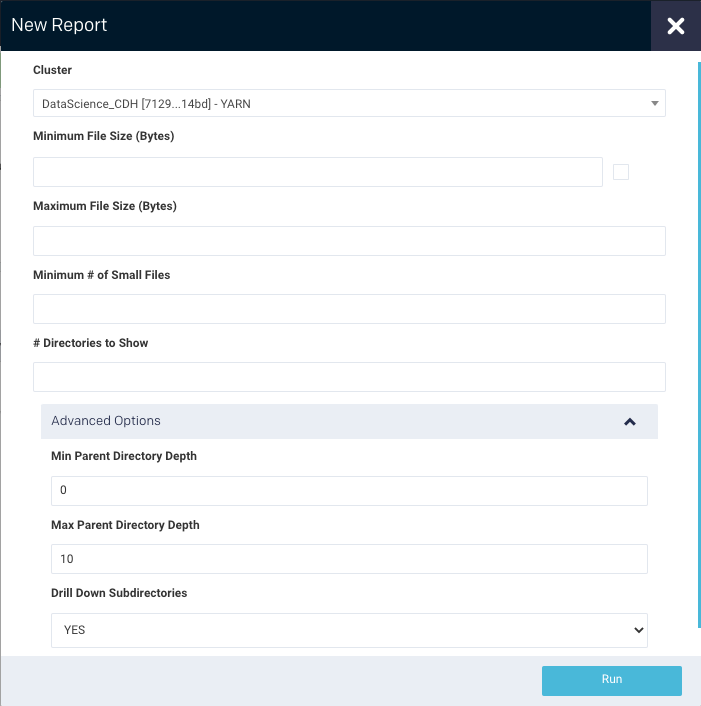
Cluster: In a multi-cluster setup, you can select the cluster you want to generate the report.
Minimum File Size (bytes)/ Maximum File Size byte: Only those files whose size ranges between the minimum and maximum file size specified will be counted for the report.
Minimum # of Small Files: Minimum number of files in a directory matching the above size criteria. The directories fulfilling this criterion are selected for the report.
# Directories to Show: This is the maximum number of directories to display.
Advanced Options:
Min parent directory depth: Minimum depth to start at, that is, root + x descendants, i.e., 0=root, 1=root's children (/one), etc.
Max parent directory depth: Maximum depth to end at, that is, root + x descendants, i.e., 1=root's children (/one), 2=root's grandchildren, (/one/two), etc.
Drill down sub-directories: Determines how the files are accounted for in the system hierarchy. Yes (default): Accounts the file size to all its ancestor's directories. No: Accounts the file size to its parent directory.
Note
Min parent directory depth and Max parent directory depth must be between 0 and 50.
Click Run to generate the report.
The progress of the report generation is shown at the top of the page.
A light green bar appears when the report is successful and results are displayed. Upon failure, the bar is light red, and the New Report button turns orange.
Click
 to download the current report that is displayed.
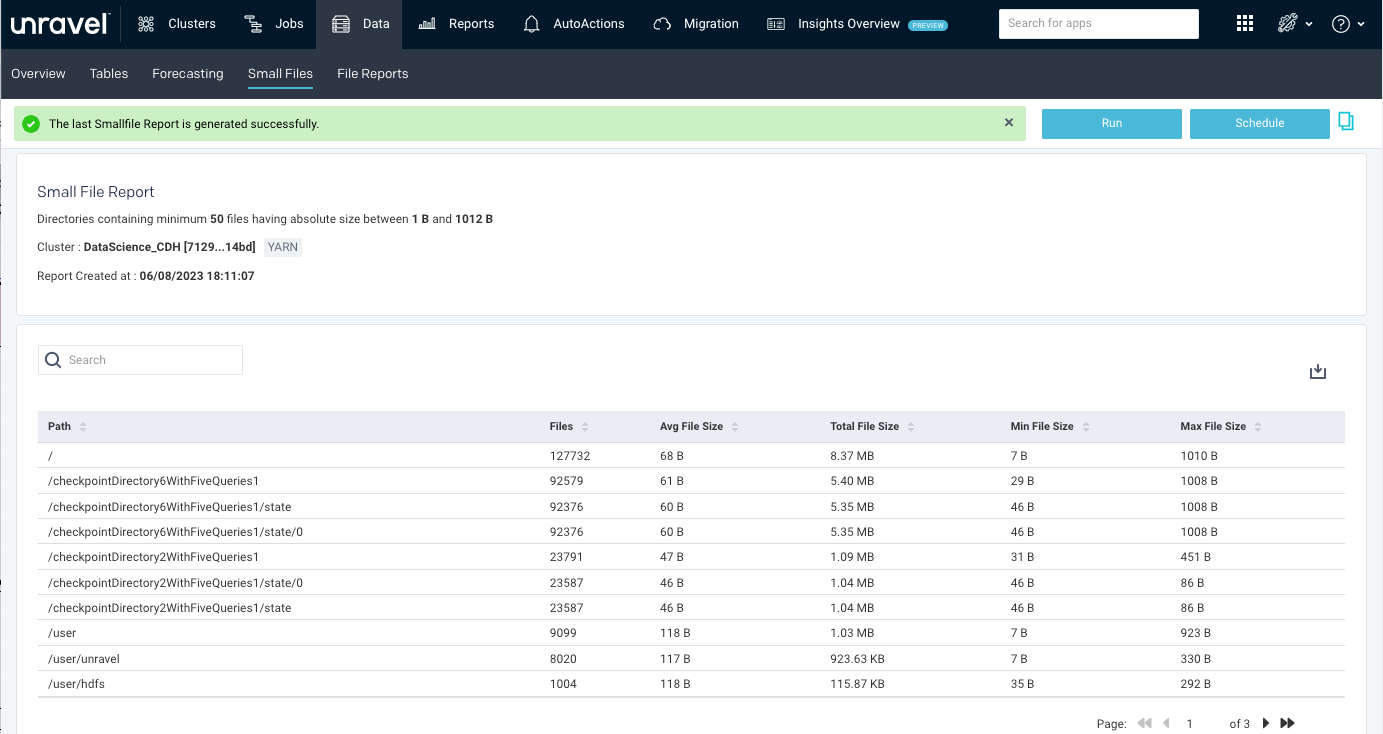
Scheduling Small files report
Click Schedule to generate the report regularly (See Generating Small Files report) and provide the following additional details for scheduling:
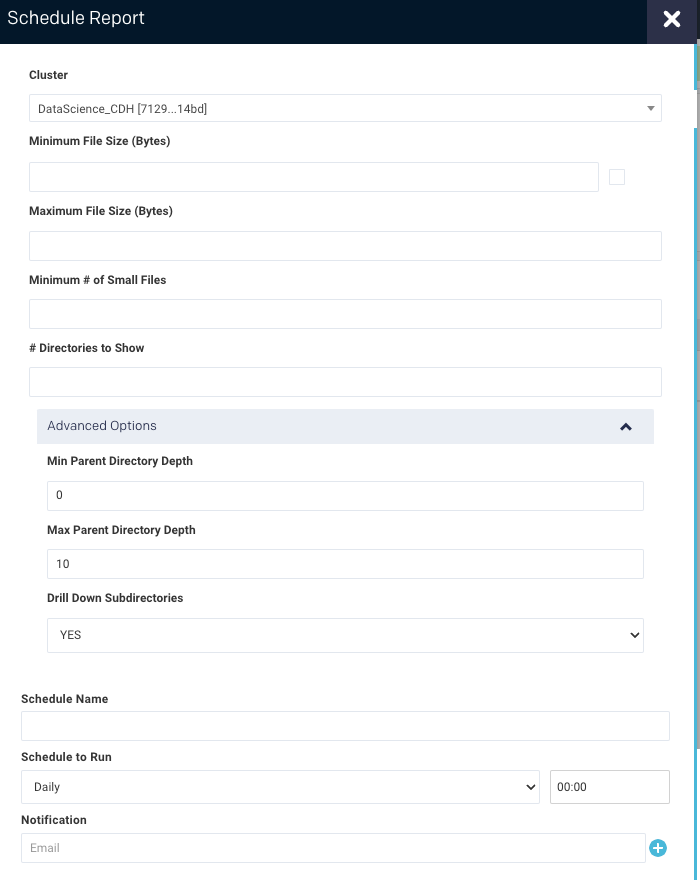
Schedule Name: Name of the schedule.
Schedule to Run: Select any of the following schedule options from the drop-down and set the time from the hours and minutes drop-down:
Daily
Weekdays (Sun-Sat)
Every two weeks
Every month
Notification: Provide an email ID to receive the notification of the reports generated.
Click Schedule