Connecting Unravel Server to a new or existing EMR cluster
This topic explains how to set up and configure your EMR cluster so that Unravel can begin monitoring jobs running on the cluster.
Assumptions
The EC2 instance for Unravel Server has been created.
Unravel services are running.
The security group on the Unravel EC2 instance allows traffic to/from EMR cluster nodes on TCP port 3000.
The Unravel EC2 instance and EMR clustersallow all outbound traffic.
The nodes in the EMR cluster allow all traffic from the Unravel EC2 instance. This implies either of the following configurations:
The EMR cluster and Unravel EC2 instance are on the same VPC and same subnet, and their security group allows all traffic from the same subnet.
The EMR cluster is on a different VPC, and you've configured VPC peering, route table creation, and updated your security policy.
Network ACL on VPC allows all traffic.
Connect to a new EMR cluster
Follow the steps below to run Unravel's bootstrap script, unravel_emr_bootstrap.py, on all nodes in the cluster. The bootstrap script makes the following changes:
On the master node:
On Hive clusters, it updates
/etc/hive/conf/hive-site.xml.On Spark clusters, it updates
/etc/spark/conf/spark-defaults.conf.It updates
/etc/hadoop/conf/mapred-site.xml.It updates
/etc/hadoop/conf/yarn-site.xml.If Tez is installed, it updates
/etc/tez/conf/tez-site.xml.It installs and starts the
unravel_esdaemon in/usr/local/unravel_es.It installs the Spark and MapReduce sensors in
/usr/local/unravel-agent.It installs the Hive Hook sensor in
/usr/lib/hive/lib/.
On all other nodes:
It installs the Spark and MapReduce sensors in
/usr/local/unravel-agent.It installs Hive sensors in
/usr/lib/hive/lib.
Download Unravel's bootstrap script,
unravel_emr_bootstrap.py.curl https://s3.amazonaws.com/unraveldatarepo/unravel_emr_bootstrap.py -o /tmp/unravel_emr_bootstrap.py
Upload the bootstrap script to an S3 bucket.
Permissions needed
You need write access to the S3 bucket that you want to upload the bootstrap script to. In addition, the AWS account you use to create the EMR cluster must have read access to the bootstrap script in order to execute its directives.
To upload the bootstrap script to the default EMR logging bucket,
s3://aws-logs-, execute the following command:account_number-region/elasticmapreduceaws s3 cp unravel_emr_bootstrap.py s3://aws-logs-
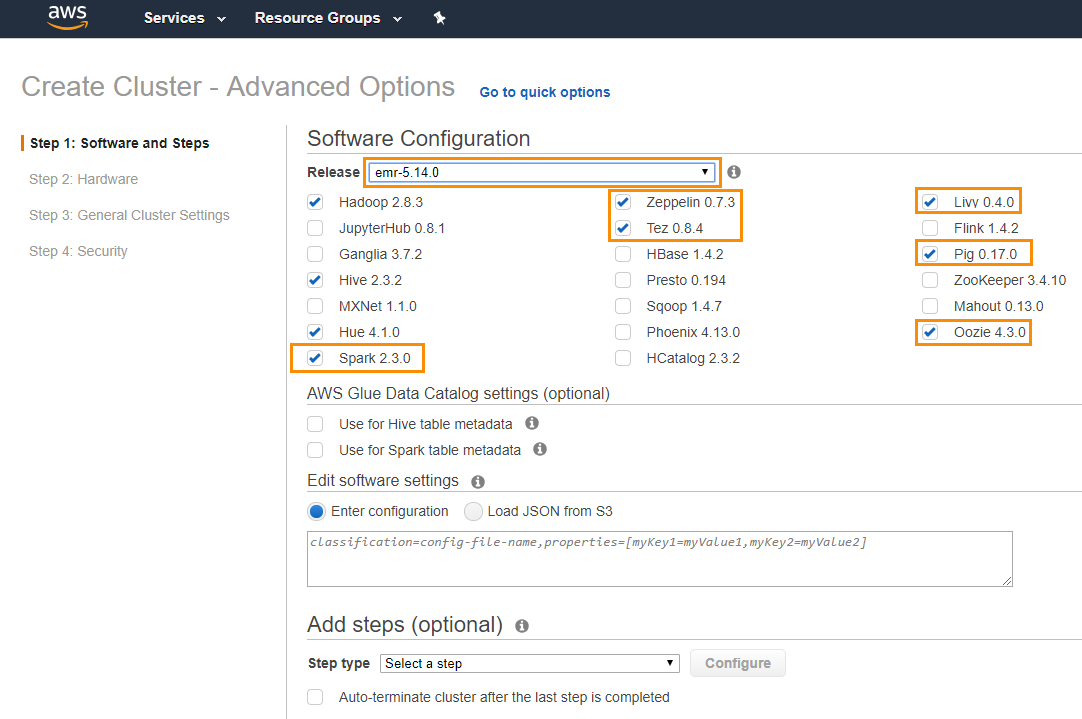
account_number-region/elasticmapreduceIn the AWS console, select the EMR service and click Create cluster.
In the Create Cluster - Quick Options screen, click Go to advanced options.

In Release, select your EMR version and all the apps you need. See Unravel's Amazon EMR compatibility matrix for the EMR releases Unravel supports.
For transient EMR clusters, add a step to run the Unravel JAR
s3://unraveldatarepo/unravel-bootstrap-step.jar.During cluster creation, this JAR waits for the
unravel_esdaemon to be up and running. It logs its actions in/tmp/unravel/unravel_step.logon the master node.In the Add steps (optional) section, select step type Custom JAR, and click Configure.
The Add step dialog appears.
In JAR location, enter
s3://unraveldatarepo/unravel-bootstrap-step.jarIn Arguments, enter these two parameters:
Parameter 1: Maximum number of minutes for which the step will wait for unravel_esto come up. Default: 4.Parameter 2: Length of each interval in seconds after which the step will check for the status of unravel_es. Default: 2.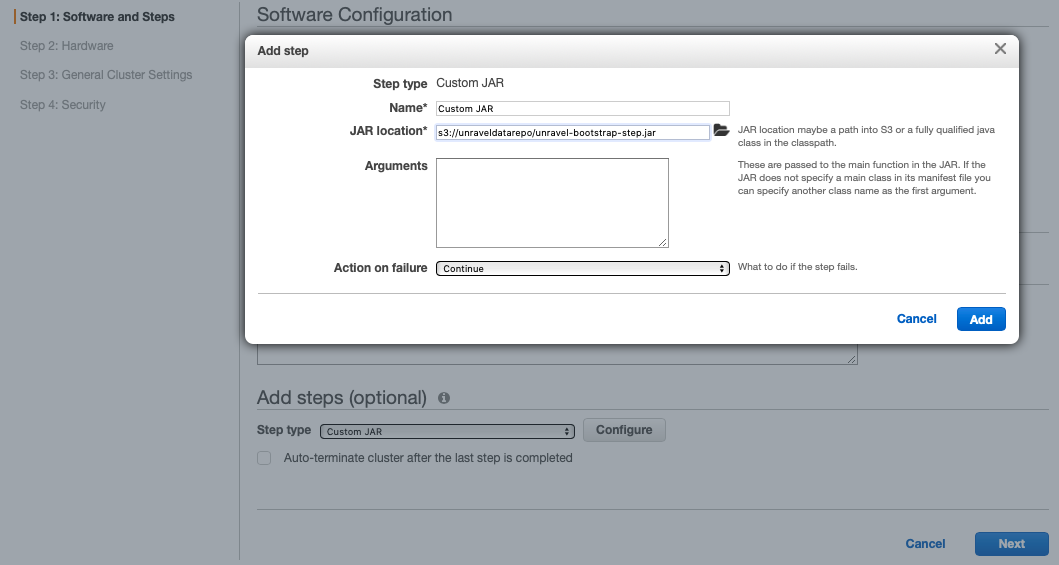
Click Add.
Click Next.
In Step 2: Hardware, specify the following settings:
Set Network and EC2 Subnet to the cluster's VPC and subnet.
The security group of the subnet you specify must have access to the Unravel EC2 node.
If you created the Unravel EC2 node from our CloudFormation template, then a new VPC was generated, named Unravel_VPC. This VPC comes with one configured subnet, and by default has a CIDR / network address block of 10.10.0.0/16 (but you might have changed this during stack creation).
If you created the Unravel EC2 node from our Amazon Machine Image (AMI), you must create the EMR cluster on the same VPC and same subnet as the Unravel EC2 node.
Modify the instance type and enter the desired instance count for core (worker) nodes.

Click Next.
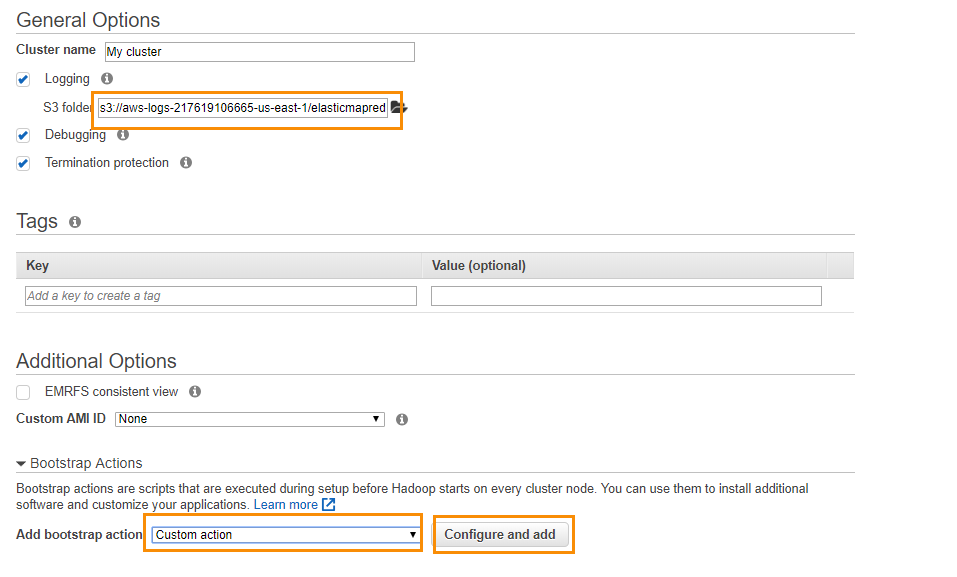
In Step 3: General Cluster Settings, specify the following settings:
Tip
For more guidance on creating a new EMR cluster, see Amazon documentation.
Cluster name: Enter the name of your cluster.
S3 bucket: Specify the location for your log files.
In Add bootstrap action, select Custom action.
In the Add Bootstrap Action dialog, specify the following settings:
Warning
If you create multiple bootstrap actions, make sure you specify that Unravel's bootstrap action runs last, after all other bootstrap actions have completed.
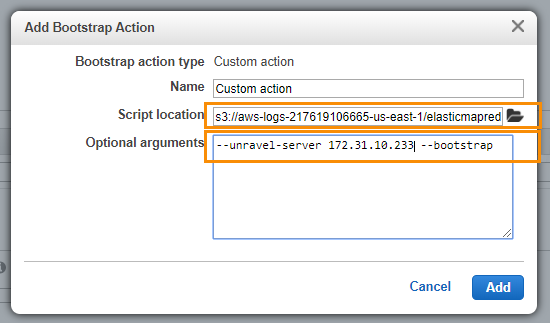
Setting
Values
Name
Custom action
Script location
Enter the S3 bucket that you uploaded Unravel's bootstrap script to.
For example,
s3://aws-logs-account_number-region/elasticmapreduceOptional arguments
You must specify these settings:
--unravel-server: IP address of the Unravel EC2 instance--bootstrap: Indicates that this action must be run at cluster creation time
For example,
--unravel-server
unravel-ec2-ip-address--bootstrapYou can also specify these settings:
--metrics-factor: Specifies the interval at which Unravel sensors push data from the EMR cluster nodes to Unravel Server.intervalintervalis in units of 5 seconds. In other words, a value of 1 means 5 seconds, 2 means 10 seconds, and so on. Default: 1--all: Enables all sensors, including the MapReduce sensor.--disable-aa: Disables the AutoAction feature.--enable-am-polling: Enables "application master" metrics polling for AutoActions.--hive-id-cachenum-jobs: Maximum number of jobs you expect to have on the cluster. Default: 1000.--init: Change the initial wait time when running in bootstrap mode. Default: 300.--sensor-url: Download sensor and daemon files from external URL. (Note: The sensor is uploaded to clusterdfs/tmp/unravel-sensors/the first time being installed. This can be configured with --sensor-dfs-path parameter.)If your cluster is kerberized, the default security settings should work, but you can change them.
Click Add.
Click Configure and add.
Select Step 4: Security and edit the hardware configuration for the cluster as follows:
Choose the EC2 key pair.
Select the EC2 security groups. AWS EMR service automatically applies additional rules that are required for EMR nodes.
In this example, the security group picked for both Master and Core & Task nodes have rules allowing all traffic access from the Unravel EC2 node.
Warning
You must choose the security group that includes the Unravel EC2 instance, otherwise bootstrapping will fail.
Click Create cluster.
If everything was entered correctly, your new EMR cluster should finish the bootstrap process and be in the Waiting state.
Once your new EMR cluster is up and running, you can run some jobs and log into the Unravel EC2 node's web UI to see the metrics collected by the Unravel node.
Connect to an existing EMR cluster
To connect the Unravel EC2 instance to an existing EMR cluster, follow the steps below to run the Unravel EMR Ansible playbook either on the EMR master node or on your Mac/Linux workstation.
Important
The following process is for existing clusters created without Unravel bootstrap. At this time, only those clusters of this type that do not have auto-scaling enabled are supported.
Whenever you upgrade Unravel Server, repeat the steps below to upgrade Unravel Sensors as well.
Sanity check
After you connect the Unravel EC2 instance to your EMR cluster, run some jobs on the EMR cluster and monitor the information displayed in Unravel UI (http://unravel_ec2_node_public_IP:3000).
Next steps
For additional configuration and instrumentation options, see Next Steps.