Microsoft Azure Databricks (Manual)
This topic explains how to deploy Unravel on Microsoft Azure Databricks walking you through the following procedures.
Verify you meet the prerequisites for installation of Azure Databricks
Create Azure components
Install Unravel
Configure and restart Unravel
Configure Databricks with Unravel
For Reference:
Installing Databricks Sensors using Setup script
Uninstalling Unravel server and sensors on Databricks
Each version of Unravel has specific platform requirements. See to Unravel's Databricks compatibility matrix confirm your Azure Databricks platform meets the requirements for the version of Unravel that you're installing.
Minimum VM type suggested: Medium memory optimized such as Standard_E8s_v3
You must already have an Azure account.
You must already have a resource group assigned to a region in order to group your policies, VMs, and storage blobs/lakes/drives.
A resource group is a container that holds related resources for an Azure solution. In Azure, you logically group related resources such as storage accounts, virtual networks, and virtual machines (VMs) to deploy, manage, and maintain them as a single entity.
You must have root privilege in order to perform some commands on the VM.
Your virtual network and subnet(s) must be big enough to be shared by the Unravel VM and the target Databricks cluster(s).
You can use an existing virtual network or create a new one, but the virtual network must be in the same region and same subscription as the Azure Databricks workspace that you plan to create.
A CIDR range between /16 - /24 is required for the virtual network.
You must assign a public IP address to the Unravel Azure VM and open port 4043 for non-SSL and 4443 for unsecured SSL.
You must allow inbound SSH connections to the Unravel VM.
You must allow outbound Internet access and all traffic within the subnet (VSNET).
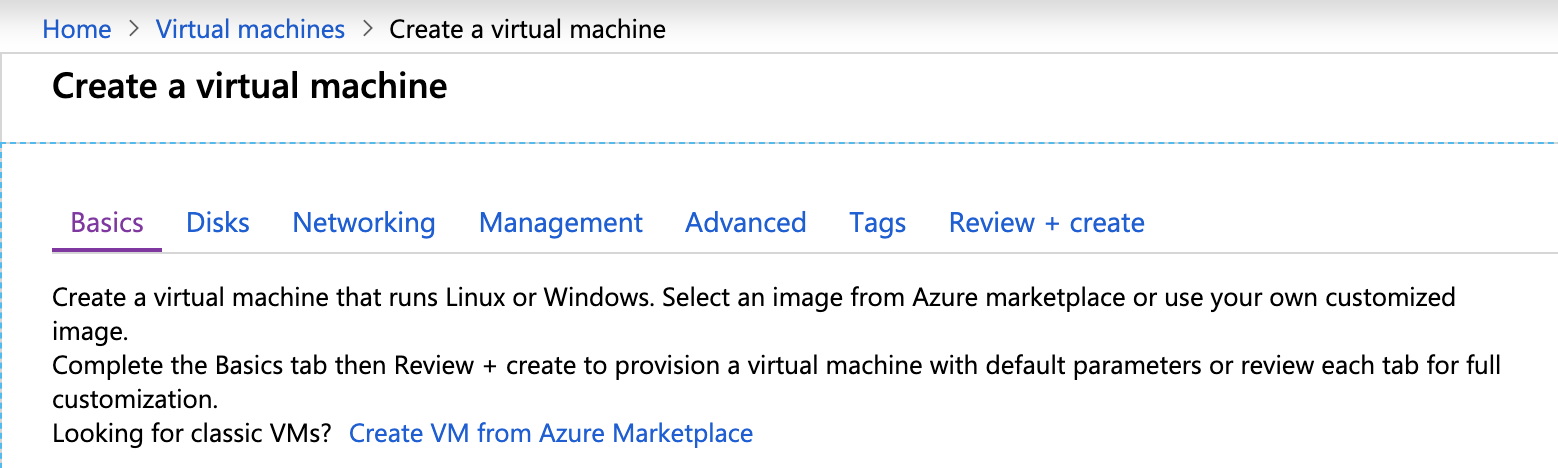
Sign in to the Azure portal.
Select Virtual Machines > Add and enter the following information:
In the Basics tab (default) enter the following.
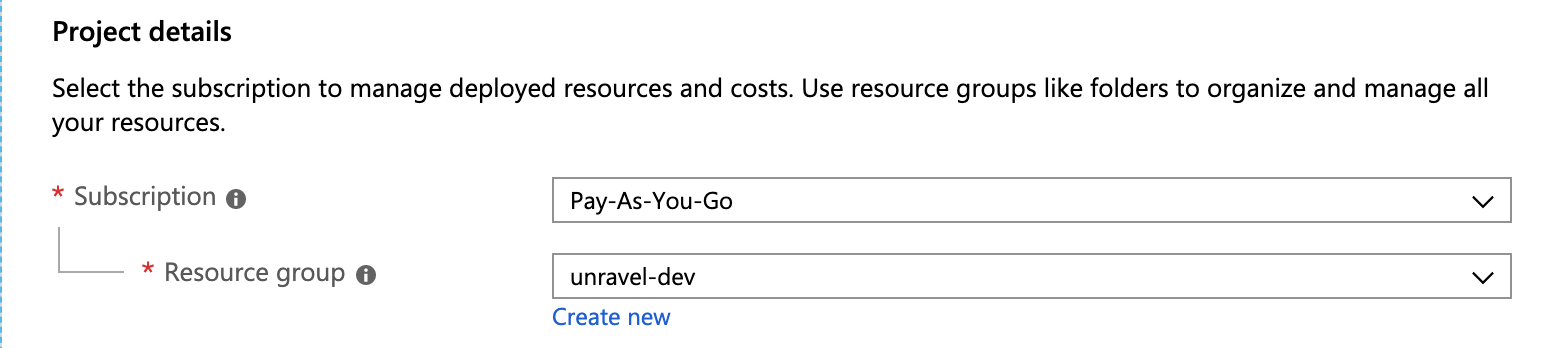
Project Details
Subscription: Choose the applicable subscription.
Resource group: Create a new group or choose an existing one.
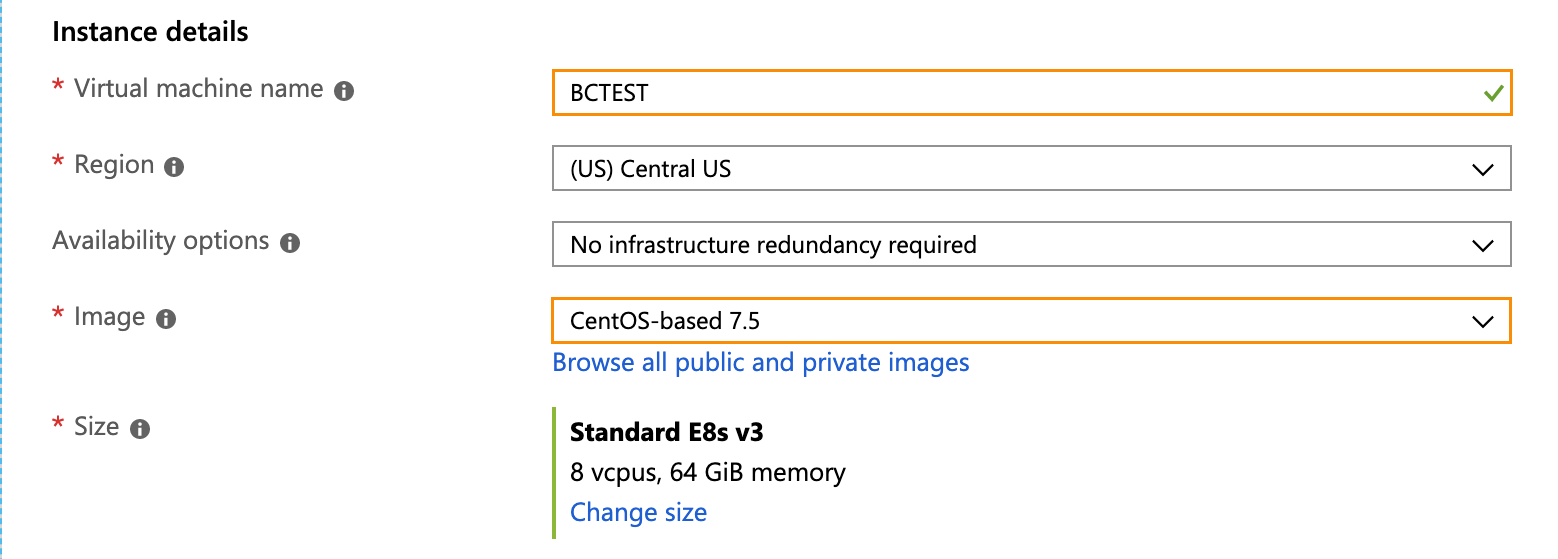
Instance Details
Virtual Machine Name:The Unravel server name.
Region: Select the Azure region.
Availability Options: Select
No infrastructure is redundancy required.Image: Select the appropriate image. Both
Centos-based 7.x+ andRed Hat Enterprise Linux 7.x+ are supported.Size: Click Change Size. In the modal select Memory optimized image with at least
128 GB memoryandPremium Disk support, for example, E16s_v3 in East US 2)
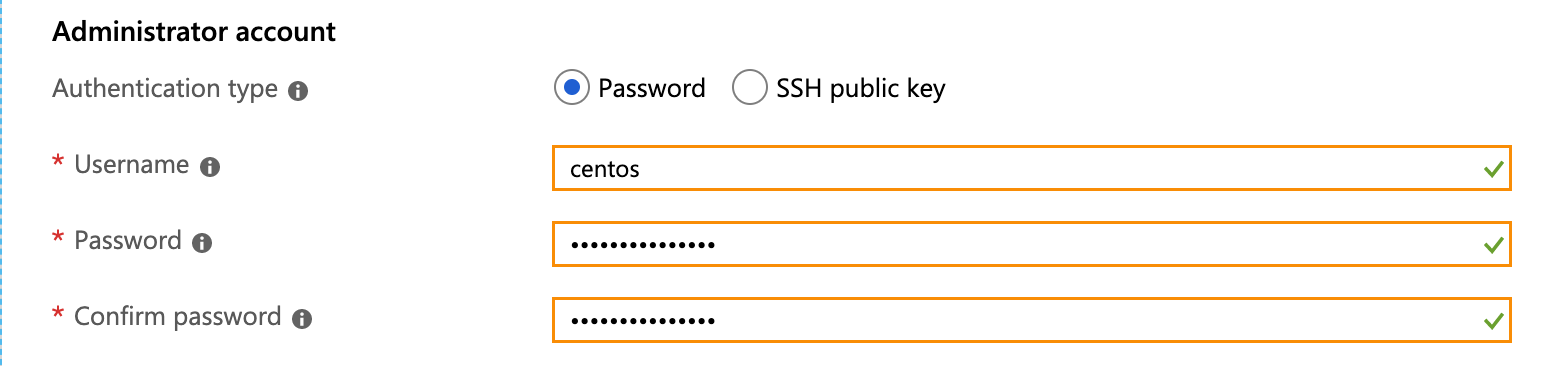
Administrator account
Authentication type: Select
passwordorSSH Key.Username and Password: Enter your VM login information.
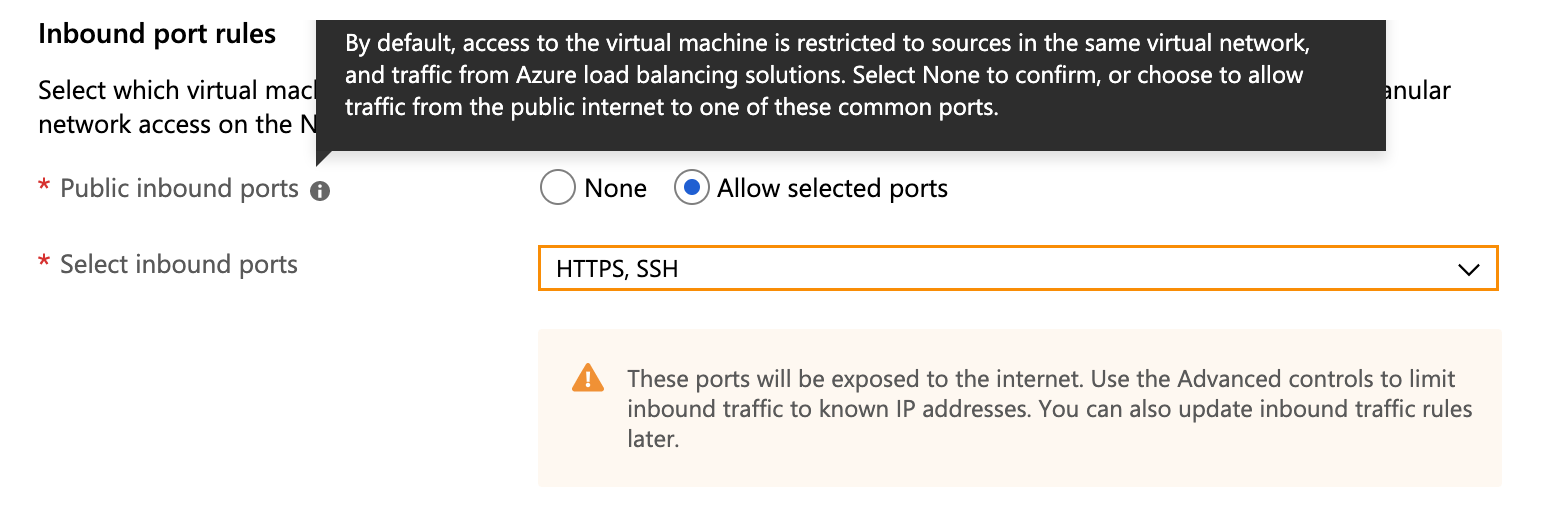
Inbound Port Rules
Public inbound ports: Select Allow selected ports.
Selected Inbound ports: Select both
HTTPSandSSH.
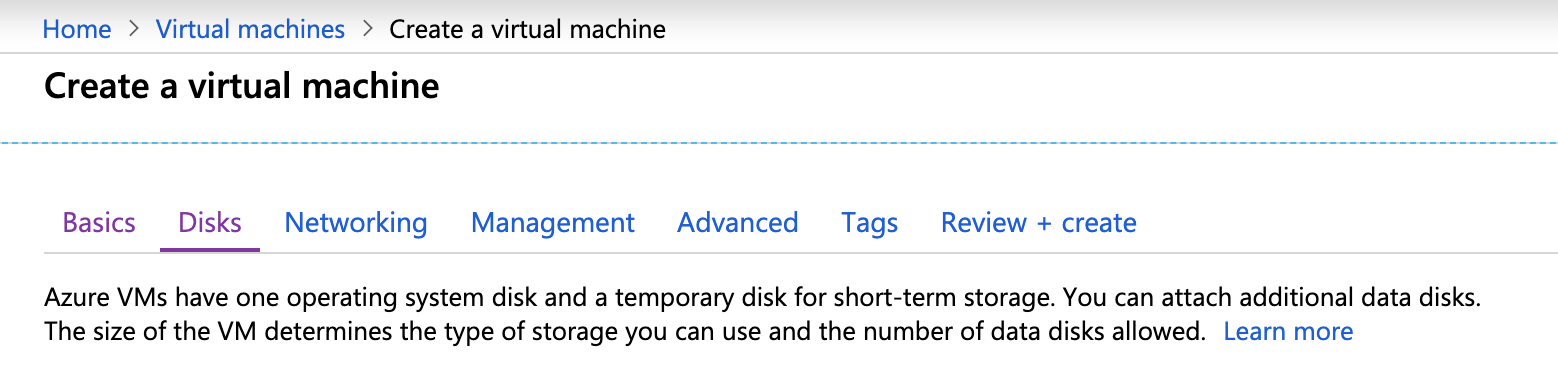
Click Next: Disks >.

In the Disks tab enter the following information:
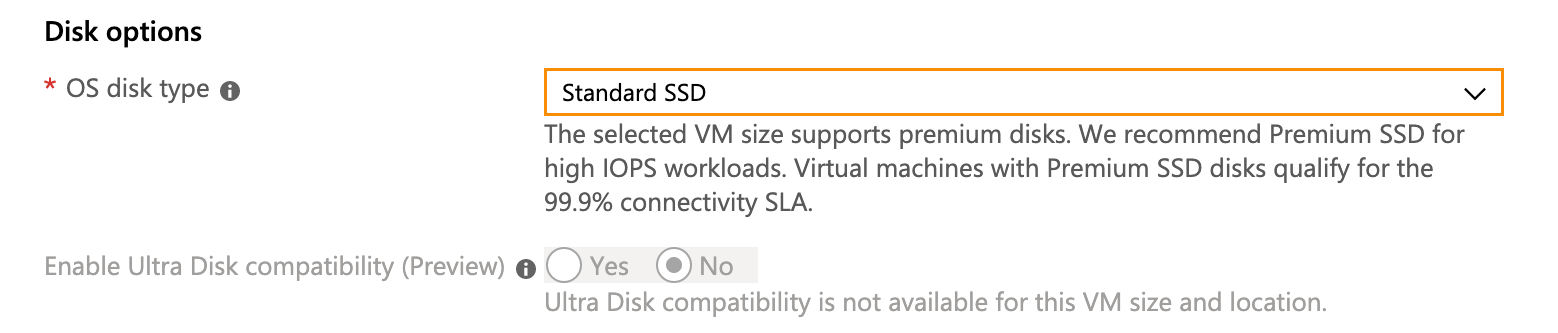
Disk Options
OS disk type: Select
Premium SSD.
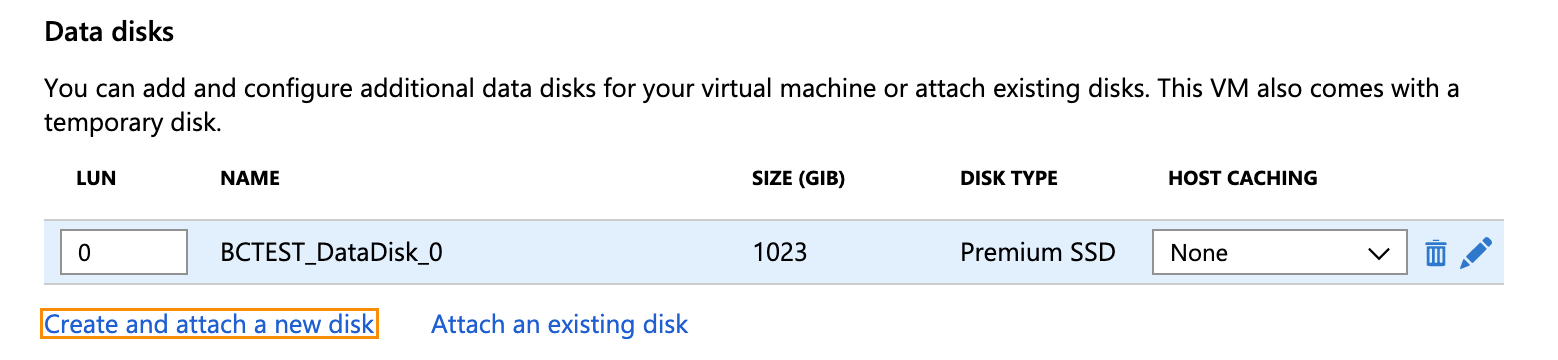
Data Disk
Click Create and attach a new disk.
Note: This disk is formatted so don't choose Attach an existing disk.
Enter a Name.
Select Source type
None (empty disk).Set Size to at least 512 GiB.
Account type: Select
premium SSD.
Click Next: Networking >

In the Networking tab enter the following information.:
Virtual network: Create new or choose an existing one.
Subnet: Create new or choose an existing one.
Public IP: Create new or choose an existing one.
Select Inbound ports: Select
HTTPSandSSH.

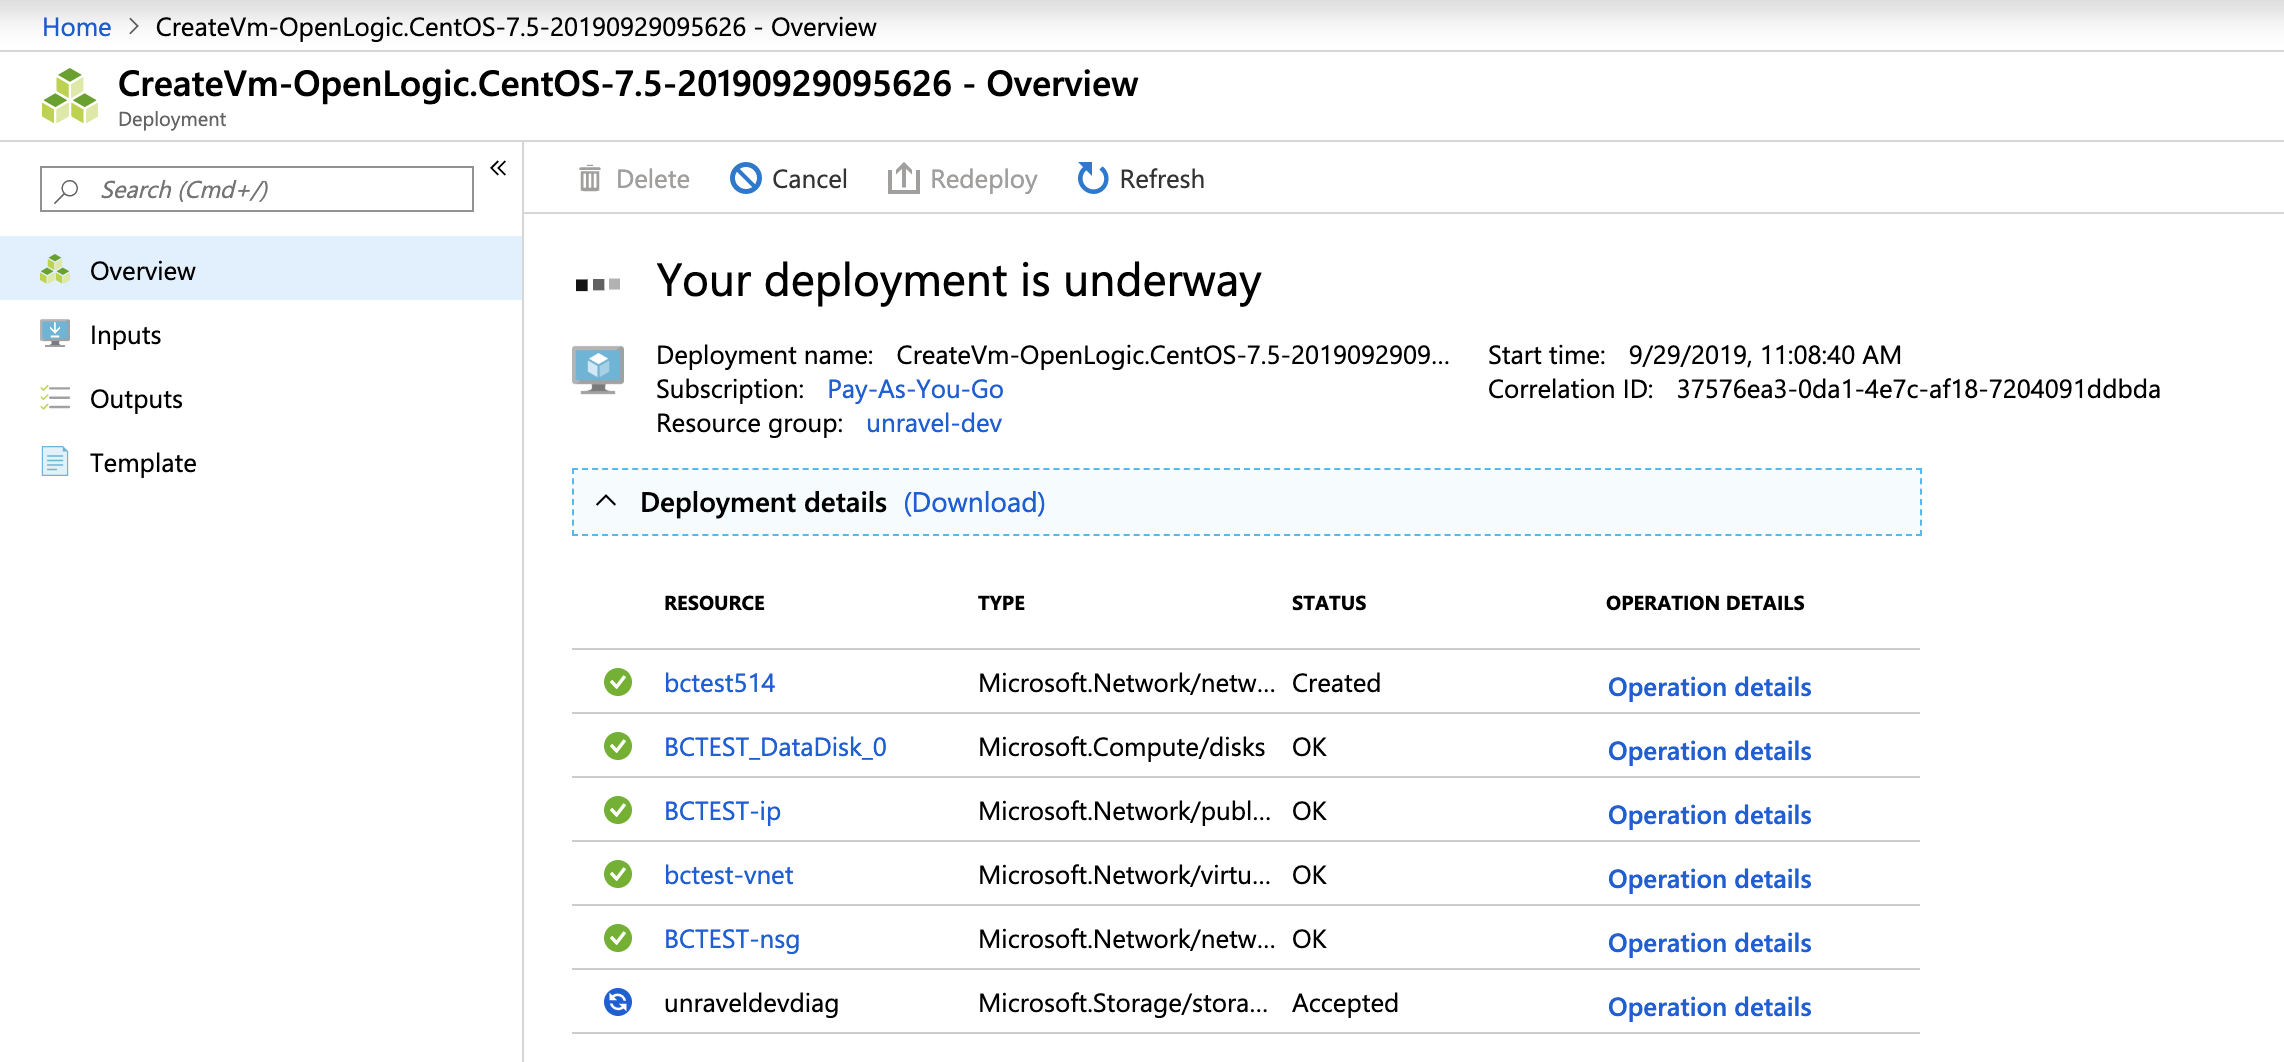
Click Review + create.

Your deployment is now created.
Select Go to Resource > Networking > Inbound port rules > Add inbound port rule and include the following ports.
Rule Name
Destination
Destination IP Address
Destination Port Ranges
Unravel_3000
IP Addresses
NIC Private IP
3000
Unravel_4043
IP Addresses
NIC Private IP
4043
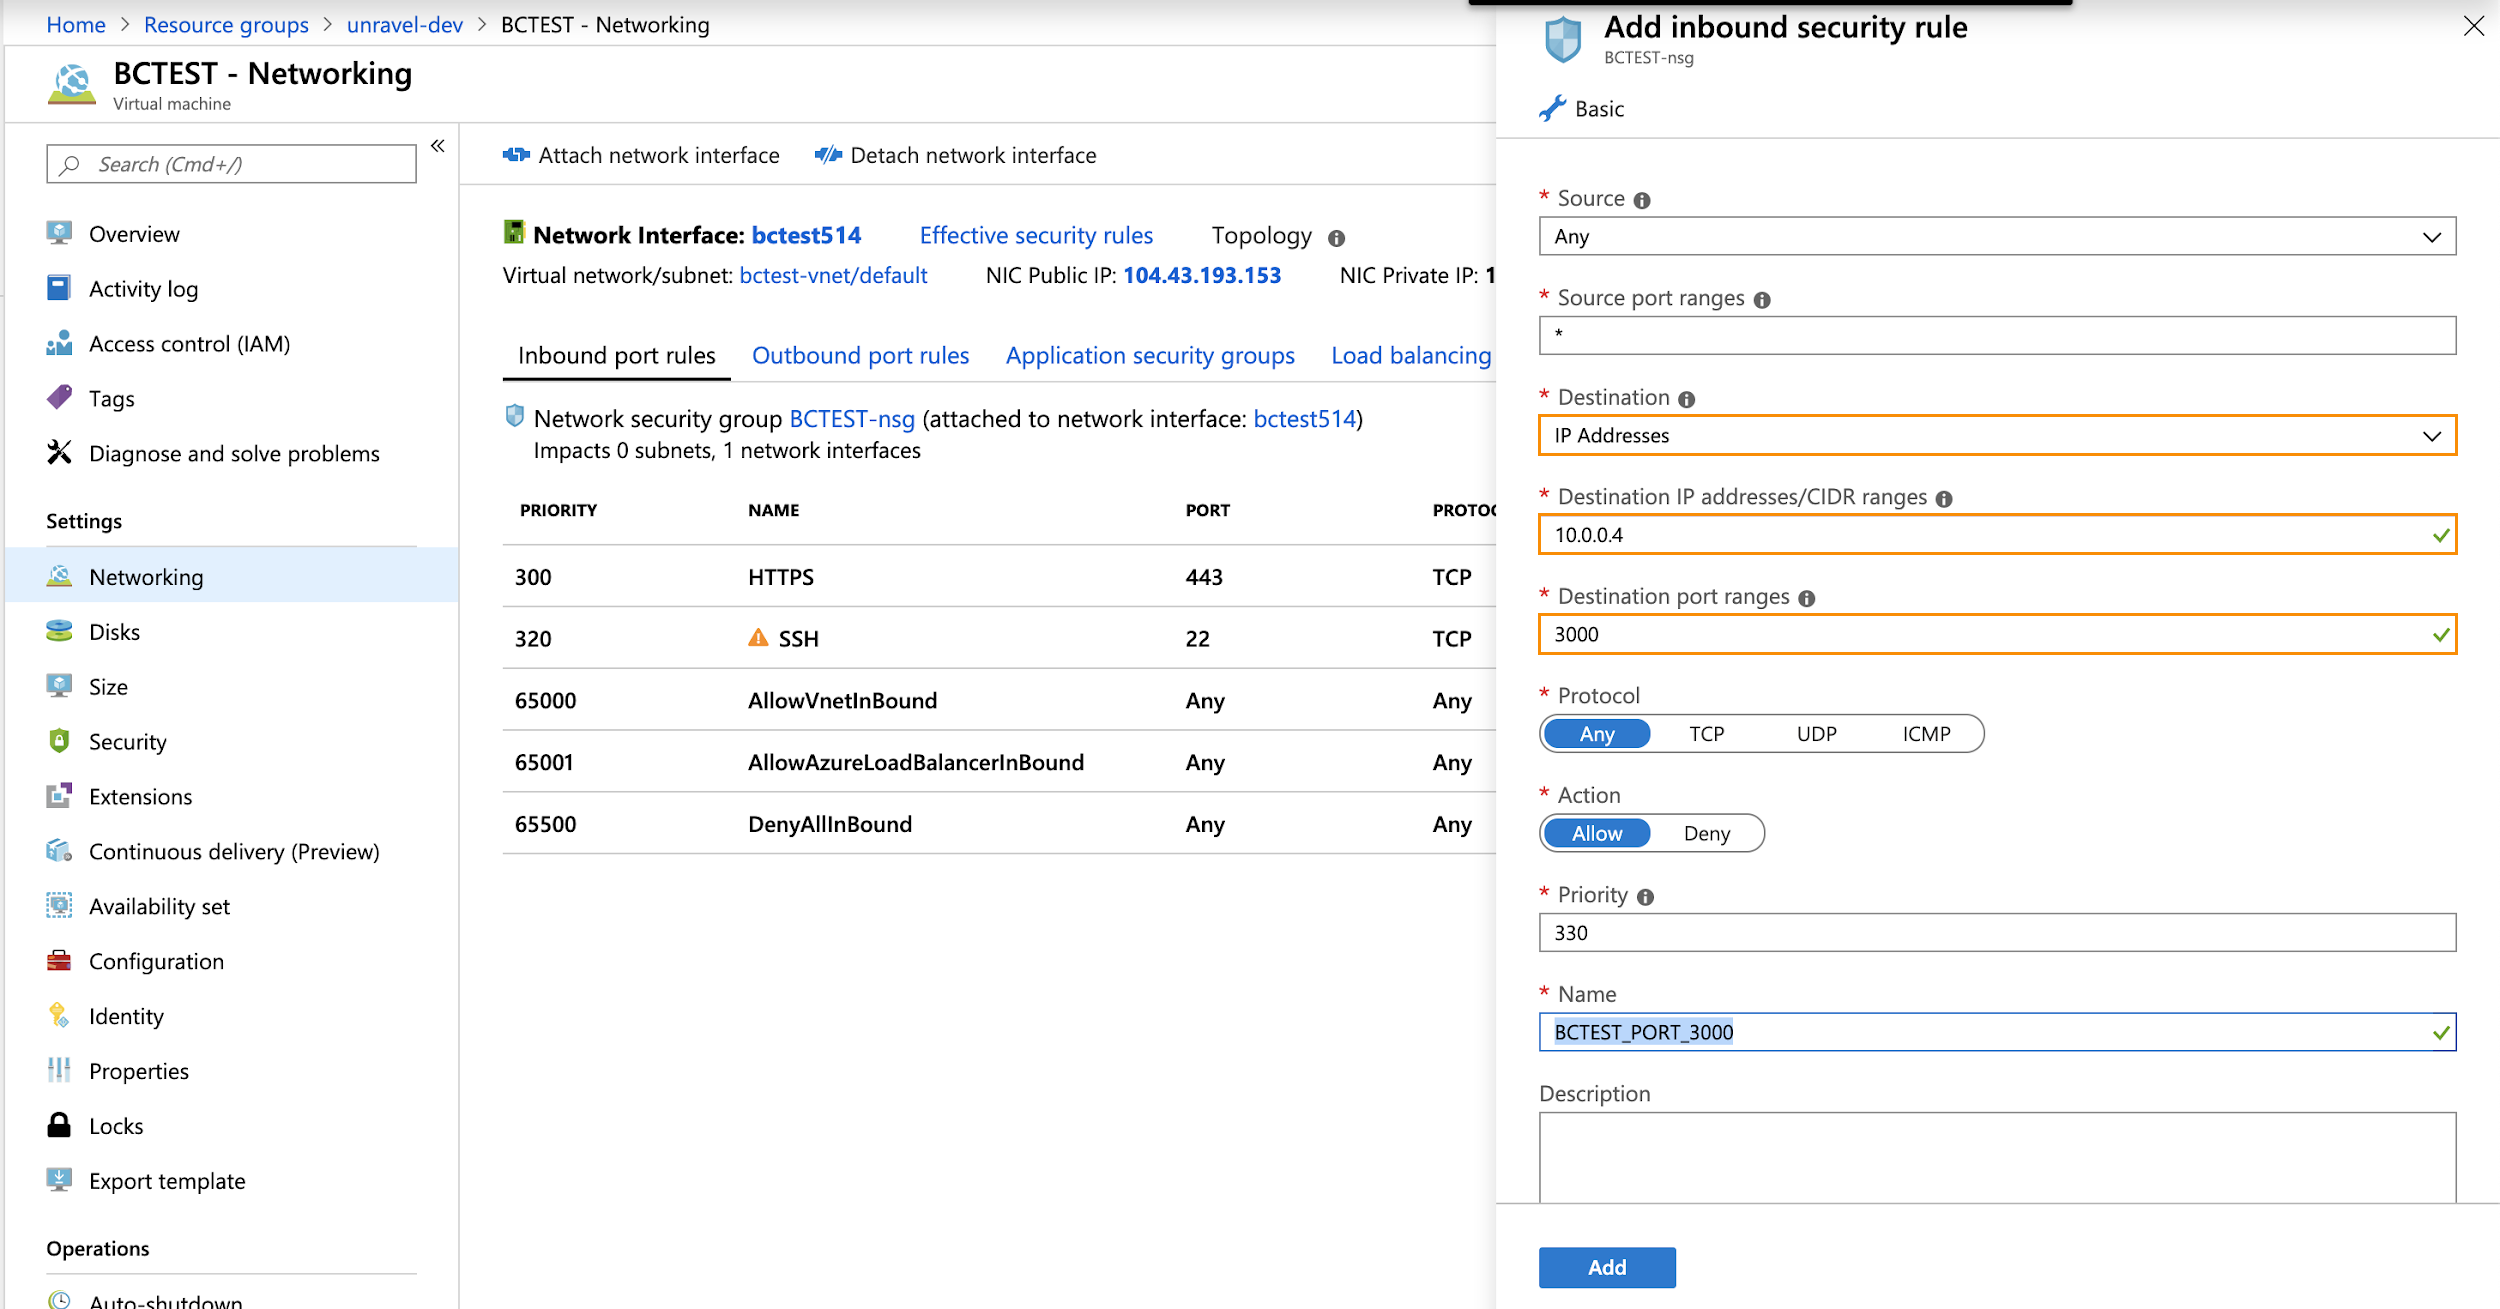
Click OK.
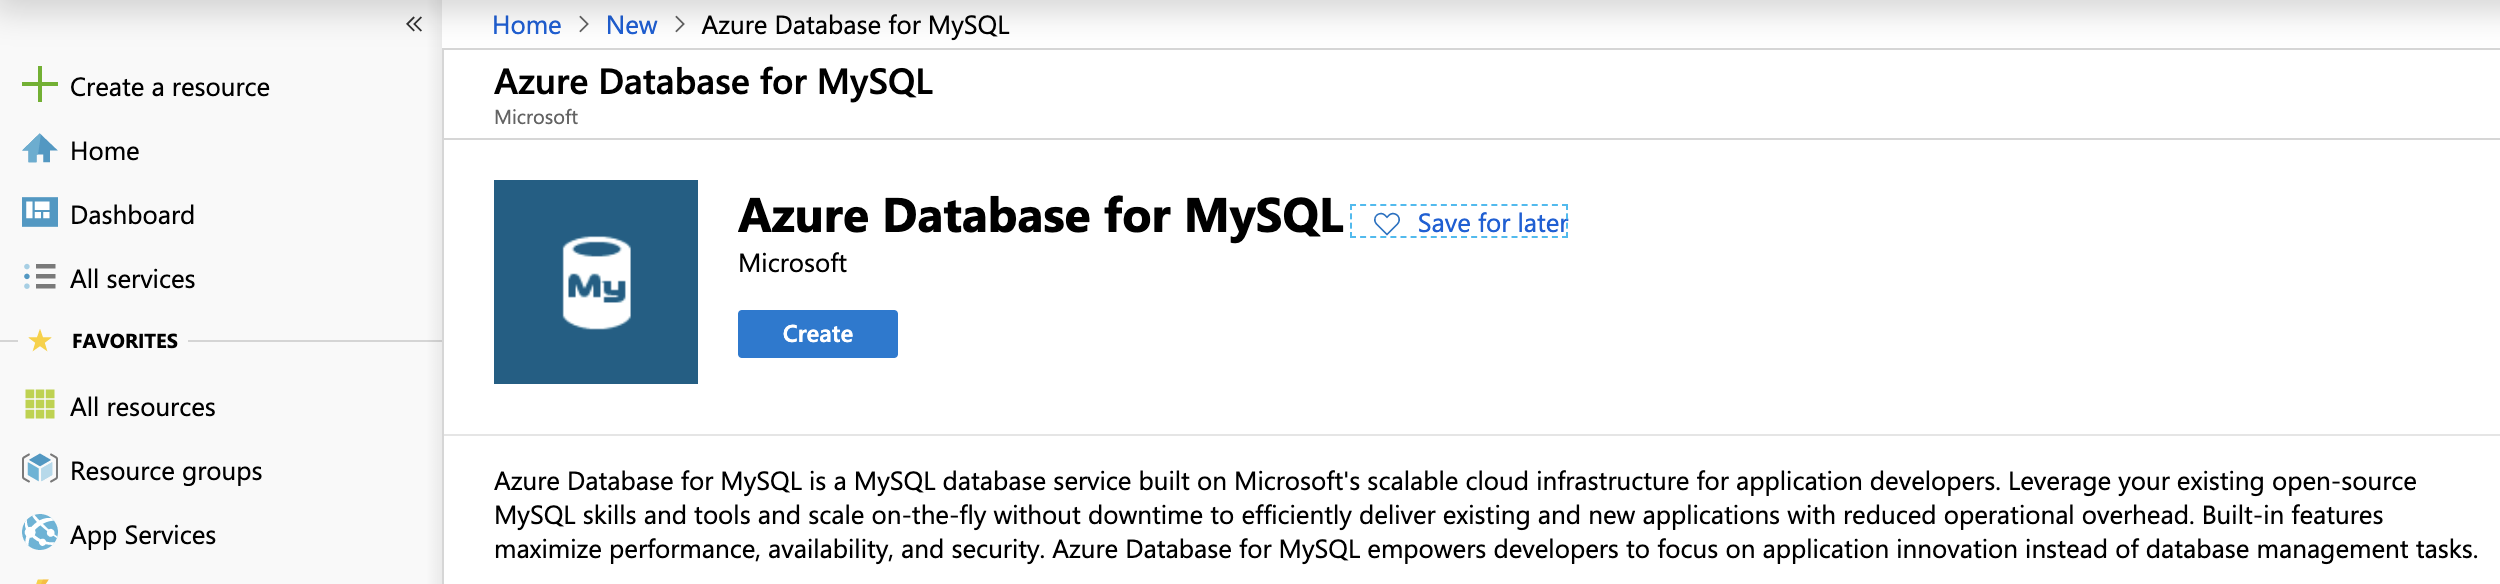
You can either create an Azure database for MySQL or Install PostgreSQL.
Select Create a Resource > Azure Database for MySQL. Click Create.
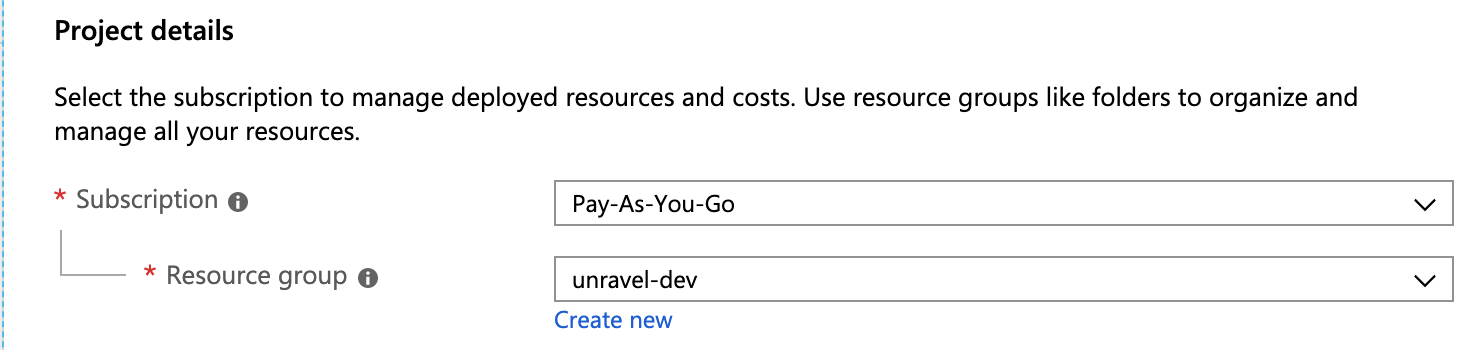
In the Basics tab (default) enter the following.
Project Details
Subscription: Choose the applicable subscription.
Resource group: Create a new group or choose an existing one.
Server Details
Server name: Enter the MySQL server name.
Data Source: Select None.
Admin Username: Enter the MySQL admin name.
Password/Confirm Password: Enter Admin password.
Location: Select Azure region; it should be same region as the VM. (See Step 3 Create Azure VM, Instance Details.)
Version: Select
5.7.
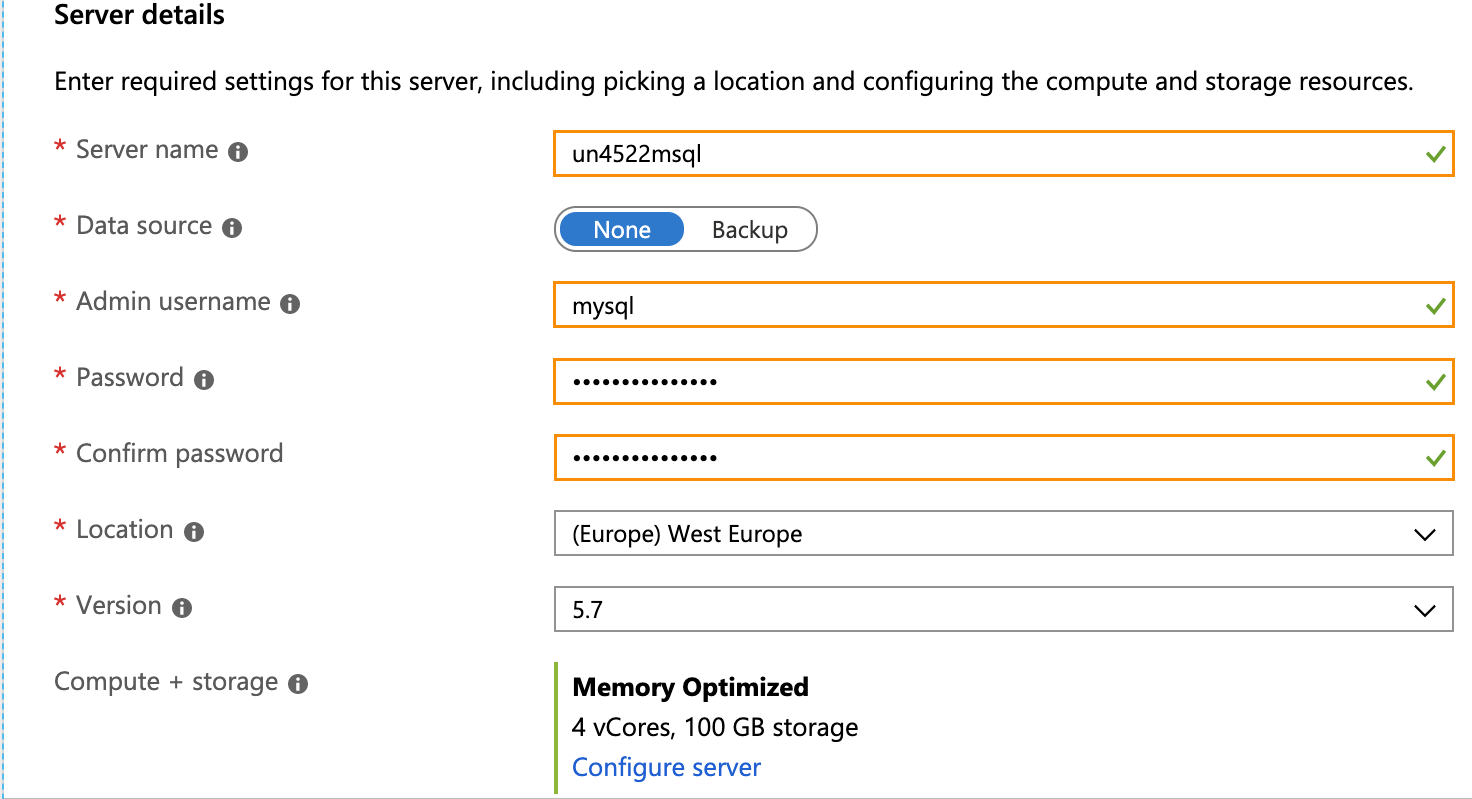
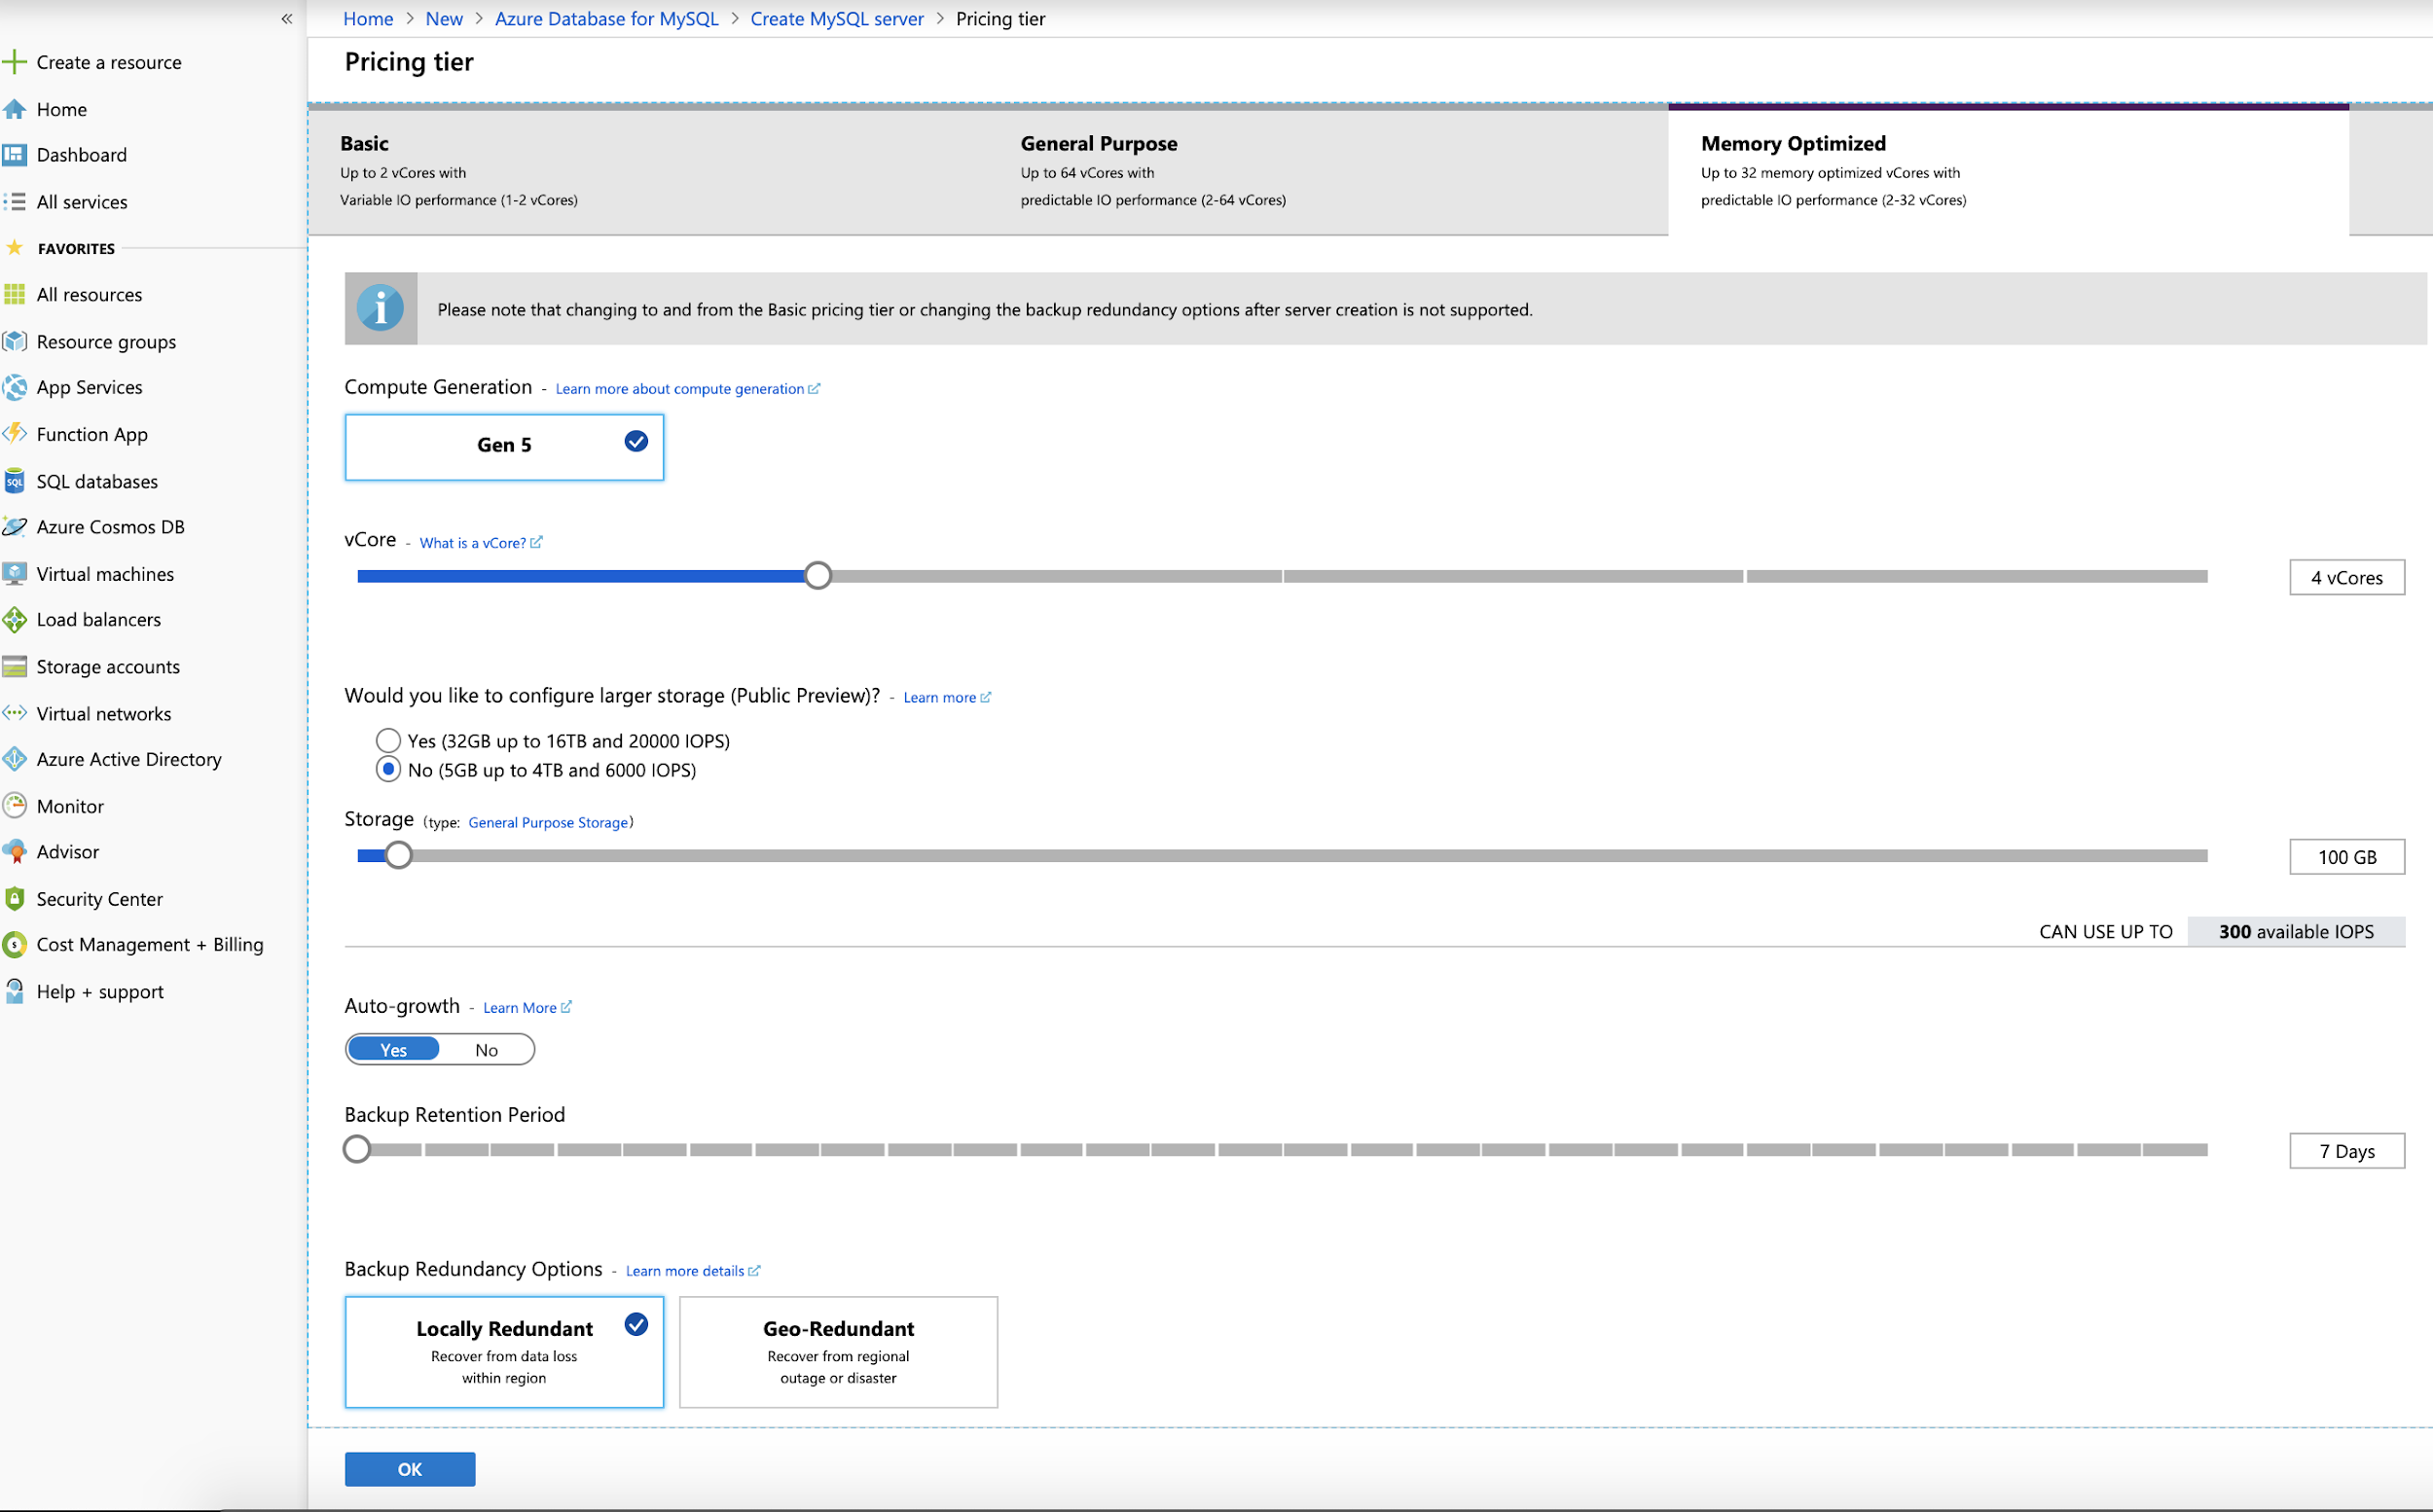
Compute + storage: Click Configure Server. Select
Memory Optimized, Compute Generation - Gen 5, 4 vCores, General Purpose Storage of 100GB with Auto-growth enabled. Click OK.
Click Review + Create.

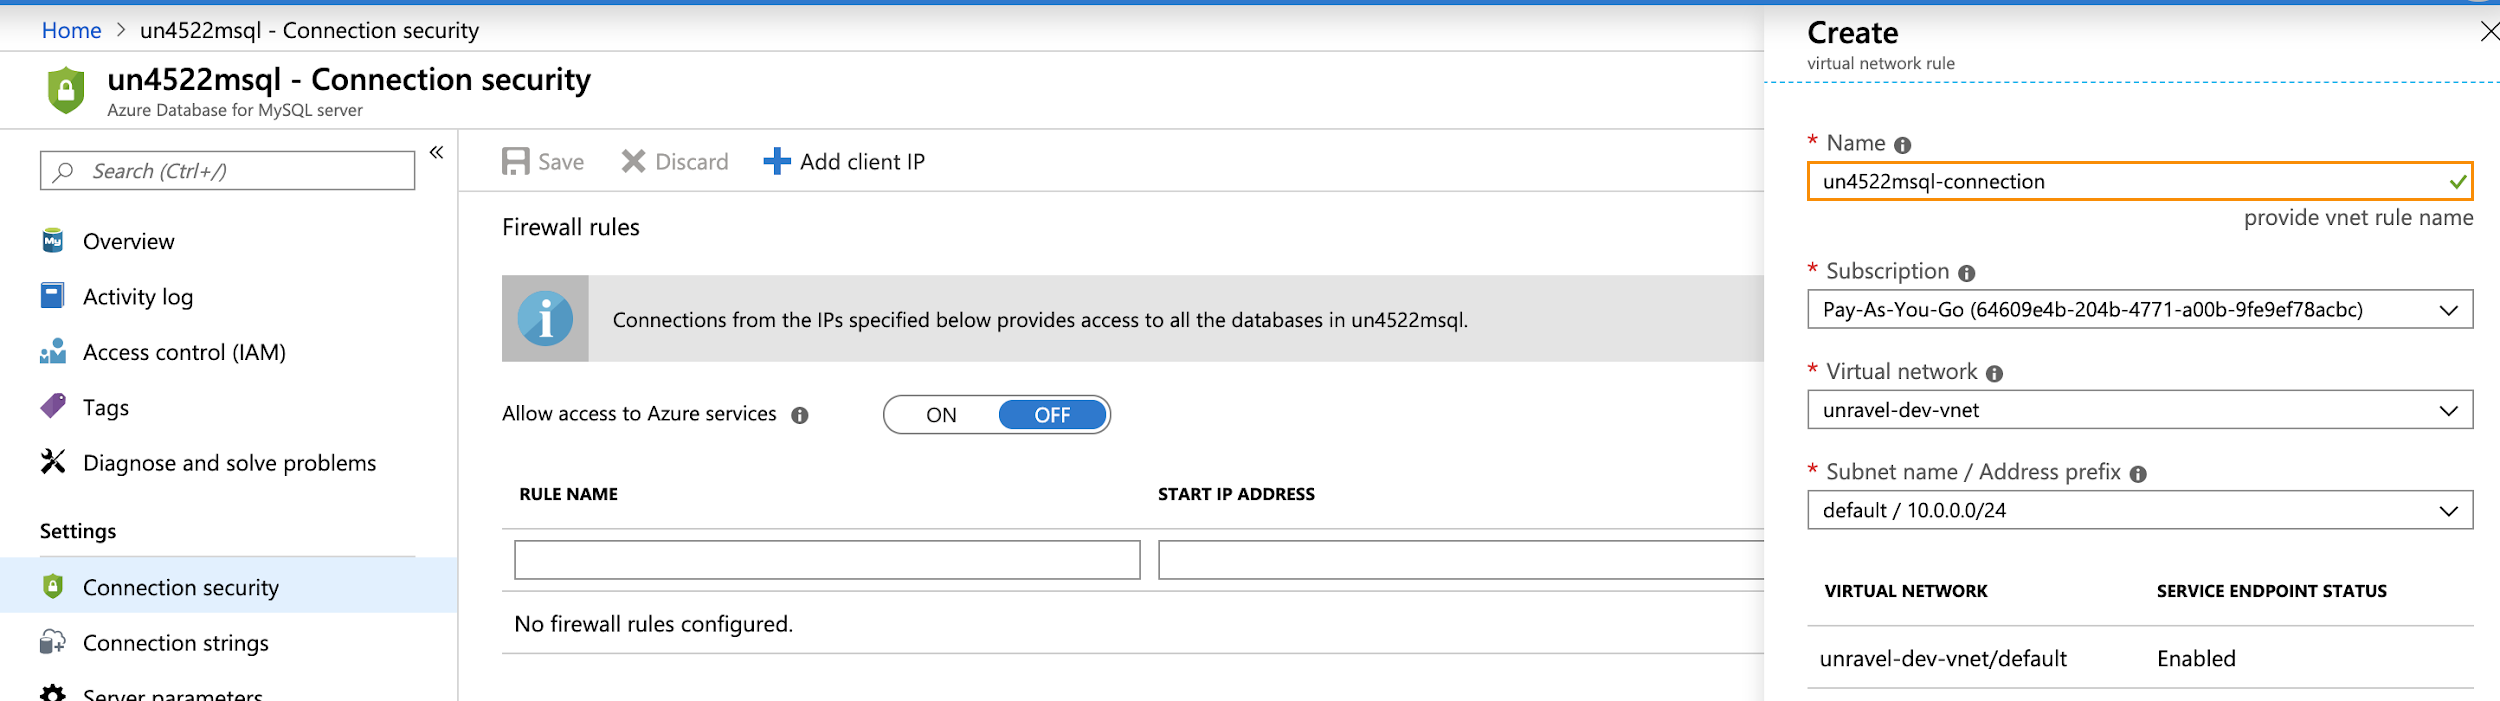
Select Go to Resource > Connection Security > Add existing virtual network, enter the following information, and then select Enable:
Select Go to Resource > Connection Security > SSL settings, and change the following:
Enforce SSL connection: Select
Disabled.
Click Save.
Select Server Parameters, change the following settings
Name
From
To
sort_buffer_size
524288
16777216 (32000000 and beyond or maximum allowed value)
query_cache_size
0
67108864 (64000000 and beyond or maximum allowed value)
max_connect_errors
100
2000000000 (2000000000 and beyond)
character_set_server
LATIN1
UTF8
innodb_file_per_table
OFF
ON
innodb_thread_concurrency
0
20
innodb_read_io_threads
4
16
innodb_io_capacity
200
4000
innodb_io_capacity_max
2000
4000
Click Save.
Note
PostgreSQL is supported from Unravel version 4.6.1.6
You can either use the Unravel bundled PostgreSQL or external PostgreSQL version 12.
Install Unravel. The Unravel bundled PostgreSQL is automatically installed.
Run the following commands in the given sequence to set up and connect the bundled PostgresSQL:
sudo /usr/local/unravel/bin/emdb_enable.sh
sudo /etc/init.d/unravel_all.sh restart.
Download PostgreSQL 12.
sudo yum install https://download.postgresql.org/pub/repos/yum/reporpms/EL-7-x86_64/pgdg-redhat-repo-latest.noarch.rpm
Run the following commands to install:
sudo yum install postgresql12-server
sudo /usr/pgsql-12/bin/postgresql-12-setup initdb
sudo systemctl start postgresql-12
sudo systemctl enable postgresql-12
Select Create a resource > Azure Databricks > Create. Go directly to step#3 if you already have workspaces.
Select Workspace name, Subscription, Resource group, Location, and Pricing tier.
Review VNET Peering options to connect Databricks with Unravel VM.
Download the latest RPM for Cloud.
Install RPM.
sudo rpm -ivh
latest-cloud-rpm2> /tmp/rpm-install-log.txt
This topic provides information about configuring database:
Using MySQL, create a database and user for Unravel. Enter MySQL admin login password when prompted:
mysql> CREATE DATABASE unravel_mysql_prod; mysql> CREATE USER '
<Unravel database user>'@'<Unravel host name>' IDENTIFIED BY '<Unravel database password>'; mysql> GRANT ALL PRIVILEGES ON unravel_mysql_prod.* TO '<Unravel database user>'@'<Unravel host name>';Configure MySQL in
/usr/local/unravel/etc/unravel.properties.unravel.jdbc.username=username@hostname unravel.jdbc.password=
<Unravel database password>unravel.jdbc.url=jdbc:mysql://<Unravel host name>:3306/unravel_mysql_prod unravel.jdbc.url.params=useSSL=true&requireSSL=falseInstall MySQL JDBC connector driver in Unravel classpath.
wget https://dev.mysql.com/get/Downloads/Connector-J/mysql-connector-java-5.1.47.tar.gz -O /tmp/mysql-connector-java-5.1.47.tar.gz

tar xvzf /tmp/mysql-connector-java-5.1.47.tar.gz
sudo mkdir -p /usr/local/unravel/share/java

sudo cp /tmp/mysql-connector-java-5.1.47/mysql-connector-java-5.1.47.jar /usr/local/unravel/share/java
sudo chown unravel:unravel /usr/local/unravel/share/java/mysql-connector-java-5.1.47.jar
Create database and tables for Unravel.
/usr/local/unravel/dbin/db_schema_upgrade.sh
Note
PostgreSQL is supported from Unravel version 4.6.1.6
Run psql and create a database and user for Unravel. Enter psql admin login password when prompted:
sudo -u postgres psql
create database unravel;
create user unravel with encrypted password 'unraveldata';
grant all privileges on database unravel to unravel;
ALTER USER unravel WITH SUPERUSER;
alter user unravel with createdb createrole inherit replication bypassrls;
grant connect on database unravel to unravel;
grant usage on schema public to unravel;
grant all privileges on all tables in schema public to unravel;
grant all privileges on all sequences in schema public to unravel;
alter default privileges in schema public grant all privileges on tables to unravel;
alter default privileges in schema public grant all privileges on sequences to unravel;
grant pg_read_server_files to unravel;
grant pg_write_server_files to unravel;
grant pg_execute_server_program to unravel;
Allow user/server to connect to the database.
Option 1: If PostgreSQL is installed on the same server as Unravel, add the following line in
/var/lib/pgsql/12/data/pg_hba.confat the first line of IPv4 local connections:host all unravel 127.0.0.1/32 md5
Option 2: If PostgreSQL is installed on a different server, do the following:
Add the following line in
/var/lib/pgsql/12/data/pg_hba.conf:host all unravel <Unravel Server Internal IP Address>/32 md5
Update
/var/lib/pgsql/12/data/postgresql.confand ensure listen_addresses = '*' is set to allow PostgreSQL to listen to all the traffic.
Add following properties in
/usr/local/unravel/etc/unravel.properties:unravel.jdbc.username=unravel unravel.jdbc.password=unraveldata unravel.jdbc.url=jdbc:postgresql://127.0.0.1:5432/unravel
Restart PostgreSQL.
sudo systemctl restart postgresql-12.service
Install PostgreSQL JDBC connector driver in Unravel classpath.
sudo mkdir -p /usr/local/unravel/share/java
wget https://jdbc.postgresql.org/download/postgresql-42.2.18.jar -O /usr/local/unravel/share/java/postgresql-42.2.18.jar
sudo chown unravel:unravel /usr/local/unravel/share/java/postgresql-42.2.18.jar
Test and update db schema.
/usr/local/unravel/install_bin/db_access.sh*
/usr/local/unravel/dbin/db_schema_upgrade.sh
Go to Workspace> Admin Console> Access Control and enable Personal Access Tokens. See Enable token-based authentication.
Go to Workspace> User Settings> Access Tokens and click Generate New Token. See Authenticate using Databricks personal access tokens. Choose the lifetime of the token as indefinite.
Install Unravel agents on the Workspace and update Unravel config with the Workspace details. See Running the Databricks_setup.sh script
Note
Run the following commands only if the Databricks command-line tool is installed using Python virtual environment:
sudo bash
virtualenv -p /usr/bin/python3 mypy3
source mypy3/bin/activate
usr/local/unravel/install_bin/databricks_setup.sh --add-workspace -i <
Workspace id> -n <Workspace name> -t <Workspace token> -r https://<Workspace location>.azuredatabricks.net -p <Workspace_tier> -u <Unravel DNS or IP address>:4043
Restart all Unravel services
service unravel_all.sh restart
Using a supported web browser, (see Unravel's Databricks compatibility matrix), navigate to
http://and log in with usernameunravel-host:3000adminwith passwordunraveldata.
In your Databricks workspace, update the following tabs under Advanced Options for every cluster (Automated/Interactive) that you want to monitor:
Copy the following snippet to Spark > Spark Conf. Replace <Unravel DNS or IP Address>. This snippet is also generated by the Databricks setup script on Unravel.
Note
For spark-submit jobs, click Configure spark-submit and copy the following snippet in the Set Parameters > Parameters text box as spark-submit parameters. Replace <Unravel DNS or IP Address>.
"--conf", "spark.eventLog.enabled=true",
"--conf", "spark.eventLog.dir=dbfs:/databricks/unravel/eventLogs/",
"--conf", "spark.unravel.shutdown.delay.ms=300",
"--conf", "spark.unravel.server.hostport=<Unravel DNS or IP Address>:4043",
"--conf", "spark.executor.extraJavaOptions= -Dcom.unraveldata.client.rest.request.timeout.ms=1000 -Dcom.unraveldata.client.rest.conn.timeout.ms=1000 -javaagent:/dbfs/databricks/unravel/unravel-agent-pack-bin/btrace-agent.jar=config=executor,libs=spark-2.3",
"--conf", "spark.driver.extraJavaOptions= -Dcom.unraveldata.client.rest.request.timeout.ms=1000 -Dcom.unraveldata.client.rest.conn.timeout.ms=1000 -javaagent:/dbfs/databricks/unravel/unravel-agent-pack-bin/btrace-agent.jar=config=driver,script=StreamingProbe.btclass,libs=spark-2.3"
spark.eventLog.enabled true
spark.eventLog.dir dbfs:/databricks/unravel/eventLogs/
spark.unravel.server.hostport <Unravel DNS or IP Address>:4043
spark.unravel.shutdown.delay.ms 300
spark.executor.extraJavaOptions -Dcom.unraveldata.client.rest.request.timeout.ms=1000 -Dcom.unraveldata.client.rest.conn.timeout.ms=1000 -javaagent:/dbfs/databricks/unravel/unravel-agent-pack-bin/btrace-agent.jar=config=executor,libs=spark-2.3
spark.driver.extraJavaOptions -Dcom.unraveldata.client.rest.request.timeout.ms=1000 -Dcom.unraveldata.client.rest.conn.timeout.ms=1000 -javaagent:/dbfs/databricks/unravel/unravel-agent-pack-bin/btrace-agent.jar=config=driver,script=StreamingProbe.btclass,libs=spark-2.3Select DBFS as Destination, and copy the following as Cluster Log Path.
dbfs:/cluster-logs/
In the Init Scripts tab, set Destination to DBFS. Copy the following as the Init script path and click Add.
dbfs:/databricks/unravel/unravel-db-sensor-archive/dbin/install-unravel.sh
This topic explains how to configure Unravel for Databricks using the /usr/local/unravel/install_bin/databricks_setup.sh script on the Unravel server. This script deploys Unravel agent binaries and prints Databricks cluster configuration that is required for Unravel monitoring. Repeat this script for each workspace you want to initialize.
Important
Run this script as the same username that you used to install the Unravel server.
usage: databricks_setup.sh --add-workspace -i<workspace-id>-n<workspace-name>-r<workspace-instance>-t<workspace-token>-u<unravel_server:port>[options] databricks_setup.sh --print-spark-conf -u<unravel_server:port>[options] databricks_setup.sh --help
Options:
Option | Description | |
|---|---|---|
| Sets up or updates a Databricks workspace for monitoring by Unravel. Valid values: | |
| Id of the workspace to be configured. | |
| Workspace name. | |
| Workspace instance. Must start with For example, | |
| Workspace access token. | |
| Unravel LR Endpoint. (e.g: 10.0.0.4:4043) | |
| (Optional) Workspace tier. Accepted values are - premium, standard. The default is premium. | |
| Enables/disables SSL for Databricks sensor and agent. Valid values: Default: | |
| (Optional) Enables/disables SSL connections to Unravel endpoints without certificates. This option is only in effect if Valid values: Default: | |
| (Optional) Spark version to be used. Default: | |
| (Optional) Enables debug logs for Unravel Databricks sensor installation. Default: | |
| (Optional) Specifies the frequency in seconds in which to poll cluster metrics. Default: | |
| Print the minimal Spark configuration required to monitor cluster using Unravel. | |
| Unravel server URL. For example, | |
| Enables/disables SSL for Databricks sensor and agent. Valid values: Default: | |
| (Optional) Enables/disables SSL connections to Unravel endpoints without certificates. This option is only in effect if Valid values: Default: | |
| (Optional) Spark version to be used. Default: | |
| Prints the usage of this script. | |
Note
If you generate new tokens, re-run this script to update Unravel Server.
To add/edit a workspace:
/usr/local/unravel/install_bin/databricks_setup.sh --add-workspace -i 1234567890 -n DemoWorkspace -t ***** -r https://eastus.azuredatabricks.net -u 10.1.2.3:4043 -p premium
Deleting directory - dbfs:/databricks/unravel/unravel-agent-pack-bin
Deleted directory successfully
Deleting directory - dbfs:/databricks/unravel/unravel-db-sensor-archive
Deleted directory successfully
Creating directory - dbfs:/databricks/unravel/logs
Created directory successfully
Creating directory - dbfs:/databricks/unravel/eventLogs
Created directory successfully
Copying /tmp/unravel_db.properties to dbfs:/databricks/unravel/unravel-db-sensor-archive/etc/unravel_db.properties
Copied file successfully
Copying /tmp/agent-pack to dbfs:/databricks/unravel/unravel-agent-pack-bin
Copied file successfully
Copying /tmp/sensor_pack to dbfs:/databricks/unravel/unravel-db-sensor-archive
Copied file successfully

-----------------------------------
Cluster Spark Configuration
-----------------------------------
spark.executor.extraJavaOptions -Dcom.unraveldata.client.rest.request.timeout.ms=1000 -Dcom.unraveldata.client.rest.conn.timeout.ms=1000 -javaagent:/dbfs/databricks/unravel/unravel-agent-pack-bin/btrace-agent.jar=config=executor,libs=spark-2.3
spark.eventLog.enabled true
spark.unravel.server.hostport 10.1.2.3:4043
spark.driver.extraJavaOptions -Dcom.unraveldata.client.rest.request.timeout.ms=1000 -Dcom.unraveldata.client.rest.conn.timeout.ms=1000 -javaagent:/dbfs/databricks/unravel/unravel-agent-pack-bin/btrace-agent.jar=config=driver,script=StreamingProbe.btclass,libs=spark-2.3
spark.eventLog.dir dbfs:/databricks/unravel/eventLogs/
spark.unravel.shutdown.delay.ms 300

-----------------------------------
Spark Submit Parameters
-----------------------------------
"--conf", "spark.executor.extraJavaOptions= -Dcom.unraveldata.client.rest.request.timeout.ms=1000 -Dcom.unraveldata.client.rest.conn.timeout.ms=1000 -javaagent:/dbfs/databricks/unravel/unravel-agent-pack-bin/btrace-agent.jar=config=executor,libs=spark-2.3",
"--conf", "spark.eventLog.enabled=true",
"--conf", "spark.unravel.server.hostport=10.1.2.3:4043",
"--conf", "spark.driver.extraJavaOptions= -Dcom.unraveldata.client.rest.request.timeout.ms=1000 -Dcom.unraveldata.client.rest.conn.timeout.ms=1000 -javaagent:/dbfs/databricks/unravel/unravel-agent-pack-bin/btrace-agent.jar=config=driver,script=StreamingProbe.btclass,libs=spark-2.3",
"--conf", "spark.eventLog.dir=dbfs:/databricks/unravel/event
To print the configuration:
/usr/local/unravel/install_bin/databricks_setup.sh -p -u 10.1.2.3:4043

-----------------------------------
Cluster Spark Configuration
-----------------------------------
spark.executor.extraJavaOptions -Dcom.unraveldata.client.rest.request.timeout.ms=1000 -Dcom.unraveldata.client.rest.conn.timeout.ms=1000 -javaagent:/dbfs/databricks/unravel/unravel-agent-pack-bin/btrace-agent.jar=config=executor,libs=spark-2.3
spark.eventLog.enabled true
spark.unravel.server.hostport 10.1.2.3:4043
spark.driver.extraJavaOptions -Dcom.unraveldata.client.rest.request.timeout.ms=1000 -Dcom.unraveldata.client.rest.conn.timeout.ms=1000 -javaagent:/dbfs/databricks/unravel/unravel-agent-pack-bin/btrace-agent.jar=config=driver,script=StreamingProbe.btclass,libs=spark-2.3
spark.eventLog.dir dbfs:/databricks/unravel/eventLogs/
spark.unravel.shutdown.delay.ms 300

-----------------------------------
Spark Submit Parameters
-----------------------------------
"--conf", "spark.executor.extraJavaOptions= -Dcom.unraveldata.client.rest.request.timeout.ms=1000 -Dcom.unraveldata.client.rest.conn.timeout.ms=1000 -javaagent:/dbfs/databricks/unravel/unravel-agent-pack-bin/btrace-agent.jar=config=executor,libs=spark-2.3",
"--conf", "spark.eventLog.enabled=true",
"--conf", "spark.unravel.server.hostport=10.1.2.3:4043",
"--conf", "spark.driver.extraJavaOptions= -Dcom.unraveldata.client.rest.request.timeout.ms=1000 -Dcom.unraveldata.client.rest.conn.timeout.ms=1000 -javaagent:/dbfs/databricks/unravel/unravel-agent-pack-bin/btrace-agent.jar=config=driver,script=StreamingProbe.btclass,libs=spark-2.3",
"--conf", "spark.eventLog.dir=dbfs:/databricks/unravel/eventLogs/",
"--conf", "spark.unravel.shutdown.delay.ms=300"

-----------------------------------
Databricks Cluster Init Script
-----------------------------------
dbfs:/databricks/unravel/unravel-db-sensor-archive/dbin/install-unravel.sh
Delete the Unravel installation location on DBFS for each workspace where Unravel is deployed using DBFS CLI:
dbfs rm -r dbfs:/databricks/unravel
For a list of Databricks workspaces configured, see /usr/local/unravel/etc/unravel.properties.