Part 1: Installing Unravel Server
Important
If you have not already done so, confirm your new node meets Unravel's hosting requirements.
1. Create a new node on your cluster
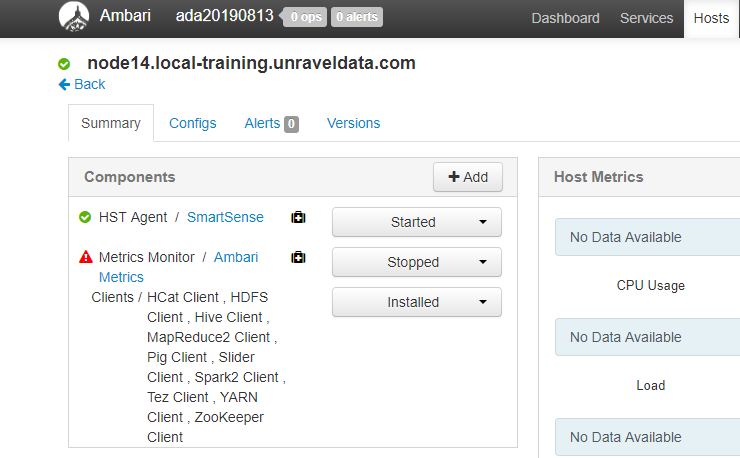
Using Ambari, add a new node (host) to your cluster. This new node will be Unravel Server's host machine.
Verify that Ambari installed the following clients on the new host:
Atlas Metadata
HCat
HDFS
Hive
Kerberos
MapReduce2
Oozie
Pig
Slider
Spark
Spark2
Tez
YARN
ZooKeeper
3. Install Unravel Server on the new node
Download the Unravel Server RPM.
Install the Unravel Server RPM.
sudo rpm -Uvh unravel-
version.rpmThe installation creates the following items:
/usr/local/unravel/, which contains executables, scripts, properties file (unravel.properties), and logs./etc/init.d/unravel_*, which contains scripts for controlling services, such asunravel_all.shfor manually stopping, starting, and getting the status of all daemons in proper order.User
unravelif it doesn't exist already.An HDFS directory for Hive Hook instrumentation, if your cluster is non-secure. If your cluster is secured you'll create this directory later.
If the cluster is kerberized, check Kerberos settings with the kinit and klist commands:
klist -kt /etc/security/keytabs/unravel.keytab
Keytab name: FILE:/etc/security/keytabs/unravel.keytab
KVNO Timestamp           Principal
---- ------------------- ------------------------------------------------------
   3 03/08/2019 15:20:13 unravel/congo52.unraveldata.com@lab.localdomain
kinit -kt /etc/security/keytabs/unravel.keytab unravel/congo52.unraveldata.com@lab.localdomain
klist
Ticket cache: FILE:/tmp/krb5cc_0
Default principal: unravel/congo52.unraveldata.com@lab.localdomain
Valid starting       Expires              Service principal
03/14/2019 16:02:49  03/15/2019 16:02:49  krbtgt/lab.localdomain@lab.localdomain
# groups unravelunravel : unravel hadoop
# kvno unravel/congo52.unraveldata.com@lab.localdomainunravel/congo52.unraveldata.com@lab.localdomain: kvno = 3
Check the
unraveluser's network access.If the cluster is kerberized, make sure Unravel can access
http://timeline-host:8188/ws/v1/timeline. Thecurlcommand below requires a successful kinit command for theunraveluser. The-uoption is a fake user and is ignored when relying on GSS-API.curl --negotiate -v -u :-X GET http://timeline-host:8188/ws/v1/timeline ... > Authorization: Negotiate
token> User-Agent: curl/7.29.0 > Host: congo52.unraveldata.com:8188 > Accept: */* > < HTTP/1.1 200 OK ...
Run the following steps for installing Unravel Tarball:
The following section provides information about deploying Unravel binaries from a tar file. The Unravel binaries can be deployed in any directory on the server. The user who installs Unravel must have the write permissions to the directory where Unravel binaries are deployed.
To deploy Unravel binaries from a tar file, do the following:
Deploy Unravel from a tar file.
Create an Installation directory and grant ownership of the directory to the user who installs Unravel. This user executes all the processes involved in Unravel installation.
mkdir
/path/to/installation/directorychown -Rusername:groupname/path/to/installation/directoryDownload Unravel.
Extract the Unravel tar file to the installation directory, which was created as part of the prerequisite.
tar zxf unravel-<version>tar.gz -C /path/to/installation/directory
Run setup.
After deploying the Unravel binaries, run the setup command.
Run the following setup command:
<
installation_directory>/versions/4.6.x.x/setupFor example:
/opt/unravel/versions/4.6.1.6.659/setup --extra /tmp/mysql --external-database mysql localhost 3306 unravel_mysql_prod unravel unraveldata
Configure unravel using the following commands:
<unravel_installation_directory>/manager config auto
These will configure Unravel, start the daemons, and check the status of the daemon processes.
Note
Run --help with the setup command as well as with any combination of the setup command for the complete usage details.
<unravel_installation_directory>/versions/4.6.x.x/setup --help
<unravel_installation_directory>/manager/setup manager config auto --help
Verify Unravel installation.
Verify the Unravel sensor, properties, and files. Run the following command from the manager tool:
manager verify <sensor|properties|files>
sensor: Checks the cluster configuration and ensures that the sensor parameters are correct.
properties: Validates
unravel.properties, checking for invalid, unknown, duplicate properties.files: Verifies and reports on any unexpected changes to unravel components, scripts, and configuration.
Start all services and verify the status for all the services.
manager start
manager report
5. (Optional) Enable additional daemons for high-volume workloads
6. Configure Unravel Server with basic options
On Unravel Server, edit /usr/local/unravel/etc/unravel.properties as follows.
Set general properties.
Specify the location of HDFS logs.
Important
If you're using Spark1 and Spark2 you must set com.unraveldata.spark.eventlog.location to two directories using a comma-separated list.
com.unraveldata.job.collector.done.log.base=/mr-history/done
com.unraveldata.job.collector.log.aggregation.base=/app-logs/*/logs*
com.unraveldata.spark.eventlog.location=hdfs:///spark1-history/,hdfs:///spark2-history/.
If Kerberos is enabled, do the following:
Create or identify a principal and keytab for Unravel to use to access the HDFS resources listed in the table below and the REST API.
Set these properties:
If Ranger is enabled, do the following:
Check/set Ranger permissions for the runtime user.
Create or identify a principal and keytab for Unravel daemons to access the HDFS resources listed in the table below.
If you are using a virus scanner
We recommend you disable your virus scanner from scanning the elasticsearch directories which are located under
/srv/unravel.Disable Unravel's Impala sensor.
HDP doesn't officially support Impala, so set com.unraveldata.sensor.tasks.disabled to
iw.com.unraveldata.sensor.tasks.disabled=iw
In the Ambari dashboard, set YARN ACLs.
Select YARN | Configs | Advanced.
Set yarn.acl.enable to
true.Add the Unravel user specified in com.unraveldata.kerberos.principal to yarn.admin.acl.
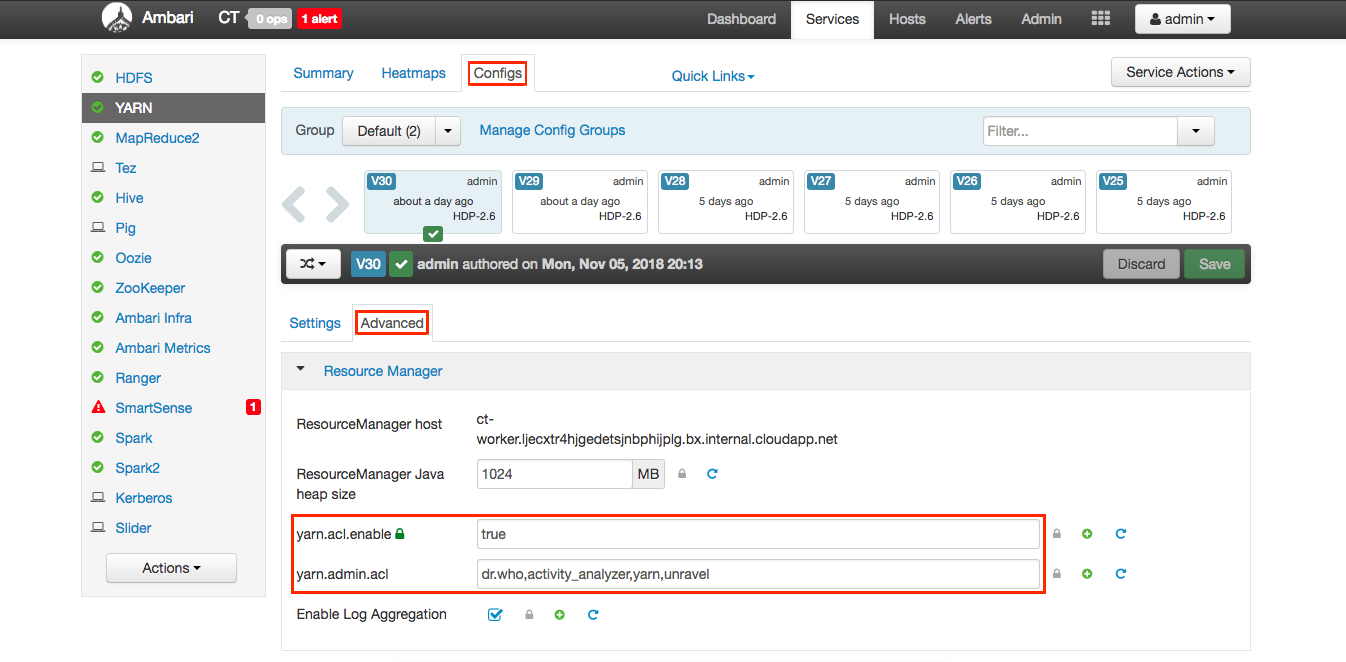
Save your changes.
7. Modify Unravel Server for HDP
On Unravel Server, stop all services and run the
switch_to_hdp.shscript.sudo /etc/init.d/unravel_all.sh stop sudo /usr/local/unravel/install_bin/switch_to_hdp.sh
Note
The changes made by
switch_to_hdp.share persistent through subsequent RPM upgrades; you don't need to re-run this when you upgrade the RPM.Open
/usr/local/unravel/etc/unravel.propertiesto see if you need to modify any properties which were added or modified by the scriptswitch_to_hdp.sh:Important
If you're using Spark1 and Spark2 you must set com.unraveldata.spark.eventlog.location to two directories using a comma-separated list.
com.unraveldata.job.collector.done.log.base=/mr-history/done
com.unraveldata.job.collector.log.aggregation.base=/app-logs/*/logs*
com.unraveldata.spark.eventlog.location=hdfs:///spark1-history/,hdfs:///spark2-history/
javax.jdo.option.ConnectionURL=jdbc:mysql://
unravel-host:3306/database-namejavax.jdo.option.ConnectionDriverName=com.mysql.jdbc.Driver javax.jdo.option.ConnectionPassword=hive-metastore-passwordjavax.jdo.option.ConnectionURL=JDBC connection string
Log into Ambari Web UI and set the following properties to match the values in
/usr/local/unravel/etc/unravel.properties:Cluster Property
Unravel Property
mapreduce.jobhistory.done-dir
com.unraveldata.job.collector.done.log.base
yarn.nodemanager.remote-app-log-dir
com.unraveldata.job.collector.done.log.aggregation.base
jdbc:mysql://
database-host:3306/database-urljavax.jdo.option.ConnectionURL
JDBC Driver Class
javax.jdo.option.ConnectionDriverName
Database Username
javax.jdo.option.ConnectionUserName
8. Change the run-as user and group for Unravel daemons
9. Start Unravel services
Run the following command to start all Unravel services:
sudo /etc/init.d/unravel_all.sh start
This completes the basic/core configuration.
10. Log into Unravel UI
Using a supported web browser (see Unravel's HDP compatibility matrix), navigate to http:// and log in with username unravel-host:3000admin with password unraveldata.
 |